# Introduction

Terrakube is an open source collaboration platform for running remote infrastructure as code operations using Terraform or OpenTofu that aims to be a complete replacement for close source tools like Terraform Enterprise, Scalr or Env0.

The platform can be easily installed in any kubernetes cluster, you can easily customize the platform using other open source tools already available for terraform (Example: terratag, infracost, terrascan, etc) and you can integrate the tool with different authentication providers like Azure Active Directory, Google Cloud Identity, Github, Gitlab or any other provider supported by [Dex](https://dexidp.io/docs/connectors/).

Terrakube provides different features like the following:

* Terraform module protocol:
  * This allows Terrakube to expose an open source terraform registry that is protected and is private by default using different Dex [connectors](https://dexidp.io/docs/connectors/) for the authentication with different providers.
* Terraform provider protocol:
  * This allows Terrakube to expose an open source terraform registry where you can have create your own private terraform providers or create a mirror of the current terraform providers available in the public Hashicorp registry.
* Handle you infrastructure as code using Organization like closed source tools like Terraform Enterprise and Scalr.
* Easily extended by default integrating with many open source tools available today for terraform CLI.
* Support to run the platform using any **RDBMS** supported by [liquibase](https://www.liquibase.org) (mysql, postgres, oracle, sql server, etc).
* Plugins support to extends functionality using different cloud providers and open source tools using the Terrakube Configuration Languague (TCL).
* Easily extends the platform using common technologies like react js, java, spring, elide, liquibase, groovy, bash, go.
* Native integration with the most popular VCS like:
  * Github.
  * Azure DevOps
  * Bitbucket
  * Gitlab
* Support for SSH key (RSA and ED25519)
* Handle Personal Access Token
* Extends and create custom flows when running terraform remote operations with custom logics like:
  * Approvals
  * Budget reviews
  * Security reviews
  * Custom logic that you can build with groovy and bash scripts

### Sponsors

| Company                                                                                                                           | Service                                                |
| --------------------------------------------------------------------------------------------------------------------------------- | ------------------------------------------------------ |
| <p><img src="/files/GhnXA55COvycgv9rF85K" alt="" data-size="original"></p><p><a href="https://jb.gg/OpenSource">JetBrains</a></p> | For providing with free licenses to their great tools. |
| <p><img src="/files/3M5G06ceff4TG464zrZz" alt="" data-size="original"></p><p><a href="https://www.gitbook.com/">Gitbook</a></p>   | For providing us with free OSS Plan.                   |
| <p><img src="/files/TH5BXQ72tM6HzhVilTdd" alt="" data-size="original"></p><p><a href="https://www.docker.com/">Docker</a></p>     | For providing us with free OSS Plan.                   |
| <p><img src="/files/dOQCHUtlPe2GWfQugqmz" alt="" data-size="original"></p><p><a href="https://tuta.com/">Tuta</a></p>             | For providing us with free email service               |


# Updates

### July 2025 (2.27.0)

This release introduces several significant advancements designed to enhance the functionality, security, and integration capabilities of Terrakube.

#### New UI container

The `terrakube-ui` container now utilizes the `nginxinc/nginx-unprivileged` image, replacing the `bitnami/nginx` image used in previous versions.

#### Centralized Terraform Module Version Management

Terraform module versions are now persistently managed within the database, transitioning from the prior Redis-based ephemeral storage. Upon the initial startup following this update, Terrakube will initiate a comprehensive update of all modules. This process may require several minutes, depending on the volume of existing modules.

#### Dynamic Credential Authentication

Enhanced support has been implemented for dynamic credential authentication with Openbao or Vault, streamlining secure access and integration with these systems.

Inside the workspace settings it only requires to use the following variables

<figure><img src="/files/YWVFnKGj0i3d37s9ovbs" alt=""><figcaption></figcaption></figure>

When running a job for example using the terraform cloud block it will work like the following:

```
terraform plan

Preparing the remote plan...

To view this run in a browser, visit:
https://terrakube-api.platform.local/app/simple/vault/runs/run-1

Waiting for the plan to start...

***************************************
Running Terraform PLAN
***************************************
data.vault_kv_secret_v2.password: Reading...
data.vault_kv_secret_v2.password: Read complete after 0s [id=shared/data/kv/creds]

No changes. Your infrastructure matches the configuration.
```

#### GitLab Integration

Jobs can now be automatically triggered by `merge request` and `release` events within GitLab repositories when defining the webhook configuration like the following:

<figure><img src="/files/dpgP0oDzkrF7MuMq91Fd" alt=""><figcaption></figcaption></figure>

A gitlab webhook will be created inside the repository

<figure><img src="/files/KZA1oGqD8aYAHYGg7nld" alt=""><figcaption></figcaption></figure>

After every job execution a status will be shown inside gitlab

<figure><img src="/files/Y33cWbsslbfDdwhcv7Ru" alt=""><figcaption></figcaption></figure>

#### Bitbucket Integration

Support has been added for triggering jobs through `pull request` and `release` events in Bitbucket.

<figure><img src="/files/2WF7l7S7xo8sr847lzmF" alt=""><figcaption></figcaption></figure>

#### Improved Development Environment Support

The `devcontainer` environment now offers enhanced support for both PostgreSQL and MSSQL databases, facilitating more flexible development workflows.

<figure><img src="/files/ea4aUyIaGCwaZcd1lSAj" alt=""><figcaption></figcaption></figure>

#### Internal System Migration

The entire project codebase has been migrated to the `io.terrakube` package structure. Concurrently, all previously defined Quartz jobs have been successfully migrated to this new package hierarchy, ensuring consistency and maintainability.

### July 2024 (2.22.0)

Welcome to the 2.22.0 release of Terrakube! As the summer season comes to a close, we’re focusing on enhancing the stability of the recent features we’ve introduced. While this is a smaller update compared to previous releases, we’re excited to see an increase in contributions from the community. Let’s dive into the key highlights:

#### Ephemeral Agents

Before this version, the executor component—responsible for running jobs like plan, apply, destroy, etc.—was more static, with the API always running and listening for new jobs. In this update, we’re introducing a more dynamic and efficient approach: ephemeral agents. Now, a new executor is created for each job and is disposed of once the job is finished. This enhancement leverages Kubernetes jobs to schedule each run, plan, and apply, making the process more resource-efficient and scalable.

![image](https://github.com/user-attachments/assets/36c2970f-816f-45e1-a78d-cb21fbbec17a)

![image](https://github.com/user-attachments/assets/166f3481-8bd4-496f-8e1d-066787c4de5d)

If you’re interested in switching to ephemeral agents, follow our [guide](https://docs.terrakube.io/getting-started/deployment/ephemeral-agents) to get started.

#### Enhanced GitHub Integration with Status Checks

In this version, we’ve enhanced the GitHub integration by adding status checks. Previously, every push to the branch configured in your Terrakube workspace would trigger a Terraform/OpenTofu apply, but there was no way to monitor the job’s progress or navigate to the workspaces directly from GitHub. With this update, you can now see the status (completed or failed) of the job directly within GitHub, and by clicking the "Details" button, you can easily navigate to Terrakube to view more information.

![image](https://github.com/user-attachments/assets/8d95d6b3-3e4b-4e3d-89ae-d7276d8cf967)

Thanks to @stanleyz for this contribution!

#### ARM64 Support for Terrakube Images

In this version, we’ve converted all Terrakube images for the UI, API, and executor to multi-architecture images. This means you can now run Terrakube on both Linux/AMD64 and Linux/ARM64 platforms, providing greater flexibility and compatibility across different environments.

For more details about our official images, take a look at our [documentation](https://docs.terrakube.io/getting-started/docker-images).

#### Custom Releases Endpoint for OpenTofu

As OpenTofu continues to gain popularity, we’ve added a new feature in this version that allows you to specify a custom releases endpoint. By default, Terrakube uses the official OpenTofu repository to list available versions. With this update, you now have the option to define a custom releases endpoint, giving you more control over the versions you allow internally for your workspaces. This also enables you to create and use custom builds from OpenTofu in your Terrakube jobs.

Thanks to @gespinozat for this contribution!

#### Multiple Branches Support in a Workspace

In this version, we’ve added the option to specify multiple branches within a single workspace. This feature is particularly useful if you need to run Terrakube jobs across different branches within the same workspace, such as during development. It provides greater flexibility and control over your infrastructure management process, allowing you to test and deploy changes in various branches without needing separate workspaces.

Thanks @akozhuharov for this contribution!

#### Other Fixes and Dependency Updates

As always, we’ve updated a bunch of dependencies to keep Terrakube up to date and secure, and we’ve also fixed multiple bugs reported by the community. You can see the full list of changes [here](https://github.com/AzBuilder/terrakube/releases/tag/2.22.0).

### May 2024 (2.21.0)

Welcome to the 2.21.0 release from Terrakube! As we reach the midpoint of the year, we’re excited to introduce several new features and enhancements that improve the overall user experience and functionality. Let’s dive into the key highlights:

#### Terrakube Actions

Terrakube actions allow you to extend the UI in Workspaces, functioning similarly to plugins. These actions enable you to add new functions to your Workspace, transforming it into a hub where you can monitor and manage your infrastructure and gain valuable insights. With Terrakube actions, you can quickly observe your infrastructure and apply necessary actions.

In the below demo, you can view how to use a couple of the new actions to [monitor metrics](https://docs.terrakube.io/user-guide/workspaces/actions/built-in-actions/terrakube.azure-monitor) and [restart an Azure VM](https://docs.terrakube.io/user-guide/workspaces/actions/built-in-actions/restart-azure-vm).

![actions](https://github.com/AzBuilder/terrakube/assets/27365102/940862ef-7d20-4bab-9fe7-c76d62e5d589)

Additionally, we are providing an action to interact with OpenAI directly from the workspace. Check out the [Terrakube OpenAI Action](https://docs.terrakube.io/user-guide/workspaces/actions/built-in-actions/terrakube.open-ai) for more details.

![openai](https://github.com/AzBuilder/terrakube/assets/27365102/d5cbf5c8-ce6c-4023-99bc-c8e6ed2eba72)

Check our [documentation](https://docs.terrakube.io/user-guide/workspaces/actions) for more details on how to use and start creating Terrakube actions.

#### Authenticate Providers with Dynamic Credentials

Terrakube's dynamic provider credentials feature allows you to establish a secure trust relationship between Terraform/OpenTofu and your cloud provider. By using unique, short-lived credentials for each job, this feature significantly reduces the risk of compromised credentials. We are excited to announce support for dynamic credentials for the following cloud providers:

* [**AWS**](https://docs.terrakube.io/user-guide/workspaces/dynamic-provider-credentials/aws-dynamic-provider-credentials)
* [**Google Cloud Platform**](https://docs.terrakube.io/user-guide/workspaces/dynamic-provider-credentials/gcp-dynamic-provider-credentials)
* [**Azure**](https://docs.terrakube.io/user-guide/workspaces/dynamic-provider-credentials/azure-dynamic-provider-credentials)

This enhancement ensures that your infrastructure management is both secure and efficient, minimizing potential security vulnerabilities while maintaining seamless integration with your cloud environments.

#### Support for --auto-approve Flag

We are pleased to announce the addition of support for the --auto-approve flag in the CLI-driven workflow. This feature allows for the automatic approval of Terraform and OpenTofu apply operations.

```
user@pop-os:~/git/simple-terraform$ terraform apply --auto-approve

Running apply in Terraform Cloud. Output will stream here. Pressing Ctrl-C
will cancel the remote apply if it's still pending. If the apply started it
will stop streaming the logs, but will not stop the apply running remotely.

Preparing the remote apply...

To view this run in a browser, visit:
https://8080-azbuilder-terrakube-jdlq1j61x7k.ws-us110.gitpod.io/app/simple/auto-approve/runs/1

Waiting for the plan to start...

***************************************
Running Terraform PLAN
***************************************

Terraform used the selected providers to generate the following execution
plan. Resource actions are indicated with the following symbols:
  + create

Terraform will perform the following actions:

  # null_resource.next will be created
  + resource "null_resource" "next" {
      + id = (known after apply)
    }

  # time_sleep.wait_30_seconds will be created
  + resource "time_sleep" "wait_30_seconds" {
      + create_duration = (known after apply)
      + id              = (known after apply)
    }

  # module.time_module.random_integer.time will be created
  + resource "random_integer" "time" {
      + id     = (known after apply)
      + max    = 5
      + min    = 1
      + result = (known after apply)
    }

Plan: 3 to add, 0 to change, 0 to destroy.

Changes to Outputs:
  + creation_time = (known after apply)
  + fake_data     = {
      + data     = "Hello World"
      + resource = {
          + resource1 = "fake"
        }
    }

module.time_module.random_integer.time: Creating...
module.time_module.random_integer.time: Creation complete after 0s [id=5]
time_sleep.wait_30_seconds: Creating...
time_sleep.wait_30_seconds: Creation complete after 5s [id=2024-04-16T22:25:15Z]
null_resource.next: Creating...
null_resource.next: Creation complete after 0s [id=7860036023219461249]

Apply complete! Resources: 6 added, 0 changed, 0 destroyed.

Outputs:

creation_time = "5s"
fake_data = {
  "data" = "Hello World"
  "resource" = {
    "resource1" = "fake"
  }
}

```

#### UI Enhancements

We have made several enhancements to the UI, focusing on improving the overall user experience:

* **Buttons:** Basic rounded corner adjustments.
* **Global Shadow Optimization:** Adjusted from three layers of shadows to two layers, used in various components.
* **Loading Spinners:** Added spinners for loading main pages instead of static loading text.
* **Field Validations:** Added validations for fields to improve form submission accuracy.

<figure><img src="https://github.com/AzBuilder/terrakube/assets/27365102/1723b589-121e-47df-9d66-df734b6c548c" alt=""><figcaption></figcaption></figure>

These updates aim to make the Terrakube interface more intuitive and visually appealing.

#### Bug fixes

We have made some improvements and fixes based on the feedback from the community and the security analysis. You can find the full list of changes for this version here <https://github.com/AzBuilder/terrakube/releases/tag/2.21.0>

### March 2024 (2.20.0)

Welcome to the 2.20.0 release from Terrakube! In our second update of the year, we're excited to share several key highlights with you:

#### Workspace Importer

Our newly Workspace Importer is designed to improve your migration from Terraform Cloud or Terraform Enterprise to Terrakube. Providing a user-friendly wizard, this feature simplifies the process of transferring all your workspaces to Terrakube, ensuring that variables, tags, state files, and other components are easily copied over. During its beta phase, this feature has been tested with hundreds of workspaces, receiving positive feedback from the community. If you're considering a migration to Terrakube, we highly recommend reviewing [our documentation](https://docs.terrakube.io/user-guide/migrating-to-terrakube#migrating-with-the-workspaces-importer) to see how this feature can save you time and effort.

![image](https://github.com/AzBuilder/terrakube/assets/27365102/0d29073f-587a-4e6c-bd49-1355642b1403)

![image](https://github.com/AzBuilder/terrakube/assets/27365102/04918c2b-3ba9-4d8b-8826-918248a1a715)

#### Enhanced API Token Management

We've enhanced the UI for managing [API tokens](https://docs.terrakube.io/user-guide/organizations/api-tokens), making it more intuitive and efficient. Now, revoking tokens can be done directly through the UI with ease.

![image](https://github.com/AzBuilder/terrakube/assets/27365102/1f0bf586-b1d1-45bd-b828-0215a94fa645)

#### Organization Default Execution Mode Update

This new feature allows you to set the default execution mode—either `local` or `remote`—at the organization level.

![image](https://github.com/AzBuilder/terrakube/assets/27365102/f6b74739-bdd9-4534-99aa-67298d9da14f)

#### Enhanced Support for Monorepos in Private Registry

Responding to community feedback regarding the management of Terraform modules within a monorepo, we've made significant enhancements to our Private Registry. Now, you have the capability to specify the path of the module within the monorepo and set a tag prefix when creating a module.

![image](https://github.com/AzBuilder/terrakube/assets/27365102/39c2a211-905c-4540-a9fe-2601928c6525)

#### Agents Support

We've expanded Terrakube capabilities with the introduction of multiple `terrakube executor agents`. Now, you have the flexibility to select the specific agent you wish to use for each workspace. This new feature enables a higher level of execution isolation based on workspaces, offering improved security and customization to suit your project's needs.

![image](https://github.com/AzBuilder/terrakube/assets/27365102/eed1353a-562e-40ba-b470-935b0c73a3a4)

#### Prefix Support for Remote Backend

If you are using the remote backend this enhancement allows you to perform operations across multiple workspaces under the same prefix, improving workspace management and operation execution.

```terraform
terraform {
  backend "remote" {
    hostname = "8080-azbuilder-terrakube-7tnuq3gnkgf.ws-us108.gitpod.io"
    organization = "simple"

    workspaces {
      prefix = "my-app-"
    }
  }
}
```

#### Breaking change for POSTGRESQL user

if you are using POSTGRESQL and using the helm chart 3.16.0 it will require you to add the database port using the property

```
api.properties.databasePort: "5432"
```

More information can be found in this [issue](https://github.com/AzBuilder/terrakube/issues/784)

#### Bug fixes

We have made some improvements and fixes based on the feedback from the community and the security analysis. You can find the full list of changes for this version here <https://github.com/AzBuilder/terrakube/releases/tag/2.20.0>

### January 2024 (2.19.0)

As we step into the new year, we are thrilled to announce the release of Terrakube 2.19.0, a significant update that continues to push the boundaries of Infrastructure as Code (IaC) management. Here are some key highlights of this release:

#### OpenTofu Now Available on Terrakube

With OpenTofu now in General Availability (GA), we've integrated it as an alternative within Terrakube. Now, when you create workspaces, you have the option to select either Terraform or OpenTofu. Terrakube will then tailor the user experience specifically to the tool you choose. Additionally, you can switch your existing workspaces to OpenTofu via the Workspace settings, allowing for a smooth transition between tools.

![image](https://github.com/AzBuilder/terrakube/assets/27365102/a722d515-ec9e-4dc6-b244-03733009ddc2)

![image](https://github.com/AzBuilder/terrakube/assets/27365102/dca7e280-32d1-4d1c-bb80-ddbdb1398f58)

![image](https://github.com/AzBuilder/terrakube/assets/27365102/b762358c-b23f-4722-bdcc-b9b24301dc4e)

In the future we are planning to introduce specific features for each Terraform and Opentofu based in their evolution. Also we will introduce support for more Iac tools later.

#### Enhanced Workspace Overview Page

We've upgraded the Workspace Overview Page to enrich your interaction with your infrastructure. Now, you'll find a detailed count of resources and outputs. Each resource is represented by an icon indicating its type, with current support for AWS and Azure icons. Clicking on a resource name unfolds a detailed view of all its attributes and dependencies, and provides direct access to the resource's documentation.

![image](https://github.com/AzBuilder/terrakube/assets/27365102/cff434dc-8b9f-46b0-84ef-29b9dacbb4fa)

![image](https://github.com/AzBuilder/terrakube/assets/27365102/3e56f159-e763-4596-801d-46f731f6cd8a)

You can access the attributes and dependencies view from both Workspace Overview Page or using the [Visual State](https://docs.terrakube.io/user-guide/workspaces/terraform-state#visual-state).

#### Webhook Improvements

Now, you have the flexibility to select the default template that will execute for each new push in your Version Control System (VCS) at the workspace level. By default, Terrakube performs Plan and Apply operations, but you can now choose a different template tailored to your specific use case. This enhancement allows for the implementation of customized workflows across different organizations or workspaces.

![image](https://github.com/AzBuilder/terrakube/assets/27365102/9b777ada-959f-4014-a5d7-c550dfed936b)

Additionally, Terrakube now checks for the configured directory in the Workspace and will only run the job when a file changes in the specified directory. This feature is particularly useful for monorepositories, where you want to manage different workspaces from a single repository. This functionality has been implemented for GitLab, GitHub, and Bitbucket.

#### CLI Driven workflow

When leveraging the [CLI-driven workflow](https://docs.terrakube.io/user-guide/workspaces/cli-driven-workflow), you now have the option to utilize the `refresh` flag.

Here's an example without the `refresh` flag:

```
user@pop-os:~/git/simple-terraform$ terraform plan

Running plan in Terraform Cloud. Output will stream here. Pressing Ctrl-C
will stop streaming the logs, but will not stop the plan running remotely.

Preparing the remote plan...

To view this run in a browser, visit:
https://8080-azbuilder-terrakube-3it4oxf0vpt.ws-us107.gitpod.io/app/simple/simple-terraform/runs/2

Waiting for the plan to start...

***************************************
Running Terraform PLAN
***************************************
null_resource.previous: Refreshing state... [id=2942672164070633234]
module.time_module.random_integer.time: Refreshing state... [id=4]
time_sleep.wait_30_seconds: Refreshing state... [id=2023-12-28T20:29:16Z]
null_resource.next: Refreshing state... [id=1447023117451433293]
null_resource.next2: Refreshing state... [id=8910164257527828565]

Terraform used the selected providers to generate the following execution
plan. Resource actions are indicated with the following symbols:
  + create

Terraform will perform the following actions:

  # null_resource.next3 will be created
  + resource "null_resource" "next3" {
      + id = (known after apply)
    }

Plan: 1 to add, 0 to change, 0 to destroy.

```

Example setting `refresh` to false:

```
terraform plan -refresh=false

Running plan in Terraform Cloud. Output will stream here. Pressing Ctrl-C
will stop streaming the logs, but will not stop the plan running remotely.

Preparing the remote plan...

To view this run in a browser, visit:
https://8080-azbuilder-terrakube-3it4oxf0vpt.ws-us107.gitpod.io/app/simple/simple-terraform/runs/3

Waiting for the plan to start...

***************************************
Running Terraform PLAN
***************************************

Terraform used the selected providers to generate the following execution
plan. Resource actions are indicated with the following symbols:
  + create

Terraform will perform the following actions:

  # null_resource.next3 will be created
  + resource "null_resource" "next3" {
      + id = (known after apply)
    }

Plan: 1 to add, 0 to change, 0 to destroy.
```

#### API Token Revocation

You now have the ability to revoke both Personal and Team API Tokens. Currently, this functionality is exclusively accessible via the API, but it will be extended to the UI in a forthcoming release. For more information, please refer to [our documentation](https://docs.terrakube.io/api/methods/personal-access-token-1).

#### Bug fixes

We have made some improvements and fixes based on the feedback from the community and the security analysis. You can find the full list of changes for this version here <https://github.com/AzBuilder/terrakube/releases/tag/2.19.0>

### December 2023 (2.18.0)

Greetings! As the year comes to a close, we are excited to present you the 2.18.0 release of Terrakube. This version brings you some features and enhancements that we hope you’ll enjoy, some of the key highlights include:

#### AWS icons in State Diagram

The state diagram now includes all the AWS architecture icons, so you can easily recognize each resource type. This feature will help you visualize your Terraform state in a more intuitive way. We are also working on improving the diagram to group the resources by VPC, location, etc which will give you a closer look at how your architecture is designed using the Terraform state.

![image](https://github.com/AzBuilder/terrakube/assets/27365102/c27d9cd2-e261-489e-9c65-df4e99d47c2b)

#### Visual State Diagram export option

Following the state diagram enhancements, we have also added the option to save the diagram in different formats. You can export a high-quality image in png, svg or jpeg formats by using the Download and selecting the preferred format. This feature will help you use the diagram for your documentation or presentations.

![image](https://github.com/AzBuilder/terrakube/assets/27365102/3f5eee59-e4cc-4849-91a5-bbcc51239b32)

#### Self Hosted VCS Providers Support

We have added support for Github Enterprise, GitLab Enterprise Edition and GitLab Community Edition. This means that you can now integrate your workspaces and modules using your self-hosted VCS providers. This is a major milestone in our vision of providing an enterprise-grade experience with Terrakube. In the upcoming releases we will add Bitbucket Server and Azure DevOps Server. For more details in how to use this feature check the following links.

* [Github Enterprise](https://docs.terrakube.io/user-guide/vcs-providers/github-enterprise)

![image](https://github.com/AzBuilder/terrakube/assets/27365102/a341cc42-c4bc-4287-9f77-61d33031a4bc)

* [GitLab Enterprise and Community Editions](https://docs.terrakube.io/user-guide/vcs-providers/gitlab-ee-and-ce)

![image](https://github.com/AzBuilder/terrakube/assets/27365102/1bca2baf-5f18-4e6b-b8a1-bdc0561770ba)

#### Webhooks support for GitLab (Cloud, EE and CE), BitBucket and Github (Cloud and Enterprise)

We have introduced a new feature that will make your workflow more efficient and convenient. Now, Terrakube will automatically trigger a new Plan and Apply job for each new push in the repository that is linked to the workspace. You no longer have to run the jobs manually using the UI or the terraform CLI. This feature will help you keep your infrastructure in sync with your code changes.

![image](https://github.com/AzBuilder/terrakube/assets/27365102/cbee6cbb-531b-488f-8396-a52f65f49e2a)

#### Bug fixes

We have made some improvements and fixes based on the feedback from the community and the security analysis. You can find the full list of changes for this version here <https://github.com/AzBuilder/terrakube/releases/tag/2.18.0>

### November 2023 (2.17.0)

Welcome to the 2.17.0 release of Terrakube. There are a couple of updates in this version that we hope you'll like, some of the key highlights include:

#### Submodules view

You can now view the submodules of your Terraform Module in the open registry. When you select a submodule, you will see its details, such as inputs, outputs and resources.

![image](https://github.com/AzBuilder/terrakube/assets/27365102/5ef297db-f65c-452f-aea7-bc0ee07a232b)

![image](https://github.com/AzBuilder/terrakube/assets/27365102/6a82dc09-1935-44b3-ae09-fa5797c69a8e)

#### Workspace Overview

We have enhanced the workspace overview to give you more information at a glance. You can now see the Terraform version, the repository, and the list of resources and outputs for each workspace.

![image](https://github.com/AzBuilder/terrakube/assets/27365102/5910b408-b941-4168-967d-d7405fd7541b)

![image](https://github.com/AzBuilder/terrakube/assets/27365102/0567a0f2-3159-4563-b6f9-a160c804302a)

#### Team API Tokens

You can now generate team API tokens using the Terrakube UI and specify their expiration time in days/minutes/hours. This gives you more flexibility and control over your team’s access to Terrakube. To learn more, please visit our [documentation](https://docs.terrakube.io/user-guide/organizations/api-tokens#user-api-tokens-1).

![image](https://github.com/AzBuilder/terrakube/assets/27365102/185b5ec3-c11f-4005-9e57-05d236ca99b3)

![image](https://github.com/AzBuilder/terrakube/assets/27365102/baf010ef-d190-4894-89ab-36f0db4fc033)

### Terraform provider for Terrakube

You can use the [Terrakube provider](https://registry.terraform.io/providers/AzBuilder/terrakube/latest/docs) for Terraform to manage modules, organizations and so on.

```
provider "terrakube" {
  endpoint = "http://terrakube-api.minikube.net"
  token    = "(PERSONAL ACCESS TOKEN OR TEAM TOKEN)"
}

data "terrakube_organization" "org" {
  name = "simple"
}

data "terrakube_vcs" "vcs" {
  name            = "sample_vcs"
  organization_id = data.terrakube_organization.org.id
}

data "terrakube_ssh" "ssh" {
  name            = "sample_ssh"
  organization_id = data.terrakube_organization.org.id
}

resource "terrakube_team" "team" {
  name             = "TERRAKUBE_SUPER_ADMIN"
  organization_id  = data.terrakube_vcs.vcs.organization_id
  manage_workspace = false
  manage_module    = false
  manage_provider  = true
  manage_vcs       = true
  manage_template  = true
}

resource "terrakube_module" "module1" {
  name            = "module_public_connection"
  organization_id = data.terrakube_ssh.ssh.organization_id
  description     = "module_public_connection"
  provider_name   = "aws"
  source          = "https://github.com/terraform-aws-modules/terraform-aws-vpc.git"
}
```

#### Bug fixes

We’ve addressed some issues reported by the community and fixed some vulnerabilities. You can see the full change log for this version here <https://github.com/AzBuilder/terrakube/releases/tag/2.17.0>

### October 2023 (2.16.0)

Welcome to the 2.16.0 release of Terrakube. There are a couple of updates in this version that we hope you'll like, some of the key highlights include:

#### Improvement in Workspaces List

We have added more filters to workspaces, so you can easily find the one you need. You can now use the tags or description of the workspaces to narrow down your search. Additionally, you can see the tags of each workspace on its card, without having to enter it. This way, you can quickly identify the workspaces that are relevant to you.

![image](https://github.com/AzBuilder/terrakube/assets/27365102/08efcfaa-cf37-4c46-8919-2f34b4e057fc)

#### Team API Tokens

In the previous version, you could only generate API tokens that were associated with a user account. Now, you can also generate API tokens that are linked to a specific team. This gives you more flexibility and control over your API access and permissions. To generate a team API token, you need to use the API for now, but we are working on adding this feature to the UI in the next version. You can find more information on how to use team API tokens in our [documentation](https://docs.terrakube.io/user-guide/organizations/team-tokens)

```
POST {{terrakubeApi}}/access-token/v1/teams
Authorization: Bearer (PERSONAL ACCESS TOKEN)
Request Body:
{
  "days": "1",
  "group": "TERRAKUBE_ADMIN",
  "description": "Sample Team Token"
}
```

#### Bug fixes and Performance

We’ve addressed some issues reported by the community regarding performance,bugs and security. You can see the full change log for this version here <https://github.com/AzBuilder/terrakube/releases/tag/2.16.0>

### August 2023 (2.15.0)

Welcome to the 2.15.0 release of Terrakube. There are a couple of updates in this version that we hope you'll like, some of the key highlights include:

#### Local Execution Mode

In the previous version, all executions were run remotely in Terrakube. However, starting from this version, you can choose to define the execution mode as either local or remote. By default, all workspaces run remotely. If you want to disable remote execution for a workspace, you can change its execution mode to “Local”. This mode allows you to perform Terraform runs locally using the CLI-driven run workflow.

![image](https://github.com/AzBuilder/terrakube/assets/27365102/d0e40b6c-0830-4153-abe3-3ce43c14e97c)

#### Accessing State from Other Workspaces

Now its possible to use `terraform_remote_state` datasource to acces state between workspaces. For further details check [our documentation](https://docs.terrakube.io/user-guide/workspaces/share-workspace-state)

```
data "terraform_remote_state" "remote_creation_time" {
  backend = "remote"
  config = {
    organization = "simple"
    hostname = "8080-azbuilder-terrakube-vg8s9w8fhaj.ws-us102.gitpod.io"
    workspaces = {
      name = "simple_tag1"
    }
  }
}
```

#### Support Cloud Block with Tags

In our previous version, we introduced support for adding tags to Workspaces. Starting from this version, you can use these tags within the cloud block to apply Terraform operations across multiple workspaces that share the same tags. You can find more details in the [CLI-Driven workflow documentation](https://docs.terrakube.io/user-guide/workspaces/cli-driven-workflow)

```
terraform {
  cloud {
    organization = "simple"
    hostname = "8080-azbuilder-terrakube-md8dylvuzta.ws-us101.gitpod.io"

    workspaces {
      tags = ["networking", "development"]
    }
  }
}
```

#### Search modules

We’ve added a search function to the Modules pages, making it easier to find modules.

#### Bug fixes

We’ve addressed some issues reported by the community, so Terrakube is becoming more stable. You can see the full change log for this version here <https://github.com/AzBuilder/terrakube/releases/tag/2.15.0>

Thanks for all the community support and contributions. Special thanks to @klinux for implementing the search feature inside Modules.

###

### Jun 2023 (2.14.0)

Welcome to the 2.14.0 release of Terrakube. There are a couple of updates in this version that we hope you'll like, some of the key highlights include:

#### Terraform cloud block support

This new version lets you use the [terraform cloud block](https://developer.hashicorp.com/terraform/cli/cloud/settings#the-cloud-block) to execute remote operations using the [CLI driven run workflow](https://docs.terrakube.io/user-guide/workspaces/cli-driven-workflow).

```
terraform {
  cloud {
    hostname = "8080-azbuilder-terrakube-q8aleg88vlc.ws-us92.gitpod.io"
    organization = "migrate-org"
    workspaces {
      name = "migrate-state"
    }
  }
}
```

#### Enhanced UI error messages for Authorization errors

We have enhanced the UI to handle authorization errors more gracefully.

![image](https://github.com/AzBuilder/terrakube/assets/27365102/fd556517-e663-42d4-ba46-f20199cb322e)

#### Workspace Tags

We have enabled tagging functionality within the workspaces. In an upcoming release, you will be able to use these tags in the cloud block feature. For more details please check the [terrakube documentation](https://docs.terrakube.io/user-guide/organizations/tags).

![image](https://github.com/AzBuilder/terrakube/assets/27365102/07551e69-a52f-45e8-ba64-cbd8f8acf663)

![image](https://github.com/AzBuilder/terrakube/assets/27365102/78cecea5-503d-4672-a46b-04e48831ea87)

#### Overview Workspace page

With Terrakube’s new workspace Overview page, you can access all the essential information for each of your workspaces in a simple and convenient panel. Initially we are including the last run and workspace tags. We will add more information in upcoming releases.

![image](https://github.com/AzBuilder/terrakube/assets/27365102/7d5fff7d-eed6-48a9-b1bc-8a4f114224f7)

#### Improved CLI run workflow logs

From this version onwards, you can view the logs in real time when you use the Terraform CLI remote backend or the cloud block.

![image](https://github.com/AzBuilder/terrakube/assets/27365102/d3082abe-5ed1-4221-88c9-9eaa13dbe5e8)

#### SSH key injection

Before, Terrakube only used SSH keys to clone private git repos. Now, Terrakube will inject the keys into the workspace. This way, if your terraform modules use git as source, Terraform will access the modules with the keys. Check the [documentation](https://docs.terrakube.io/user-guide/vcs-providers/ssh#ssh-key-injection) for further details.

For the full changelog for this version please check <https://github.com/AzBuilder/terrakube/releases/tag/2.14.0>

### May 2023 (2.13.0)

Welcome to the 2.13.0 release of Terrakube. There are a couple of updates in this version that we hope you'll like, some of the key highlights include:

#### Terraform init -migrate-state support

Now you can easily migrate your Terraform state from other tools like TFE or Terraform Cloud to Terrakube. The migration command is supported by using the terraform CLI.

```
terraform login 8080-azbuilder-terrakube-q8aleg88vlc.ws-us92.gitpod.io
terraform init -migrate-state
```

Check out our [documentation](https://docs.terrakube.io/user-guide/remote-state-migration) for further details about the process.

#### Improved Log streaming in the UI

Starting with this version, you can see the logs in the Terrakube UI in almost real time, so you can easily follow up on your Terraform changes.

![image](https://github.com/AzBuilder/terrakube/assets/27365102/069d08dd-9ba4-4b1c-b98d-549661a59077)

Also we optimized the code and updated most libs to the latest versions For the full changelog for this version please check <https://github.com/AzBuilder/terrakube/releases/tag/2.13.0>

### Mar 2023 (2.12.0)

Welcome to the 2.12.0 release of Terrakube. There are a couple of updates in this version that we hope you'll like, some of the key highlights include:

#### Search options in Workspaces

Use the new controls in the workspaces list to filter by status or search by name.

![image](https://user-images.githubusercontent.com/27365102/227623916-7d6633bf-835f-4b6e-8aba-0f35fd31dc50.png)

#### Simplified process to add a new VCS provider

You can now connect to a vcs provider in one step, instead of creating it first and then updating the call back url.

![image](https://user-images.githubusercontent.com/27365102/227625007-37fa43e1-9946-4b05-9a0a-2eb02006d682.png)

#### Open Telemetry

We added Open Telemetry to the api, registry and executor components for monitoring Terrakube. In future versions, we will also provide Grafana templates for custom metrics like jobs execution and workspaces usage. Check the [documentation](https://docs.terrakube.io/getting-started/deployment/open-telemetry) for further information.

![image](https://user-images.githubusercontent.com/4461895/223861732-82bf163b-f3c8-4463-af51-3953c7ae9f76.png)

#### Improvement to Templates

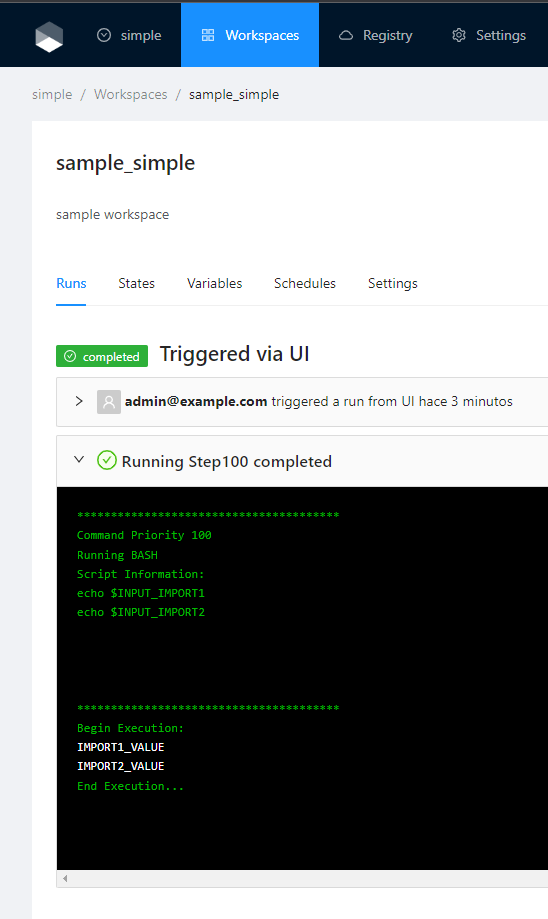
* In the previous version we introduced the use of `importCommands`, and now improve reutilization we are adding `inputsTerraform` and `inputsEnv` so basically now you can send parameters to your templates in an easy way. For example:

```yaml
flow:
  - type: "terraformPlan"
    step: 100
    importComands:
      repository: "https://github.com/AzBuilder/terrakube-extensions"
      folder: "templates/terratag"
      branch: "import-template"
      inputsEnv:
        INPUT_IMPORT1: $IMPORT1
        INPUT_IMPORT2: $IMPORT2
      inputsTerraform:
        INPUT_IMPORT1: $IMPORT1
        INPUT_IMPORT2: $IMPORT2
  - type: "terraformApply"
    step: 200
```

Check the [documentation](https://docs.terrakube.io/user-guide/organizations/templates/filter-gloval-variables-in-jobs) for more details.

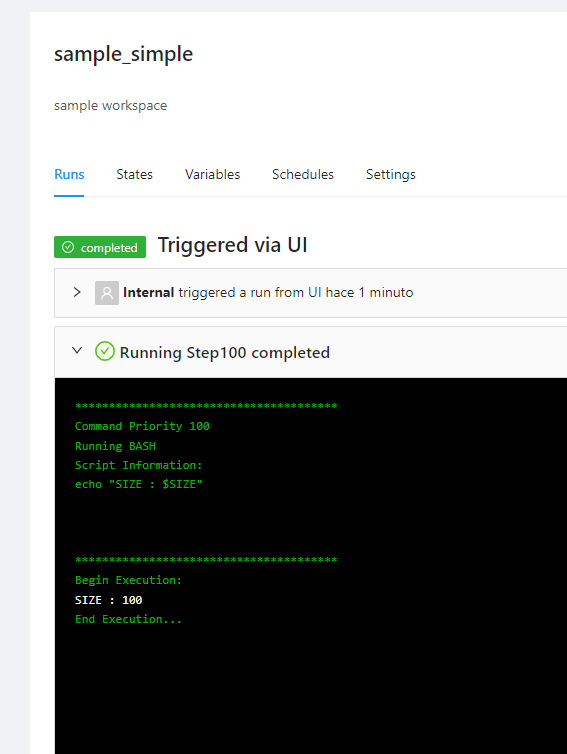
* And if you want to create a schedule for a template, you can do it easily now with `scheduleTemplates`.

```yaml
flow:
  - type: "customScripts"
    step: 100
    inputsTerraform:
      SIZE: $SIZE_SMALL
    commands:
      - runtime: "BASH"
        priority: 100
        before: true
        script: |
          echo "SIZE : $SIZE"
  - type: "scheduleTemplates"
    step: 200
    templates:
      - name: "schedule1"
        schedule: "0 0/5 * ? * * *"
      - name: "schedule2"
        schedule: "0 0/10 * ? * * *"
```

Check [here](https://docs.terrakube.io/user-guide/organizations/templates/template-scheduling-in-jobs) for more details.

#### Restrict Terraform Versions or Provide your own Terraform build

You can now use a custom Terraform CLI build or restrict the Terraform versions in your organization with terrakube. Check the [documentation](https://docs.terrakube.io/getting-started/deployment/custom-terraform-cli-builds) for more details.

#### Terrakube Installation

We improved the helm chart to make the installation easy and now you can quickly install Terrakube for a Sandbox Test environment in [Minikube](https://docs.terrakube.io/getting-started/deployment/minikube). If you prefer you can now try Terrakube using [Docker compose](https://docs.terrakube.io/getting-started/docker-compose)

Thanks for the community contribution, specially thanks to @Diliz and @jstewart612 for their contributions in the Helm Chart. For the full changelog for this version please check <https://github.com/AzBuilder/terrakube/releases/tag/2.12.0>

And if you have any idea or suggestion don't hesitate to let us know.

### February 2023 (2.11.0)

Welcome to the 2.11.0 release of Terrakube. There are a couple of updates in this version that we hope you'll like, some of the key highlights include:

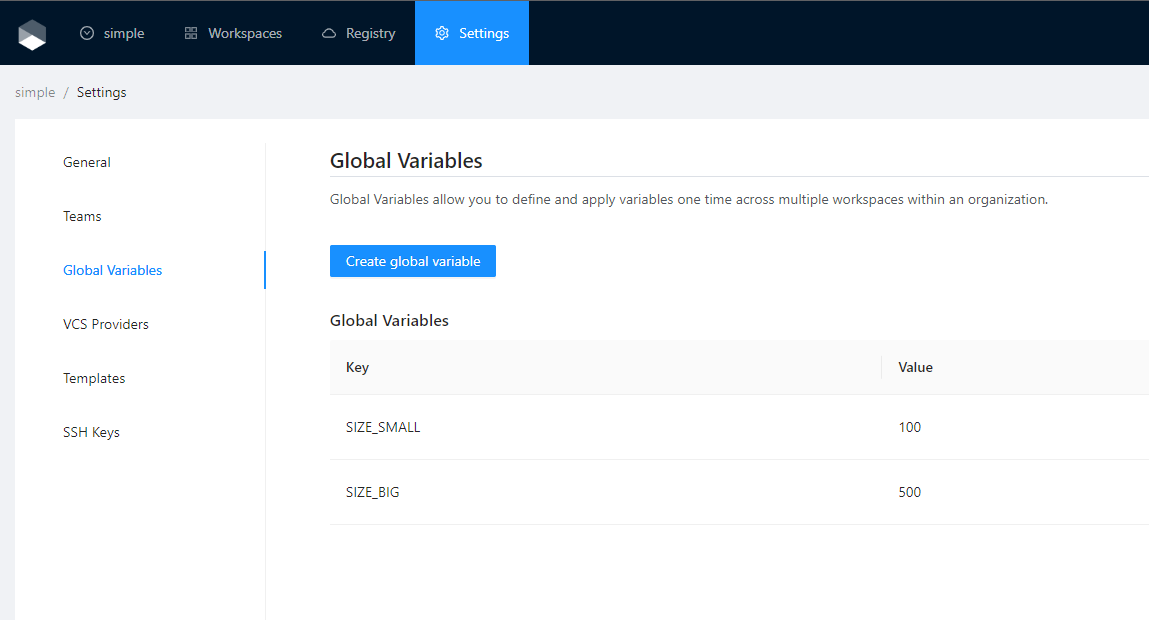
#### Adding Global Variables to Organization Settings

Global Variables allow you to define and apply variables one time across all workspaces within an organization. So you can set your cloud provider credentials and reuse it in all the workspaces inside the same organization. See more details in [our documentation](https://docs.terrakube.io/user-guide/organizations/global-variables)

![image](https://user-images.githubusercontent.com/27365102/221226933-ee19e11e-ed97-448f-8213-5c4848d5289b.png)

#### Adding CLI and API Driven workflows to workspaces

[CLI-driven](https://docs.terrakube.io/user-guide/workspaces/creating-workspaces#cli-driven-workflow) and [API-driven](https://docs.terrakube.io/user-guide/workspaces/creating-workspaces#cli-driven-workflow) workflows are available now. This mean you can create a workspace in the UI and then connect to the same using the Terraform cli or the Terrakube API. Or if you prefer you can go ahead and connect to your Terrakube organization locally from the Terraform cli. Check the [CLI-driven worflow documentation](https://docs.terrakube.io/user-guide/workspaces/cli-driven-workflow) for further details.

For CLI or API driven workspaces you will see the steps directly in the overview tab:

![image](https://user-images.githubusercontent.com/27365102/221228244-89f6993c-2fbb-481b-ad45-b0520e5f2fb9.png)

And in the list of workspaces you will see a badge so you can easily identify CLI and API driven workspaces

![image](https://user-images.githubusercontent.com/27365102/221229865-885cf590-706b-4a3f-bef2-fb14707570aa.png)

#### Improved error handling for invalid templates

If you have an error in your template yaml syntax will be easy to identify it. You will see a more clear message about the job execution failure so you can easily see if the error is related with the execution or with the template configuration.

![image](https://user-images.githubusercontent.com/27365102/221230638-d65335cd-29c5-4454-b6cf-4b9665b4cc1e.png)

#### Import scripts inside the templates

If you have some scripts that you want to reuse, you can import it using the new `importCommand` this will improve the reuse of templates, so you can share some commons steps with the community in your github repos. See [Terrakube docs](https://docs.terrakube.io/user-guide/organizations/templates/import-templates) for more details in how to import scripts

```yaml
flow:
  - type: "terraformPlan"
    step: 100
    importComands:
      repository: "https://github.com/AzBuilder/terrakube-extensions"
      folder: "templates/terratag"
      branch: "import-template"
  - type: "terraformApply"
    step: 200
```

#### Adding UI templates support in workspaces

UI templates extend the idea of templates to the UI, so you can customize how each step will look like, in your custom flow inside Terrakube. Basically you can use standard HTML to build the way in which Terrakube will present the specific step

For example you can present a more user friendly information when extracting data from infracost result. And in the UI if you have a custom Template for that step you will se the Structured UI by default, but you can switch the view to the standard terminal output to see the full logs for that step.

Check some examples:

![image](https://user-images.githubusercontent.com/27365102/221233136-f1efde52-88db-4407-af41-fab66d8db460.png) ![image](https://user-images.githubusercontent.com/27365102/221233363-d23d52d9-269c-4274-872c-03c2f204a2ef.png)

UI templates will allow to create better UI experiences. And brings new ways to customize the way you use Terrakube in your organization. In the upcoming releases we will create some standards templates that you can reuse for the terraform plan and apply. And also we will provide a Terrakube extensions that allows to create UI templates easily.

#### Improving organization selection on initial login

When you login to Terrakube for the first time and if you have multiple organizations assigned, then you will see a screen to select your organization.

For the full changelog for this version please check <https://github.com/AzBuilder/terrakube/releases/tag/2.11.0>

And if you have any idea or suggestion don't hesitate to let us know.


# Architecture

This is the high level architecture of the platform

![](/files/CKvEvv9nwMI602IbA4bM)

Component descriptions:

* Terrakube API:
  * Expose a JSON:API or GraphQL API providing endpoints to handle:
    * Organizations.
    * Workspace API with the following support:
      * Terraform state history
      * Terraform output history
      * Terraform Variables (public/secrets)
      * Environment Variables (public/secrets)
      * Cron like support to schedule the jobs execution programmatically
    * Job.
      * Custom terraform flows based on Terrakube Configuration Language
    * Modules
    * Providers
    * Teams
    * Teamplate
* Terrakube Jobs:
  * Automatic process that check for any pending job operations in any workspace to trigger a custom logic flow based on Terrakube Configuration Language
* Terrakube Executor:
  * Service that executes the Terrakube job operations written in Terrakube Configuration Language, handle the terraform state and outputs using cloud storage providers like Azure Storage Account
* Terrakube Open Registry:
  * This component allows to expose an open source private repository protected by Dex that you can use to handle your company private terraform modules or providers.
* Cloud Storage:
  * Cloud storage to handle terraform state, outputs and terraform modules used by terraform CLI
* RDBMS:
  * The platform can be used with any database supported by the Liquibase project.
* Security:
  * All authentication and authorization is handle using [Dex](https://dexidp.io/).
* Terrakube CLI:
  * Go based CLI that can communicate with the Terrakube API and execute operation for organizations, workspaces, jobs, templates, modules or providers
* Terrakube UI:
  * React based frontend to handle all Terrakube Operations.

{% hint style="info" %}
Terrakube can installed in any kuberentes cluster using any cloud provider. We provide a Helm Chart that can be found in the following [link](https://github.com/AzBuilder/terrakube-helm-chart).
{% endhint %}


# Security

### General security

Terrakube security is based organizations and groups.

{% hint style="info" %}
All Dex connectors that implement the groups claims can be used inside Terrakube.
{% endhint %}

An organization can have one or multiple groups and each group have different kind of access to manage the following options:

* Module
  * Manage terraform modules inside an organization
* VCS
  * Manage private connections to different VCS like Github, Bitbucket, Azure DevOps and Gitlab and handle SSH keys
* Template
  * Manage the custom flows written in Terrakube Configuration Language when running any job inside the platform
* Workspaces
  * Manage the terraform workspaces to run remote terraform operations.
* Providers
  * Manage the terraform providers available inside the platform

{% hint style="warning" %}
Adding a group to an organization will grant access to read the content inside the organization but to be able to manage any option like module, workspace, templates or providers or VCS a Terrakube administrator will need to grant it
{% endhint %}

### Administrator group

There is one special group inside Terrakube called ***TERRAKUBE\_ADMIN***, this is the only group that has access to create organizations and grant access to a teams to manage different organization features, you can also customize the group name if you want to use a different name depending on which [Dex connector](https://dexidp.io/docs/connectors/) you are using when running Terrakube.

###


# Getting Started

To quickly run terrakube in your test environment please check the following:

{% content-ref url="/pages/9qvqhAUTS68Us6TswNO1" %}
[Minikube + HTTPS](/getting-started/deployment/minikube-+-https)
{% endcontent-ref %}


# Docker Images

Images for Terrakube components can be found in the following links:

| Component          | Link                                                    |
| ------------------ | ------------------------------------------------------- |
| Terrakube API      | <https://hub.docker.com/r/azbuilder/api-server/tags>    |
| Terrakube Registry | <https://hub.docker.com/r/azbuilder/open-registry/tags> |
| Terrakube Executor | <https://hub.docker.com/r/azbuilder/executor/tags>      |
| Terrakube UI       | <https://hub.docker.com/r/azbuilder/terrakube-ui/tags>  |

{% hint style="success" %}
Default Images are based on Ubuntu Jammy (linux/amd64)
{% endhint %}

The docker images are generated using cloud native buildpacks with the maven plugin, more information can be found in these links:

* <https://docs.spring.io/spring-boot/docs/current/reference/html/container-images.html#container-images.buildpacks>
* <https://docs.spring.io/spring-boot/docs/3.1.5/maven-plugin/reference/htmlsingle/#build-image>

### Alpaquita Linux (Experimental)

From Terrakube 2.17.0 we generate 3 additional docker images for the API, Registry and Executor components that are based on [Alpaquita Linux](https://bell-sw.com/alpaquita-linux/) that are designed and optimized for Spring Boot applications.

```
docker pull azbuilder/api-server:2.17.0-alpaquita
docker pull azbuilder/open-registry:2.17.0-alpaquita
docker pull azbuilder/executor:2.17.0-alpaquita
```

{% hint style="danger" %}
Alpaquita Linux images for the Executor component does not include GIT, Terraform modules using remote executions like the following wont work:

```
module "consul" {
  source = "git@github.com:hashicorp/example.git"
}
```

{% endhint %}


# Docker Compose

### Local Domains

We will be using following domains to run Terrakube with docker compose:

```
terrakube.platform.local
terrakube-api.platform.local
terrakube-registry.platform.local
terrakube-dex.platform.local
```

### HTTPS Local Certificates

Install [mkcert](https://github.com/FiloSottile/mkcert#installation) to generate the local certificates.

### Generate local CA certificate

```
mkcert -install
Created a new local CA 💥
The local CA is now installed in the system trust store! ⚡️
The local CA is now installed in the Firefox trust store (requires browser restart)! 🦊
```

### Create Docker Network

```
docker network create terrakube-network -d bridge --subnet 10.25.25.0/24 --gateway 10.25.25.254
```

We will be using `10.25.25.253` for our the traefik gateway

### Local DNS entries

Update the /etc/hosts file adding the following entries:

```
10.25.25.253 terrakube.platform.local
10.25.25.253 terrakube-api.platform.local
10.25.25.253 terrakube-registry.platform.local
10.25.25.253 terrakube-dex.platform.local
```

### Running Terrakube Locally with HTTPS

```
git clone https://github.com/AzBuilder/terrakube.git
cd terrakube/docker-compose
mkcert -key-file key.pem -cert-file cert.pem platform.local "*.platform.local"
CAROOT=$(mkcert -CAROOT)/rootCA.pem
cp $CAROOT rootCA.pem
docker compose up -d --force-recreate
```

After 1 or 2 minutes Terrakube will be available in the following URL once all the container are initialized correctly:

* <https://terrakube.platform.local>
  * Username: <admin@example.com>
  * Password: admin

<figure><img src="/files/Fd6R9Nxb71lO8BVmdWPq" alt=""><figcaption></figcaption></figure>

Special thanks to [SolomonHD](https://gist.github.com/SolomonHD) who has created the [Traefik](https://doc.traefik.io/traefik/) setup example to use Terrakube

Original Reference:

<https://gist.github.com/SolomonHD/b55be40146b7a53b8f26fe244f5be52e>


# Deployment

The easiest way to deploy Terrakube is using our Helm Chart, to learn more about this please review the following:

{% content-ref url="/pages/hv0e6c0m7wHOAz5ps3Xm" %}
[Helm Chart](/getting-started/deployment/docker-compose)
{% endcontent-ref %}

You can deploy Terrakube using different authentication providers for more information check

{% content-ref url="<https://github.com/terrakube-io/docs/blob/main/getting-started/deployment/broken-reference/README.md>" %}
<https://github.com/terrakube-io/docs/blob/main/getting-started/deployment/broken-reference/README.md>
{% endcontent-ref %}


# Helm Chart

You can deploy Terrakube to any Kubernetes cluster using the helm chart available in the following repository:

<https://github.com/terrakube-io/terrakube-helm-chart>

### Helm Repository

To use the repository do the following:

```
helm repo add terrakube-repo https://charts.terrakube.io
helm repo update
```


# Minikube

{% hint style="warning" %}
This following will install Terrakube using "HTTP" a few features like the Terraform registry and the Terraform remote state won't be available because they require "HTTPS", to install with HTTPS support locally with minikube check [this](/getting-started/deployment/minikube-+-https)
{% endhint %}

Terrakube can be installed in minikube as a sandbox environment to test, to use it please follow this:

### Setup Helm Repository

```
helm repo add terrakube-repo https://charts.terrakube.io
helm repo update
```

### Setup Minikube

```
minikube start
minikube addons enable ingress
minikube addons enable storage-provisioner
minikube ip 
```

{% hint style="info" %}
Copy the minikube ip address ( Example: 192.168.59.100)
{% endhint %}

### Setup Terrakube namespace

```
kubectl create namespace terrakube
```

### Setup DNS records

```
sudo nano /etc/hosts

192.168.59.100 terrakube-ui.minikube.net
192.168.59.100 terrakube-api.minikube.net
192.168.59.100 terrakube-reg.minikube.net
```

### Install Terrakube

```
helm install terrakube terrakube-repo/terrakube -n terrakube
```

{% hint style="info" %}
It will take some minutes for all the pods to be available, the status can be checked using

kubectl get pods -n terrakube
{% endhint %}

{% hint style="warning" %}
If you found the following message "***Snippet directives are disabled by the Ingress administrator***", please update the ***ingres-nginx-controller configMap in namespace ingress-nginx adding the following:***

```
allow-snippet-annotations: "true"

Reference: https://github.com/terrakube-io/terrakube/issues/618#issuecomment-1838980451
```

{% endhint %}

The environment has some users, groups and sample data so you can test it quickly.

Visit <http://terrakube-ui.minikube.net> and login using <admin@example.com> with password admin

<figure><img src="/files/LAkKt3ITxQaINpw3JZCc" alt=""><figcaption></figcaption></figure>

You can login using the following user and passwords

<figure><img src="/files/ULuJ08MCI2L7dscwqOPz" alt=""><figcaption></figcaption></figure>

| User                | Password | Member Of                               |
| ------------------- | -------- | --------------------------------------- |
| <admin@example.com> | admin    | TERRAKUBE\_ADMIN, TERRAKUBE\_DEVELOPERS |
| <aws@example.com>   | aws      | AWS\_DEVELOPERS                         |
| <gcp@example.com>   | gcp      | GCP\_DEVELOPERS                         |
| <azure@example.com> | azure    | AZURE\_DEVELOPERS                       |

| Groups                |
| --------------------- |
| TERRAKUBE\_ADMIN      |
| TERRAKUBE\_DEVELOPERS |
| AZURE\_DEVELOPERS     |
| AWS\_DEVELOPERS       |
| GCP\_DEVELOPERS       |

{% hint style="warning" %}
The sample user and groups information can be updated in the kubernetes secret:

terrakube-openldap-secrets
{% endhint %}

{% hint style="danger" %}
Minikube will use a very simple OpenLDAP, make sure to change this when using in a real kubernetes environment. Using the option security.useOpenLDAP=false in your helm deployment.
{% endhint %}

Select the "simple" organization and the "sample\_simple" workspace and run a job.

<figure><img src="/files/cA7RgbqUzndBlJujsvGo" alt=""><figcaption></figcaption></figure>

<figure><img src="/files/rllNJ6AiX3sEkwi1lqiW" alt=""><figcaption></figcaption></figure>

<figure><img src="/files/8VQP0f9dFVm00jUWPOD8" alt=""><figcaption></figcaption></figure>

{% hint style="info" %}
For more advance configuration options to install Terrakube visit:

[https://github.com/terrakube-io/terrakube-helm-chart](https://github.com/terrakube-io/terrakube-helm-chart/)
{% endhint %}


# Minikube + HTTPS

Terrakube can be installed in **minikube** as a sandbox environment with **HTTPS**, using terrakube with **HTTPS** will allow to use the Terraform registry and the Terraform remote state backend to be used locally without any issue.

Please follow these instructions:

Requirements:

* Install [mkcert](https://github.com/FiloSottile/mkcert#installation) to generate the local certificates.

We will be using following domains in our test installation:

```
terrakube-api.minikube.net
terrakube-ui.minikube.net
terrakube-reg.minikube.net
```

### Generate local CA certificate

```
mkcert -install
Created a new local CA 💥
The local CA is now installed in the system trust store! ⚡️
The local CA is now installed in the Firefox trust store (requires browser restart)! 🦊
```

### Local CA certificate path

```
mkcert -CAROOT
/home/myuser/.local/share/mkcert
```

### Local CA certificate content

```
cat /home/myuser/.local/share/mkcert/rootCA.pem
```

### Generate certificate for \*.minikube.net

These command will generate two files key.pem and cert.pem that we will be using later.

```
mkcert -key-file key.pem -cert-file cert.pem minikube.net *.minikube.net

Created a new certificate valid for the following names 📜
 - "minikube.net"
 - "*.minikube.net"

Reminder: X.509 wildcards only go one level deep, so this won't match a.b.minikube.net ℹ️

The certificate is at "cert.pem" and the key at "key.pem" ✅

It will expire on 19 January 2026 🗓
```

Now we have all the necessary to install Terrakube with **HTTPS**

### Setup Helm Repository

```
helm repo add terrakube-repo https://charts.terrakube.io
helm repo update
```

### Setup Minikube

<pre><code><strong>minikube start
</strong>minikube addons enable ingress
minikube addons enable storage-provisioner
minikube ip 
</code></pre>

{% hint style="info" %}
Copy the minikube ip address ( Example: 192.168.59.100)
{% endhint %}

### Create Kubernetes secret with local certificate

```
kubectl -n kube-system create secret tls mkcert --key key.pem --cert cert.pem
```

### Setup Terrakube namespace

```
kubectl create namespace terrakube
```

### Setup DNS records

```
sudo nano /etc/hosts

192.168.59.100 terrakube-ui.minikube.net
192.168.59.100 terrakube-api.minikube.net
192.168.59.100 terrakube-reg.minikube.net
```

### Setup Ingress Certificates

```
minikube addons configure ingress

-- Enter custom cert(format is "namespace/secret"): kube-system/mkcert
✅  ingress was successfully configured

minikube addons disable ingress

🌑  "The 'ingress' addon is disabled

minikube addons enable ingress

🔎  Verifying ingress addon...
🌟  The 'ingress' addon is enabled
```

### Helm Values.

We need to generate a file called **values.yaml** with the following using the content of our rootCa.pem from the previous step:

```
security:
  caCerts:
    rootCA.pem: |
      -----BEGIN CERTIFICATE-----
      XXXXXXXXXXXXXXXXXXXXXXXXXXXXXXXXXXXXXXXXXXXXXXXXXXXXXXXXXXXXXXXX
      XXXXXXXXXXXXXXXXXXXXXXXXXXXXXXXXXXXXXXXXXXXXXXXXXXXXXXXXXXXXXXXX
      XXXXXXXXXXXXXXXXXXXXXXXXXXXXXXXXXXXXXXXXXXXXXXXXXXXXXXXXXXXXXXXX
      XXXXXXXXXXXXXXXXXXXXXXXXXXXXXXXXXXXXXXXXXXXXXXXXXXXXXXXXXXXXXXXX
      XXXXXXXXXXXXXXXXXXXXXXXXXXXXXXXXXXXXXXXXXXXXXXXXXXXXXXXXXXXXXXXX
      XXXXXXXXXXXXXXXXXXXXXXXXXXXXXXXXXXXXXXXXXXXXXXXXXXXXXXXXXXXXXXXX
      XXXXXXXXXXXXXXXXXXXXXXXXXXXXXXXXXXXXXXXXXXXXXXXXXXXXXXXXXXXXXXXX
      XXXXXXXXXXXXXXXXXXXXXXXXXXXXXXXXXXXXXXXXXXXXXXXXXXXXXXXXXXXXXXXX
      XXXXXXXXXXXXXXXXXXXXXXXXXXXXXXXXXXXXXXXXXXXXXXXXXXXXXXXXXXXXXXXX
      XXXXXXXXXXXXXXXXXXXXXXXXXXXXXXXXXXXXXXXXXXXXXXXXXXXXXXXXXXXXXXXX
      XXXXXXXXXXXXXXXXXXXXXXXXXXXXXXXXXXXXXXXXXXXXXXXXXXXXXXXXXXXXXXXX
      -----END CERTIFICATE-----

api:
  properties:
    databaseType: "H2"

registry:
  enabled: true
  replicaCount: "1"
  serviceType: "ClusterIP"

dex:
  config:
    issuer: https://terrakube-api.minikube.net/dex

    storage:
      type: memory
    web:
      http: 0.0.0.0:5556
      allowedOrigins: ['*']
      skipApprovalScreen: true
    oauth2:
      responseTypes: ["code", "token", "id_token"]

    connectors:
    - type: ldap
      name: OpenLDAP
      id: ldap
      config:
        # The following configurations seem to work with OpenLDAP:
        #
        # 1) Plain LDAP, without TLS:
        host: terrakube-openldap-service:1389
        insecureNoSSL: true
        #
        # 2) LDAPS without certificate validation:
        #host: localhost:636
        #insecureNoSSL: false
        #insecureSkipVerify: true
        #
        # 3) LDAPS with certificate validation:
        #host: YOUR-HOSTNAME:636
        #insecureNoSSL: false
        #insecureSkipVerify: false
        #rootCAData: 'CERT'
        # ...where CERT="$( base64 -w 0 your-cert.crt )"

        # This would normally be a read-only user.
        bindDN: cn=admin,dc=example,dc=org
        bindPW: admin

        usernamePrompt: Email Address

        userSearch:
          baseDN: ou=users,dc=example,dc=org
          filter: "(objectClass=person)"
          username: mail
          # "DN" (case sensitive) is a special attribute name. It indicates that
          # this value should be taken from the entity's DN not an attribute on
          # the entity.
          idAttr: DN
          emailAttr: mail
          nameAttr: cn

        groupSearch:
          baseDN: ou=Groups,dc=example,dc=org
          filter: "(objectClass=groupOfNames)"

          userMatchers:
            # A user is a member of a group when their DN matches
            # the value of a "member" attribute on the group entity.
          - userAttr: DN
            groupAttr: member

          # The group name should be the "cn" value.
          nameAttr: cn

    staticClients:
    - id: example-app
      redirectURIs:
      - 'https://terrakube-ui.minikube.net'
      - '/device/callback'
      - 'http://localhost:10000/login'
      - 'http://localhost:10001/login'
      name: 'example-app'
      public: true


## Ingress properties
ingress:
  useTls: true
  includeTlsHosts: true
  ui:
    enabled: true
    domain: "terrakube-ui.minikube.net"
    path: "/"
    pathType: "Prefix"
    tlsSecretName: tls-secret-ui-terrakube
    ingressClassName: "nginx"
    annotations:
      nginx.ingress.kubernetes.io/use-regex: "true"
  api:
    enabled: true
    domain: "terrakube-api.minikube.net"
    path: "/"
    pathType: "Prefix"
    tlsSecretName: tls-secret-api-terrakube
    ingressClassName: "nginx"
    annotations:
      nginx.ingress.kubernetes.io/use-regex: "true"
      nginx.ingress.kubernetes.io/proxy-set-headers: "terrakube/custom-headers"
  registry:
    enabled: true
    domain: "terrakube-reg.minikube.net"
    path: "/"
    pathType: "Prefix"
    tlsSecretName: tls-secret-reg-terrakube
    ingressClassName: "nginx"
    annotations:
      nginx.ingress.kubernetes.io/use-regex: "true"
      nginx.ingress.kubernetes.io/proxy-set-headers: "terrakube/custom-headers"
  dex:
    enabled: true
    path: "/dex/"
    pathType: "Prefix"
    annotations:
      nginx.ingress.kubernetes.io/use-regex: "true"
      nginx.ingress.kubernetes.io/proxy-set-headers: "terrakube/custom-headers"
```

{% hint style="warning" %}
If you are following this guild for Terrakube 4.2.5 or lower, you will also have to mount the CA certs explicitly. For more information, see [Custom CA certs](/getting-started/deployment/custom-ca-certs)
{% endhint %}

### Install Terrakube with local HTTPS support

```
helm install terrakube terrakube-repo/terrakube -n terrakube --values values.yaml 
```

###

{% hint style="warning" %}
If you found the following message "***Snippet directives are disabled by the Ingress administrator***", please update the ***ingres-nginx-controller configMap in namespace ingress-nginx adding the following:***

```
allow-snippet-annotations: "true"

Reference: https://github.com/terrakube-io/terrakube/issues/618#issuecomment-1838980
```

{% endhint %}

### Using Terrakube

The environment has some users, groups and sample data so you can test it quickly.

Visit **<https://terrakube-ui.minikube.net>** and login using **<admin@example.com>** with password **admin**

We should be able to use the UI using a valid certificate.

<figure><img src="/files/DM6AUMHrdGOE4vzZuuSN" alt=""><figcaption></figcaption></figure>

### Mac Networking

When using mac there is an additional step to access terrakube please check the following tool to access the app

<https://github.com/chipmk/docker-mac-net-connect>

### Connect to Terrakube

Using terraform we can connect to the terrakube api and the private registry using the following command with the same credentials that we used to login to the UI.

```
terraform login terrakube-api.minikube.net
terraform login terrakube-reg.minikube.net
```

### Terraform Remote State.

Lets create a simple Terraform file.

```
terraform {
  cloud {
    organization = "simple"
    hostname = "terrakube-api.minikube.net"

    workspaces {
      tags = ["myplayground", "example"]
    }
  }
}

# This resource will destroy (potentially immediately) after null_resource.next
resource "null_resource" "previous" {}

resource "time_sleep" "wait_5_seconds" {
  depends_on = [null_resource.previous]

  create_duration = "5s"
}

# This resource will create (at least) 30 seconds after null_resource.previous
resource "null_resource" "next" {
  depends_on = [time_sleep.wait_5_seconds]
}
```

### Execute Terraform Remotely

#### Terraform Init:

```shell
$ terraform init

Initializing Terraform Cloud...

No workspaces found.
  
  There are no workspaces with the configured tags (example, myplayground)
  in your Terraform Cloud organization. To finish initializing, Terraform needs at
  least one workspace available.
  
  Terraform can create a properly tagged workspace for you now. Please enter a
  name to create a new Terraform Cloud workspace.

  Enter a value: simple


Initializing provider plugins...
- Finding latest version of hashicorp/null...
- Finding latest version of hashicorp/time...
- Installing hashicorp/null v3.2.1...
- Installed hashicorp/null v3.2.1 (signed by HashiCorp)
- Installing hashicorp/time v0.9.1...
- Installed hashicorp/time v0.9.1 (signed by HashiCorp)

Terraform has created a lock file .terraform.lock.hcl to record the provider
selections it made above. Include this file in your version control repository
so that Terraform can guarantee to make the same selections by default when
you run "terraform init" in the future.
```

#### Terraform apply:

```bash
$ terraform apply

Running apply in Terraform Cloud. Output will stream here. Pressing Ctrl-C
will cancel the remote apply if it's still pending. If the apply started it
will stop streaming the logs, but will not stop the apply running remotely.

Preparing the remote apply...

To view this run in a browser, visit:
https://terrakube-api.minikube.net/app/simple/simple/runs/40

Waiting for the plan to start...

***************************************
Running Terraform PLAN
***************************************

Terraform used the selected providers to generate the following execution
plan. Resource actions are indicated with the following symbols:
  + create

Terraform will perform the following actions:

  # null_resource.next will be created
  + resource "null_resource" "next" {
      + id = (known after apply)
    }

  # null_resource.previous will be created
  + resource "null_resource" "previous" {
      + id = (known after apply)
    }

  # time_sleep.wait_5_seconds will be created
  + resource "time_sleep" "wait_5_seconds" {
      + create_duration = "5s"
      + id              = (known after apply)
    }

Plan: 3 to add, 0 to change, 0 to destroy.

Changes to Outputs:
  + creation_time = "5s"

Do you want to perform these actions in workspace "simple"?
  Terraform will perform the actions described above.
  Only 'yes' will be accepted to approve.

  Enter a value: yes

null_resource.previous: Creating...
null_resource.previous: Creation complete after 0s [id=6182221597368620892]
time_sleep.wait_5_seconds: Creating...
time_sleep.wait_5_seconds: Creation complete after 5s [id=2023-10-19T20:25:22Z]
null_resource.next: Creating...
null_resource.next: Creation complete after 0s [id=9093191930998774410]

Apply complete! Resources: 3 added, 0 changed, 0 destroyed.
```

#### Checking the UI will show:

<figure><img src="/files/lz3X7qcuAOTSLuu4bRiA" alt=""><figcaption></figcaption></figure>


# Ingress Configuration

The default ingress configuration for terrakube can be customize using a terrakube.yaml like the following:

```
dex:
  config:
    issuer: http://terrakube-api.minikube.net/dex ## CHANGE THIS DOMAIN
    #.....
    #PUT ALL THE REST OF THE DEX CONFIG AND UPDATE THE URL WITH THE NEW DOMAIN
    #.....

## Ingress properties
ingress:
  useTls: false
  ui:
    enabled: true
    domain: "terrakube-ui.minikube.net" ## CHANGE THIS DOMAIN
    path: "/"
    pathType: "Prefix" 
    annotations:
      kubernetes.io/ingress.class: nginx
      nginx.ingress.kubernetes.io/use-regex: "true"
  api:
    enabled: true
    domain: "terrakube-api.minikube.net" ## CHANGE THIS DOMAIN
    path: "/"
    pathType: "Prefix"
    annotations:
      kubernetes.io/ingress.class: nginx
      nginx.ingress.kubernetes.io/use-regex: "true"
      nginx.ingress.kubernetes.io/configuration-snippet: "proxy_set_header Authorization $http_authorization;"
  registry:
    enabled: true
    domain: "terrakube-reg.minikube.net" ## Change to your customer domain
    path: "/"
    pathType: "Prefix"
    annotations:
      kubernetes.io/ingress.class: nginx
      nginx.ingress.kubernetes.io/use-regex: "true"
      nginx.ingress.kubernetes.io/configuration-snippet: "proxy_set_header Authorization $http_authorization;"
  dex:
    enabled: true
    path: "/dex/"
    pathType: "Prefix"
    annotations:
      kubernetes.io/ingress.class: nginx
      nginx.ingress.kubernetes.io/use-regex: "true"
      nginx.ingress.kubernetes.io/configuration-snippet: "proxy_set_header Authorization $http_authorization;"
```

{% hint style="info" %}
Update the custom domains and the other ingress configuration depending of your kubernetes environment
{% endhint %}

{% hint style="warning" %}
The above example is using a simple ngnix ingress
{% endhint %}

Now you can install terrakube using the command

```bash
helm install --values terrakube.yaml terrakube terrakube-repo/terrakube -n terrakube
```


# User Authentication (DEX)

To authenticate users Terrakube implement [DEX](https://dexidp.io/) so you can authenticate using differente providers using [dex connectors](https://dexidp.io/docs/connectors/) like the following:

* Azure Active Direcory
* Google Cloud Identity
* Amazon Cognito
* Github Authentication
* Gitlab Authentictaion
* OIDC
* LDAP
* Keycloak
* etc.

{% hint style="info" %}
Any dex connector that implements the "groups" scope should work without any issue
{% endhint %}

The Terrakube [helm chart](https://azbuilder.github.io/terrakube-helm-chart/) is using DEX as dependency, so you can quickly implement it using any exiting dex configuration.

{% hint style="danger" %}
Make sure to update the dex configuration when deploying terrakube in a real kubernetes environment, by default it is using a very basic openLDAP with some sample data. To disable udpate security.useOpenLDAP in your terrakube.yaml
{% endhint %}

To customize the DEX setup just create a simple terrakube.yaml and update the configuration like the following example:

```
# UPDATE THE DEX CLIENT ID AND SCOPE 
security:
  dexClientId: "example-app"
  dexClientScope: "email openid profile offline_access groups"
  useOpenLDAP: false
  
# UPDATE THE DEX CONFIG
dex:
  config:
    issuer: http://terrakube-api.minikube.net/dex

    storage:
      type: memory
    web:
      http: 0.0.0.0:5556
      allowedOrigins: ['*']
      skipApprovalScreen: true
    oauth2:
      responseTypes: ["code", "token", "id_token"] 

    connectors:
    - type: ldap
      name: OpenLDAP
      id: ldap
      config:
        # The following configurations seem to work with OpenLDAP:
        #
        # 1) Plain LDAP, without TLS:
        host: terrakube-openldap-service:389
        insecureNoSSL: true
        #
        # 2) LDAPS without certificate validation:
        #host: localhost:636
        #insecureNoSSL: false
        #insecureSkipVerify: true
        #
        # 3) LDAPS with certificate validation:
        #host: YOUR-HOSTNAME:636
        #insecureNoSSL: false
        #insecureSkipVerify: false
        #rootCAData: 'CERT'
        # ...where CERT="$( base64 -w 0 your-cert.crt )"

        # This would normally be a read-only user.
        bindDN: cn=admin,dc=example,dc=org
        bindPW: admin

        usernamePrompt: Email Address

        userSearch:
          baseDN: ou=People,dc=example,dc=org
          filter: "(objectClass=person)"
          username: mail
          # "DN" (case sensitive) is a special attribute name. It indicates that
          # this value should be taken from the entity's DN not an attribute on
          # the entity.
          idAttr: DN
          emailAttr: mail
          nameAttr: cn

        groupSearch:
          baseDN: ou=Groups,dc=example,dc=org
          filter: "(objectClass=groupOfNames)"

          userMatchers:
            # A user is a member of a group when their DN matches
            # the value of a "member" attribute on the group entity.
          - userAttr: DN
            groupAttr: member

          # The group name should be the "cn" value.
          nameAttr: cn

    staticClients:
    - id: example-app
      redirectURIs:
      - 'http://terrakube-ui.minikube.net'
      - '/device/callback'
      - 'http://localhost:10000/login'
      - 'http://localhost:10001/login'
      name: 'example-app'
      public: true
```

{% hint style="success" %}
Dex configuration examples can be found [here](https://dexidp.io/docs/connectors/).
{% endhint %}


# Storage backend


# Azure Storage Account

{% hint style="info" %}
This guide will assume that you are using the minikube deployment, but the storage backend can be used in any real kubernetes environment.
{% endhint %}

The first step will be to create one azure storage account with the following containers:

* content
* registry
* tfoutput
* tfstate

{% hint style="info" %}
Create Azure Storage Account tutorial [link](https://learn.microsoft.com/en-us/azure/storage/common/storage-account-create?tabs=azure-portal)
{% endhint %}

Once the storage account is created you will have to get the "[Access Key](https://learn.microsoft.com/en-us/azure/storage/common/storage-account-keys-manage?tabs=azure-portal)"

Now you have all the information we will need to create a terrakube.yaml for our terrakube deployment with the following content:

```yaml
## Terrakube Storage
storage:
  defaultStorage: false
  azure:
    storageAccountName: "<<STORAGE ACCOUNT NAME>>"
    storageAccountResourceGroup: "<< RESOURCE GROUP >>"
    storageAccountAccessKey: "<< STORAGE ACCOUNT ACCESS KEY"
```

Now you can install terrakube using the command

```bash
helm install --values terrakube.yaml terrakube terrakube-repo/terrakube -n terrakube
```


# Amazon Cloud Storage

### Using Access Key and Secret

{% hint style="info" %}
This guide will assume that you are using the minikube deployment, but the storage backend can be used in any real kubernetes environment.
{% endhint %}

The first step will be to create one s3 bucket with private access

{% hint style="info" %}
Create S3 bucket tutorial [link](https://docs.aws.amazon.com/AmazonS3/latest/userguide/creating-bucket.html)
{% endhint %}

Once the s3 bucket is created you will need to get the following:

* access key
* secret key
* bucket name
* region

Now you have all the information we will need to create a terrakube.yaml for our terrakube deployment with the following content:

```yaml
## Terrakube Storage
storage:
  defaultStorage: false
  aws:
    accessKey: "rqerqw"
    secretKey: "sadfasfdq"
    bucketName: "qerqw"
    region: "us-east-1"
```

Now you can install terrakube using the command:

```bash
helm install --values terrakube.yaml terrakube terrakube-repo/terrakube -n terrakube

```

### Using Role Authentication

{% hint style="info" %}
This feature is supported from Terrakube version 2.24.0
{% endhint %}

If need it Terrakube can authenticate without using the access key or secret deploying the storage configuration like the following:

```yaml
## Terrakube Storage
storage:
  defaultStorage: false
  aws:
    bucketName: "my-bucket-name"
    region: "us-east-1"

## Terrakube components properties
api:
  version: "2.24.0"
  env:
  - name: AwsEnableRoleAuth
    value: true

executor:
  version: "2.24.0"
  env:
  - name: AwsIncludeBackendKeys
    value: false
  - name: AwsEnableRoleAuth
    value: true

registry:
  version: "2.24.0"
  env:
  - name: AwsEnableRoleAuth
    value: true
```


# Google Cloud Storage

{% hint style="info" %}
This guide will assume that you are using the minikube deployment, but the storage backend can be used in any real kubernetes environment.
{% endhint %}

The first step will be to create one google storage bucket with private access

{% hint style="info" %}
Create storage bucket tutorial [link](https://cloud.google.com/storage/docs/creating-buckets)
{% endhint %}

Once the google storage bucket is created you will need to get the following:

* project id
* bucket name
* JSON GCP credentials file with access to the storage bucket

Now you have all the information we will need to create a terrakube.yaml for our terrakube deployment with the following content:

```yaml
## Terrakube Storage
storage:
  defaultStorage: false
  gcp:
    projectId: "sample project"
    bucketName: "sampledata"
    credentials: |
      {
        "type": "service_account",
        "project_id": "XXXXXXX",
        ......
      }
```

Now you can install terrakube using the command:

```bash
helm install --values terrakube.yaml terrakube terrakube-repo/terrakube -n terrakube
```


# Minio (S3 compatible)

{% hint style="info" %}
This guide will assume that you are using the minikube deployment, but the storage backend can be used in any real kubernetes environment.
{% endhint %}

The first step will be to deploy a minio instance inside minikube in the terrakube namespace

{% hint style="info" %}
MINIO helm deployment [link](https://artifacthub.io/packages/helm/bitnami/minio)
{% endhint %}

Create the file minio-setup.yaml that we can use to create the default user and buckets

```
auth:
  rootUser: "admin"
  rootPassword: "superadmin"
defaultBuckets: "terrakube"
```

```
kubectl install --values minio-setup.yaml miniostorage bitnami/minio -n terrakube
```

Once the minio storage is installed lets get the service name.

```
kubectl get svc -o wide -n terrakube
```

The service name for the minio storage should be "miniostorage"

Once minio is installed with a bucket you will need to get the following:

* access key
* secret key
* bucket name
* endpoint (<http://miniostorage:9000>)

Now you have all the information we will need to create a terrakube.yaml for our terrakube deployment with the following content:

```yaml
## Terrakube Storage
storage:
  defaultStorage: false
  minio:
    accessKey: "admin"
    secretKey: "superadmin"
    bucketName: "terrakube"
    endpoint: "http://miniostorage:9000"
```

Now you can install terrakube using the command:

```bash
helm install --values terrakube.yaml terrakube terrakube-repo/terrakube -n terrakube
```


# Database Backend

In a production deployment, it is recommended to host your database backend on external cloud provider like AWS, GCP or Azure.


# SQL Azure

To use a SQL Azure with your Terrakube deployment create a terrakube.yaml file with the following content:

```yaml
## Terrakube API properties
api:
  defaultDatabase: false
  loadSampleData: false
  properties:
    databaseType: "SQL_AZURE"
    databaseHostname: "server_name.database.windows.net"
    databaseName: "database_name"
    databaseUser: "database_user"
    databasePassword: "database_password"
    databaseSchema: "dbo"

```

{% hint style="info" %}
loadSampleData this will add some organization, workspaces and modules by default in your database if need it
{% endhint %}

Now you can install terrakube using the command.

```bash
helm install --values terrakube.yaml terrakube terrakube-repo/terrakube -n terrakube
```


# PostgreSQL

{% hint style="info" %}
By default the helmchart deploy a postgresql database in your terrakube namespace but if you want to customize that you can change the default deployment values.
{% endhint %}

To use a PostgreSQL with your Terrakube deployment create a terrakube.yaml file with the following content:

```yaml
## Terrakube API properties
api:
  defaultDatabase: false
  loadSampleData: false
  properties:
    databaseType: "POSTGRESQL"
    databaseHostname: "server_name.postgres.database.com"
    databaseName: "database_name"
    databaseUser: "database_user"
    databasePassword: "database_password"
    databaseSslMode: "disable"
    databasePort: "5432"

```

{% hint style="info" %}
loadSampleData this will add some organization, workspaces and modules by default in your database if need it
{% endhint %}

Now you can install terrakube using the command.

```bash
helm install --values terrakube.yaml terrakube terrakube-repo/terrakube -n terrakube
```

{% hint style="warning" %}
Postgresql SSL mode can be use adding databaseSslMode parameter by default the value is "disable", but it accepts the following values; disable, allow, prefer, require, verify-ca, verify-full. This feature is supported from Terrakube 2.15.0. Reference: <https://jdbc.postgresql.org/documentation/publicapi/org/postgresql/PGProperty.html#SSL_MODE>
{% endhint %}


# H2

To use a H2 with your Terrakube deployment create a terrakube.yaml file with the following content:INT

```yaml
## Terrakube API properties
api:
  defaultDatabase: false
  loadSampleData: true
  properties:
    databaseType: "H2"
    databaseHostname: ""
    databaseName: ""
    databaseUser: ""
    databasePassword: ""

```

{% hint style="danger" %}
H2 database is just for testing, each time the api pod is restarted a new database will be created
{% endhint %}

{% hint style="success" %}
loadSampleData this will add some organization, workspaces and modules by default in your database, keep databaseHostname, databaseName, databaseUser and databasePassword empty
{% endhint %}

Now you can install terrakube using the command.

```bash
helm install --values terrakube.yaml terrakube terrakube-repo/terrakube -n terrakube
```


# Custom CA Certs

### Adding certificates at runtime

Terrakube componentes (api, registry and executor) are using [buildpacks](https://buildpacks.io/docs/concepts/) to create the docker images

<figure><img src="https://user-images.githubusercontent.com/4461895/223739868-d206fa74-4a06-40eb-9790-db36df6ee74e.png" alt=""><figcaption></figcaption></figure>

When using buildpack to add a custom CA certificate at runtime you need to do the following:

Provide the following environment variable to the container:

```
SERVICE_BINDING_ROOT: /mnt/platform/bindings
```

Inside the path there is a folder call "ca-certificates"

```
cnb@terrakube-api-678cb68d5b-ns5gt:/mnt/platform/bindings$ ls
ca-certificates
```

We need to mount some information to that path

```
/mnt/platform/bindings/ca-certificates
```

Inside this folder we should put out custom PEM CA certs and one additional file call **type**

```
cnb@terrakube-api-678cb68d5b-ns5gt:/mnt/platform/bindings/ca-certificates$ ls
terrakubeDemo1.pem  terrakubeDemo2.pem  type
```

The content of the file **type** is just the text **"ca-certificates"**

```
cnb@terrakube-api-678cb68d5b-ns5gt:/mnt/platform/bindings/ca-certificates$ cat type
ca-certificates
```

Finally your helm terrakube.yaml should look something like this because we are mounting out CA certs and the file called **type** in the following path **" /mnt/platform/bindings/ca-certificates"**

```
## Terrakube Security
security:
  caCerts:
    terrakubeDemo1.pem: |
      -----BEGIN CERTIFICATE-----
      MIIDZTCCA.........

      -----END CERTIFICATE-----
    terrakubeDemo2.pem: |
      -----BEGIN CERTIFICATE-----
      MIIDZTCCA.....

      -----END CERTIFICATE-----
```

Version 4.2.6 and later will automatically mount certificates passed via `security.caCerts`. If you are using version 4.2.5 or below of the Helm chart, you also need to explicitly mount the certificates. Repeat for `api`, `executor` and `registry`:

```yaml
api:
  env:
  - name: SERVICE_BINDING_ROOT
    value: /mnt/platform/bindings
  volumes:
    - name: ca-certs
      secret:
        secretName: terrakube-ca-secrets
        items:
        - key: "terrakubeDemo1.pem"
          path: "terrakubeDemo1.pem"
        - key: "terrakubeDemo2.pem"
          path: "terrakubeDemo2.pem"
        - key: "type"
          path: "type"
  volumeMounts:
  - name: ca-certs
    mountPath: /mnt/platform/bindings/ca-certificates
    readOnly: true
```

{% hint style="warning" %}
When mounting the volume with the ca secrets dont forget to add the key "type", the content of the file is already defined inside the helm chart
{% endhint %}

Checking the terrakube component two additional ca certs are added inside the sytem truststore

```
Added 2 additional CA certificate(s) to system truststore
Setting Active Processor Count to 2
Calculating JVM memory based on 5791152K available memory
For more information on this calculation, see https://paketo.io/docs/reference/java-reference/#memory-calculator
Calculated JVM Memory Configuration: -XX:MaxDirectMemorySize=10M -Xmx5033128K -XX:MaxMetaspaceSize=246023K -XX:ReservedCodeCacheSize=240M -Xss1M (Total Memory: 5791152K, Thread Count: 250, Loaded Class Count: 41022, Headroom: 0%)
Enabling Java Native Memory Tracking
Adding 126 container CA certificates to JVM truststore
Spring Cloud Bindings Enabled
Picked up JAVA_TOOL_OPTIONS: -Djava.security.properties=/layers/paketo-buildpacks_bellsoft-liberica/java-security-properties/java-security.properties -XX:+ExitOnOutOfMemoryError -XX:ActiveProcessorCount=2 -XX:MaxDirectMemorySize=10M -Xmx5033128K -XX:MaxMetaspaceSize=246023K -XX:ReservedCodeCacheSize=240M -Xss1M -XX:+UnlockDiagnosticVMOptions -XX:NativeMemoryTracking=summary -XX:+PrintNMTStatistics -Dorg.springframework.cloud.bindings.boot.enable=true

  .   ____          _            __ _ _
 /\\ / ___'_ __ _ _(_)_ __  __ _ \ \ \ \
( ( )\___ | '_ | '_| | '_ \/ _` | \ \ \ \
 \\/  ___)| |_)| | | | | || (_| |  ) ) ) )
  '  |____| .__|_| |_|_| |_\__, | / / / /
 =========|_|==============|___/=/_/_/_/
 :: Spring Boot ::                (v2.7.8)
```

Additinal information about buildpacks can be found in this link:

* [https://blog.dahanne.net/2021/02/06/customizing-cloud-native-buildpacks-practical-examples/#Add\_certificates\_binding\_at\_runtime:\~:text=ca%2Dcertificates-,Add%20certificates%20binding%20at%20runtime,-If%20your%20image](https://blog.dahanne.net/2021/02/06/customizing-cloud-native-buildpacks-practical-examples/#Add_certificates_binding_at_runtime)
* <https://github.com/paketo-buildpacks/ca-certificates>
* <https://github.com/paketo-buildpacks/spring-boot>

### Adding certificate at build time

Terrakube allow to add the certs when building the application, to use this option use the following:

```
git clone https://github.com/AzBuilder/terrakube
cd terrakube
git checkout <<TERRAKUBE-VERSION>>
mv EXAMPLE.pem bindings/ca-certificates

# This script should be run from the root folder
./scripts/build/terrakubeBuild.sh
```

The certs will be added at runtime as the following image.

<figure><img src="/files/UC3ENjPUQY5A3KPMlmhV" alt=""><figcaption></figcaption></figure>


# Custom Terraform CLI Builds

Terrakube will support terraform cli custom builds or custom cli mirrors, the only requirement is to expose an endpoint with the following structure:

{% hint style="info" %}
Support is available from version 2.12.0
{% endhint %}

Example Endpoint:

* <https://eov1ys4sxa1bfy9.m.pipedream.net/>

```json
{
   "name":"terraform",
   "versions":{
      "1.3.9":{
         "builds":[
            {
               "arch":"amd64",
               "filename":"terraform_1.3.9_linux_amd64.zip",
               "name":"terraform",
               "os":"linux",
               "url":"https://releases.hashicorp.com/terraform/1.3.9/terraform_1.3.9_linux_amd64.zip",
               "version":"1.3.9"
            }
         ],
         "name":"terraform",
         "shasums":"terraform_1.3.9_SHA256SUMS",
         "shasums_signature":"terraform_1.3.9_SHA256SUMS.sig",
         "shasums_signatures":[
            "terraform_1.3.9_SHA256SUMS.72D7468F.sig",
            "terraform_1.3.9_SHA256SUMS.sig"
         ],
         "version":"1.3.9"
      }
   }
}
```

{% hint style="success" %}
This is usefull when you have some network restrictions that does not allow to get the information from <https://releases.hashicorp.com/terraform/index.json> in your private kuberentes cluster.
{% endhint %}

To support custom terrafom cli releases when using the helm chart us the following:

```
api:
  version: "2.12.0"
  terraformReleasesUrl: "https://eov1ys4sxa1bfy9.m.pipedream.net/"

executor:
  version: "2.12.0"
```


# Self-Hosted Agents

{% hint style="info" %}
This feature is supported from version 2.20.0 and helm chart version 3.16.0
{% endhint %}

Terrakube allow to have one or multiple agents to run jobs, you can have as many agents as you want for a single organization.

To use this feature you could deploy a single executor component using the following values:

```yaml
# Executor should be enable but we need to customize the apiServiceUrl
executor:
  enabled: true
  apiServiceUrl: "http://terrakube-api-service.terrakube:8080" ## The API is in another namespace called "terrakube"

# We need to disable the default openLdap but we need to provide the internal secret
# so the executor can authenticat with the API and the Registry
security:
  useOpenLDAP: false
  internalSecret: "AxxPdgpCi72f8WhMXCTGhtfMRp6AuBfj"

# We need to disable dex in this deployment
dex:
  enabled: false

# We need to disable default storage MINIO and set some custom values 
# in this example will be deploying like using an external MINIO
#(other backend storage could be used too)
storage:
  defaultStorage: false
  minio:
    accessKey: "admin"
    secretKey: "superadmin"
    bucketName: "terrakube"
    endpoint: "http://terrakube-minio.terrakube:9000" ## MINIO is in another namespace called "terrakube"

# We need to disable API, the default redis and default postgresql database
# But we need to provide some properties like the redis connection
api:
  enabled: false
  defaultRedis: false
  defaultDatabase: false
  properties:
    redisHostname: "terrakube-redis-master.terrakube" ## REDIS is in another namespace called "terrakube"
    redisPassword: "7p9iWVeRV4S944"

# We need to disable registry deployment
registry:
  enabled: false

# We need to disable ui deployment
ui:
  enabled: false

# We need to disable the ingress configuration
# but we need to specify the api and registry URL 
ingress:
  useTls: false
  includeTlsHosts: false
  ui:
    enabled: false
  api:
    enabled: false
    domain: "terrakube-api.minikube.net"
  registry:
    enabled: false
    domain: "terrakube-reg.minikube.net"
  dex:
    enabled: false
```

{% hint style="warning" %}
The above values are assuming the we have deploy terrakube using the domain "minikube.net" inside a namespace called "terrakube"
{% endhint %}

Now that we have our values.yaml we can use the following helm command:

```
helm install --debug --values ./your-values.yaml terrakube terrakube-repo/terrakube -n self-hosted-executor
```

Now we have a single executor component ready to accept jobs or we could change the number or replicas to have multiple replicas like a pool of agent:

<figure><img src="/files/LZOmuYSwWlDMbtIiY0nH" alt=""><figcaption></figcaption></figure>


# Ephemeral Agents

{% hint style="warning" %}
This feature is supported from version 2.22.0
{% endhint %}

The following will explain how to run the executor component in`"ephemeral"` mode.

These environment variables can be used to customize the API component:

* ExecutorEphemeralNamespace (Default value: "terrakube")
* ExecutorEphemeralImage (Defatul value: "azbuilder/executor:2.22.0" )
* ExecutorEphemeralSecret (Default value: "terrakube-executor-secrets" )

> The above is basically to control where the job will be created and executed and to mount the secrets required by the executor component

Internally the Executor component will use the following to run in `"ephemeral"` :

* EphemeralFlagBatch (Default value: "false")
* EphemeralJobData, this contains all the data that the executor need to run.

### Helm Chat Configuration (Automatic)

To enable the ephemeral executor using the helm chart please use the following options:

```yaml
api:
  serviceAccountName: "terrakube-api-service-account"
  ephemeralExecution:
    enabled: true
```

### Manual Configuration

To use Ephemeral executors we need to create the following configuration:

#### Service Account Creation

```
apiVersion: v1
kind: ServiceAccount
metadata:
  name: terrakube-api-service-account
  namespace: terrakube
```

#### Role Creation

```
apiVersion: rbac.authorization.k8s.io/v1
kind: Role
metadata:
  namespace: terrakube
  name: terrakube-api-role
rules:
- apiGroups: ["batch"]
  resources: ["jobs"]
  verbs: ["get", "list", "watch", "create", "update", "patch", "delete"]
```

#### Role Binding Creation

```
apiVersion: rbac.authorization.k8s.io/v1
kind: RoleBinding
metadata:
  name: terrakube-api-role-binding
  namespace: terrakube
subjects:
- kind: ServiceAccount
  name: terrakube-api-service-account
  namespace: terrakube
roleRef:
  kind: Role
  name: terrakube-api-role
  apiGroup: rbac.authorization.k8s.io
```

#### Workspace Configuration

Add the environment variable `TERRAKUBE_ENABLE_EPHEMERAL_EXECUTOR=1` like the image below

<figure><img src="/files/huUAujTxGLw9l4KqlxyA" alt=""><figcaption></figcaption></figure>

#### Workspace Execution

Now when the job is running internally Terrakube will create a K8S job and will execute each step of the job in a `"ephemeral executor"`

<figure><img src="/files/pkJQiJ2Y8BI0LGHfG7XR" alt=""><figcaption></figcaption></figure>

Internal Kubernetes Job Example:

<figure><img src="/files/vrOK0ADiKUeiYLdl03uc" alt=""><figcaption></figcaption></figure>

Plan Running in a pod:

<figure><img src="/files/1rTFvyuHpHVkyApaTh8R" alt=""><figcaption></figcaption></figure>

Apply Running in a different pod:

<figure><img src="/files/Kh7S5DRlty6kxMBYNFQw" alt=""><figcaption></figcaption></figure>

### Node Selector.

{% hint style="warning" %}
Adding node selector configuration is available from version 2.23.0
{% endhint %}

If required you can specify the node selector configuration where the pod will be created using something like the following:

```yaml
api:
  env:
  - name: JAVA_TOOL_OPTIONS
    value: "-Dorg.terrakube.executor.ephemeral.nodeSelector.diskType=ssd -Dorg.terrakube.executor.ephemeral.nodeSelector.nodeType=spot"
```

The above will be the equivalent to use the Kubernetes YAML like:

```yaml
  nodeSelector:
    disktype: ssd
    nodeType: spot
```

### Using Environment Variables for Configuration

{% hint style="warning" %}
This feature is supported from version 2.23.0 or 2.24.0
{% endhint %}

The following environment variables can be used to customize the ephemeral executor adding the following values inside the workspace settings:

* EPHEMERAL\_CONFIG\_NODE\_SELECTOR\_TAGS
  * Example: key1=value1;key2=value2
  * [Reference](https://github.com/AzBuilder/terrakube/pull/1243)
* EPHEMERAL\_CONFIG\_SERVICE\_ACCOUNT
  * Example: myserviceaccount
  * [Reference](https://github.com/AzBuilder/terrakube/pull/1243)
* EPHEMERAL\_CONFIG\_ANNOTATIONS
  * Example: key1=value1;key2=value2
  * [Reference](https://github.com/AzBuilder/terrakube/pull/1243)
* EPHEMERAL\_CONFIG\_TOLERATIONS
  * Example: `key:operator:effect`
  * [`Reference`](https://github.com/AzBuilder/terrakube/pull/1579)
* EPHEMERAL\_CONFIG\_MAP\_NAME
  * [Reference](https://github.com/AzBuilder/terrakube/pull/1505)
* EPHEMERAL\_CONFIG\_MAP\_MOUNT\_PATH
  * [Reference](https://github.com/AzBuilder/terrakube/pull/1505)

More information can be found inside this [code](https://github.com/AzBuilder/terrakube/blob/main/api/src/main/java/org/terrakube/api/plugin/scheduler/job/tcl/executor/ephemeral/EphemeralExecutorService.java)


# External Redis

By default the helm chart is using bitnami redis, this container is only for testing purposes and for a real cluster it is better to use an external redis.

To enable it, the following values can be used:

```yaml
api:
  defaultRedis: false
  env:
  - name: TerrakubeRedisSSL
    value: "true"
  - name: TerrakubeRedisTruststorePath
    value: /layers/paketo-buildpacks_bellsoft-liberica/jre/lib/security/cacerts 
  - name: TerrakubeRedisTruststorePassword
    value: changeit
  properties:
    redisHostname: "MY-REDIS-IN-AZURE.redis.cache.windows.net"
    redisPassword: "MY-REDIS-ACCESS-KEY"
    redisPort: "6380"

executor:
  env:
  - name: SERVICE_BINDING_ROOT
    value: /mnt/platform/bindings
  - name: TerrakubeRedisSSL
    value: "true"
  - name: TerrakubeRedisTruststorePath
    value: /layers/paketo-buildpacks_bellsoft-liberica/jre/lib/security/cacerts 
  - name: TerrakubeRedisTruststorePassword
    value: changeit
```

{% hint style="warning" %}
"changeit" is the default password for the java keystore included in the container in this path "/layers/paketo-buildpacks\_bellsoft-liberica/jre/lib/security/cacerts"
{% endhint %}

### Ephemeral Executor with Redis SSL

{% hint style="info" %}
Using EPHEMERAL\_JOB\_ENV\_VARS is supported from version 2.28.0
{% endhint %}

To add the additional environment variables to the ephemeral executor the following could be used:

<figure><img src="/files/fTbBrDJgB9V2ZktIKUZX" alt=""><figcaption></figcaption></figure>

Value:

```
EPHEMERAL_JOB_ENV_VARS=TerrakubeRedisSSL=true;TerrakubeRedisTruststorePath=/layers/paketo-buildpacks_bellsoft-liberica/jre/lib/security/cacerts;TerrakubeRedisTruststorePassword=changeit;ExecutorEphemeralSecret=terrakube-executor-secrets-ephemeral
```


# Proxy Configuration

When Terrrakube needs to run behind a corporate proxy the following environment variable can be used in each container:

```
JAVA_TOOL_OPTIONS="-Dhttp.proxyHost=your.proxy.net -Dhttp.proxyPort=8080 -Dhttp.nonProxyHosts=XXXXX -Dhttps.proxyHost=your.proxy.net -Dhttps.proxyPort=8080 -Dhttps.nonProxyHosts=XXXXX"
```

When using the official helm chart the environment variable setting can be set like the following:

```yaml
api:
  env:
  - name: JAVA_TOOL_OPTIONS
    value: "-Dhttp.proxyHost=your.proxy.net -Dhttp.proxyPort=8080 -Dhttp.nonProxyHosts=XXXXX -Dhttps.proxyHost=your.proxy.net -Dhttps.proxyPort=8080 -Dhttps.nonProxyHosts=XXXXX"
    
registry:
  env:
  - name: JAVA_TOOL_OPTIONS
    value: "-Dhttp.proxyHost=your.proxy.net -Dhttp.proxyPort=8080 -Dhttp.nonProxyHosts=XXXXX -Dhttps.proxyHost=your.proxy.net -Dhttps.proxyPort=8080 -Dhttps.nonProxyHosts=XXXXX"

executor:
  env:
  - name: JAVA_TOOL_OPTIONS
    value: "-Dhttp.proxyHost=your.proxy.net -Dhttp.proxyPort=8080 -Dhttp.nonProxyHosts=XXXXX -Dhttps.proxyHost=your.proxy.net -Dhttps.proxyPort=8080 -Dhttps.nonProxyHosts=XXXXX"
```

[Reference](https://github.com/AzBuilder/terrakube/issues/699)


# Token Security

Terrakube use two secrets internally to sign the personal access token and one internal token for intercomponent comunnication when using the helm deployment you can change this values using the following keys:

```yaml
security:
  patSecret: "AAAAAAAAAAAAAAAAAAAA"
  internalSecret: "BBBBBBBBBBBBBBBBB"
```

{% hint style="danger" %}
Make sure to change the default values in a real kubernetes deployment.
{% endhint %}

{% hint style="warning" %}
The secret should be 32 character long and it should be base64 compatible string.
{% endhint %}


# Open Telemetry

Terrakube components support [Open Telemetry](https://opentelemetry.io/) by default to enable effective observability.

To enable telemetry inside the Terrakube components please add the following environment variable:

```
OTEL_JAVAAGENT_ENABLED=true
```

{% hint style="success" %}
Terrakube API, Registry and Executor support the setup for now from version 2.12.0.

UI support will be added in the future.
{% endhint %}

Once the open telemetry agent is enable we can use other environment variables to setup the monitoring for our application for example to enable jaeger we could add the following using addtional environment variables:

```
OTEL_TRACES_EXPORTER=jaeger
OTEL_EXPORTER_JAEGER_ENDPOINT=http://jaeger-all-in-one:14250
OTEL_SERVICE_NAME=TERRAKUBE-API
```

Now we can go the jaeger ui to see if everything is working as expected.

<figure><img src="/files/XiBy3TWzrnijWVNviCjL" alt=""><figcaption></figcaption></figure>

<figure><img src="/files/1iTNyTic1KglDEa3nI6e" alt=""><figcaption></figcaption></figure>

There are several differente configuration options for example:

#### Jaeger exporter

The [Jaeger](https://www.jaegertracing.io/docs/1.21/apis/#protobuf-via-grpc-stable) exporter. This exporter uses gRPC for its communications protocol.

| System property               | Environment variable             | Description                                                                                |
| ----------------------------- | -------------------------------- | ------------------------------------------------------------------------------------------ |
| otel.traces.exporter=jaeger   | OTEL\_TRACES\_EXPORTER=jaeger    | Select the Jaeger exporter                                                                 |
| otel.exporter.jaeger.endpoint | OTEL\_EXPORTER\_JAEGER\_ENDPOINT | The Jaeger gRPC endpoint to connect to. Default is `http://localhost:14250`.               |
| otel.exporter.jaeger.timeout  | OTEL\_EXPORTER\_JAEGER\_TIMEOUT  | The maximum waiting time, in milliseconds, allowed to send each batch. Default is `10000`. |

#### Zipkin exporter

The [Zipkin](https://zipkin.io/zipkin-api/) exporter. It sends JSON in [Zipkin format](https://zipkin.io/zipkin-api/#/default/post_spans) to a specified HTTP URL.

| System property               | Environment variable             | Description                                                                                                           |
| ----------------------------- | -------------------------------- | --------------------------------------------------------------------------------------------------------------------- |
| otel.traces.exporter=zipkin   | OTEL\_TRACES\_EXPORTER=zipkin    | Select the Zipkin exporter                                                                                            |
| otel.exporter.zipkin.endpoint | OTEL\_EXPORTER\_ZIPKIN\_ENDPOINT | The Zipkin endpoint to connect to. Default is `http://localhost:9411/api/v2/spans`. Currently only HTTP is supported. |

#### Prometheus exporter

The [Prometheus](https://github.com/prometheus/docs/blob/master/content/docs/instrumenting/exposition_formats.md) exporter.

| System property                  | Environment variable               | Description                                                                        |
| -------------------------------- | ---------------------------------- | ---------------------------------------------------------------------------------- |
| otel.metrics.exporter=prometheus | OTEL\_METRICS\_EXPORTER=prometheus | Select the Prometheus exporter                                                     |
| otel.exporter.prometheus.port    | OTEL\_EXPORTER\_PROMETHEUS\_PORT   | The local port used to bind the prometheus metric server. Default is `9464`.       |
| otel.exporter.prometheus.host    | OTEL\_EXPORTER\_PROMETHEUS\_HOST   | The local address used to bind the prometheus metric server. Default is `0.0.0.0`. |

{% hint style="success" %}
For more information please check, [the official open telemetry documentation](https://github.com/open-telemetry/opentelemetry-java/blob/main/sdk-extensions/autoconfigure/README.md).
{% endhint %}

Open Telemetry Example

One small example to show how to use open telemetry with docker compose can be found in the following URL:

{% embed url="<https://github.com/AzBuilder/terrakube/tree/main/telemetry-compose>" %}


# Development

To quickly develop Terrakube you can use the following guides:

{% content-ref url="/pages/o4ZzFSUu051lHNGAJVfq" %}
[Broken mention](broken://pages/o4ZzFSUu051lHNGAJVfq)
{% endcontent-ref %}


# Local Dev Container

This page contains the configuration for a development container that provides a consistent environment for working with Terrakube.

The devcontainer includes all the necessary tools and dependencies to develop both the Java backend, TypeScript frontend components and includes terraform CLI.

{% hint style="info" %}
The below was tested using Ubuntu-based distribution and Windows 11 with Firefox browser.
{% endhint %}

### Features

* Java 25 (Liberica)
* Maven 3.9.9
* Node.js 22.x with Yarn
* VS Code extensions for Java, JavaScript/TypeScript

### Getting Started

#### Prerequisites

* [Visual Studio Code](https://code.visualstudio.com/)
* [VS Code Remote - Containers extension](https://marketplace.visualstudio.com/items?itemName=ms-vscode-remote.remote-containers)

**Local Development Domains**

To use the devcontainer we need to setup the following domains in our local computer:

```
terrakube.platform.local
terrakube-api.platform.local
terrakube-registry.platform.local
terrakube-dex.platform.local
```

**HTTPS Local Certificates**

Install [mkcert](https://github.com/FiloSottile/mkcert#installation) to generate the local certificates.

To generate local CA certificate execute the following:

```
mkcert -install
Created a new local CA 💥
The local CA is now installed in the system trust store! ⚡️
The local CA is now installed in the Firefox trust store (requires browser restart)! 🦊
```

**Local DNS entries**

Update the /etc/hosts or C:\Windows\System32\drivers\etc\hosts file adding the following entries:

```
127.0.0.1 terrakube.platform.local
127.0.0.1 terrakube-api.platform.local
127.0.0.1 terrakube-registry.platform.local
127.0.0.1 terrakube-dex.platform.local
```

#### Opening the Project in a Dev Container

* Clone the Terrakube repository and run the project:

  ```
  git clone https://github.com/AzBuilder/terrakube.git
  cd terrakube/.devcontainer
  mkcert -key-file key.pem -cert-file cert.pem platform.local *.platform.local
  CAROOT=$(mkcert -CAROOT)/rootCA.pem
  cp $CAROOT rootCA.pem
  cd ..
  code .
  ```

1. When prompted to "Reopen in Container", click "Reopen in Container". Alternatively, you can:
   * Press F1 or Ctrl+Shift+P
   * Type "Remote-Containers: Reopen in Container" and press Enter
2. Wait for the container to build and start. This may take a few minutes the first time.
3. Start all Terrakube component
4. Terrakube should be availabe with the following url `https://terrakube.platform.local` using `admin@example.com` with password `admin`

### Windows devcontainer

Sometimes in windows the `postCreateCommand` fails because of how windows manage the new lines characters

<figure><img src="/files/od4KE8t02RfcqWiLIGCD" alt=""><figcaption></figcaption></figure>

To fix this it is required to open a terminal in VS Code and run the following:

```bash
sed -i 's/\r$//' ./scripts/setupDevelopmentEnvironment.sh
bash ./scripts/setupDevelopmentEnvironment.sh
```

### Running Terrakube

<figure><img src="/files/W6UwaVsfVbkZiJrWUwBf" alt=""><figcaption></figcaption></figure>

<figure><img src="/files/a0c5nAoyuETTqe8akDgI" alt=""><figcaption></figcaption></figure>

### Ports

The devcontainer forwards the following ports:

* 8080: Terrakube API
* 8075: Terrakube Registry
* 8090: Terrakube Executor
* 3000: Terrakube UI
* 80/443: Traefik Gateway

### Customization

You can customize the devcontainer by modifying:

* `.devcontainer/devcontainer.json`: VS Code settings and extensions
* `.devcontainer/Dockerfile`: Container image configuration


# GitHub Codespaces

This page contains the configuration for a development container using GitHub Codespaces that provides a consistent environment for working with Terrakube.

The devcontainer includes all the necessary tools and dependencies to develop both the Java backend, TypeScript frontend components and includes terraform CLI.

### Features

* Java 25 (Liberica)
* Maven 3.9.9
* Node.js 24.x with Yarn
* VS Code extensions for Java, JavaScript/TypeScript

### Prerequisites

* GitHub Account

### **Prepare project**

The first step is to create a GitHub fork to work with Terrakube

<figure><img src="/files/iGpRFLcly0bEKeeWomRx" alt=""><figcaption></figcaption></figure>

Once you have created a fork you need to create a new branch to work for any new Terrakube feature

<figure><img src="/files/bjruYDSvntKBs7gYKwGj" alt=""><figcaption></figcaption></figure>

Open a new GitHub workspace using "new with options"

<figure><img src="/files/mDLO0xz8QlRh8TQQbVw3" alt=""><figcaption></figcaption></figure>

Select a 4 CPU configuration like the following.

<figure><img src="/files/H6mQZvTx1slVQKy0O3AU" alt=""><figcaption></figcaption></figure>

Dev container setup will take a couple of minutes.

<figure><img src="/files/eG0msHDJ05HGUa9oL4Av" alt=""><figcaption></figcaption></figure>

Once the environment setup is completed, you will see the following message

<figure><img src="/files/ezkKmOAHbl1ggHz7bD8d" alt=""><figcaption></figcaption></figure>

Now we can run the new development environment

<figure><img src="/files/TibfTS6f1CN1WfxWqkeQ" alt=""><figcaption></figcaption></figure>

You need to accept using the Java "Standard Mode".

<figure><img src="/files/jTCwNdzUVqAmanlRY0Yi" alt=""><figcaption></figcaption></figure>

The dev container will download all the maven dependencies, this could take a couple of minutes

<figure><img src="/files/PrZ8Jzbt8m74F9t8mYDL" alt=""><figcaption></figcaption></figure>

Once all dependencies are downloaded, you can see the four component running like the following

<figure><img src="/files/gpbDI0IGCrcNjWML6mtA" alt=""><figcaption></figcaption></figure>

If not you can simply start the ui, api, registry and executor one by one using the following menu

<figure><img src="/files/2SLU0LxF5NxVnvbBcphd" alt=""><figcaption></figcaption></figure>

After we have the components running, we need to change the port configuration, we need to make sure DEX, the api, registry and ui are using public ports.

<figure><img src="/files/nPKuqMWuSIOZXSfpJdP6" alt=""><figcaption></figcaption></figure>

Example:

<figure><img src="/files/kTynfgugU55MZPV1gex2" alt=""><figcaption></figcaption></figure>

In the end it should look like this using public ports:

<figure><img src="/files/BZ7tUkGkZUPKi14noCGv" alt=""><figcaption></figcaption></figure>

The development environment automatically creates "DEVCONTAINER.md" that contains all the URL for each component.

<figure><img src="/files/rKomD4s5PcsBACqpewtS" alt=""><figcaption></figcaption></figure>

You will need to visit the URL for dex, ui, api and registry in order to accept that we need to use a public port for our environment.

<figure><img src="/files/Kb6jWTBc928COzcWgJRD" alt=""><figcaption></figcaption></figure>

You will see a message like this and click "continue"

<figure><img src="/files/M8a9Ft2mr66jhFU0ZEob" alt=""><figcaption></figcaption></figure>

Once you click continue

<figure><img src="/files/kFhHqerek73TlpcsL29j" alt=""><figcaption></figcaption></figure>

You need to do the same for the other components: api, registry, executor and dex

<figure><img src="/files/fAiVnUB1cV2SyGFHODAf" alt=""><figcaption></figcaption></figure>

Now you can go back to the UI and click "Sign in"

<figure><img src="/files/erod5NYQIvDOLKaOOxSH" alt=""><figcaption></figcaption></figure>

This will redirect you to dex where you can use "<admin@example.com>" and "admin" to complete the login.

<figure><img src="/files/UE4u2zycSRtYyUIrF3fF" alt=""><figcaption></figcaption></figure>

Grant DEX access

<figure><img src="/files/wkZVWY0dks85WbIDU4SW" alt=""><figcaption></figcaption></figure>

Now you can start testing the development environment and do any required changes

<figure><img src="/files/7N51sDJ0Wc8rgiB442R6" alt=""><figcaption></figcaption></figure>

If you need to update the code for any java component, you can simply click "Stop"

<figure><img src="/files/MUb7W2zmwGOAg7BJtog5" alt=""><figcaption></figcaption></figure>

Start a new instance

<figure><img src="/files/muNkkfFZLtOggpH8Bj79" alt=""><figcaption></figcaption></figure>

Once all the changes are completed, we pick the files an push the changes to our feature branch

<figure><img src="/files/QpauWNgrYldxYU84eFs9" alt=""><figcaption></figcaption></figure>

You can return to GitHub and create a new pull request to the Terrakube main repository

<figure><img src="/files/mO998wdX0hK3UzYc7ztI" alt=""><figcaption></figcaption></figure>

In the end the pull request will look like this.

<figure><img src="/files/GxerNFq4V3dnPSGDDMsz" alt=""><figcaption></figcaption></figure>

Now you have completed your open source contribution to Terrakube 🙂

Finally you can go to GitHub and delete your codespace.

<figure><img src="/files/DWQS4MjhuQVgMv8MjLco" alt=""><figcaption></figcaption></figure>


# User Management

You can handle Terrakube users with differen authentication providers like the following

{% content-ref url="/pages/NfUu5DOkpWehkzwxIsFf" %}
[Azure Active Directory](/getting-started/user-management/azure-active-directory)
{% endcontent-ref %}

{% content-ref url="/pages/rY8xEOBsIDxwjgg8n5tI" %}
[Google Cloud Identity](/getting-started/user-management/google-cloud-identity)
{% endcontent-ref %}

{% content-ref url="/pages/yPst787sRZbbgcvZVJtD" %}
[Amazon Cognito](/getting-started/user-management/amazon-cognito)
{% endcontent-ref %}

{% content-ref url="/pages/4bFxtb87KOu7PkqQMdwI" %}
[Github](/getting-started/user-management/docker-desktop)
{% endcontent-ref %}

{% content-ref url="/pages/5swvAARvngxDpkYGi1sJ" %}
[Keycloak](/getting-started/user-management/keycloak)
{% endcontent-ref %}


# Azure Active Directory

{% hint style="warning" %}
Azure Authentication with Dex Connecor require Terrakube >= 2.6.0 and Helm Chart >= 2.0.0
{% endhint %}

### Requirements

* Azure Active Directory [here](https://developer.microsoft.com/en-us/microsoft-365/dev-program)
* Azure Storage Account

For this example lets image that you will be using the following domains to deploy Terrakube.

* registry.terrakube.azure.com
* ui.terrakube.azure.com
* api.terrakube.azure.com

### Setup Azure Authentication

You need to complete the Azure authentication setup for Dex. You can found information in this [link](https://dexidp.io/docs/connectors/microsoft/)

You need to go to your Azure and create a new Application

After the application is created you need to add the redirect URL.

<figure><img src="/files/8zJHN5hs4RPsaQObwqC4" alt=""><figcaption></figcaption></figure>

You will also need to add the permission Directory.Read.All and ask a Azure administrator to approve the permission.

<figure><img src="/files/56LDrFzsMJlFWcYgwqIQ" alt=""><figcaption></figcaption></figure>

Now you can create the DEX configuration, you will use this config later when deploying the helm chart.

```
## Dex
dex:
  config:
    issuer: https://api.terrakube.azure.com/dex
    storage:
      type: memory
    oauth2:
      responseTypes: ["code", "token", "id_token"] 
      skipApprovalScreen: true
    web:
      allowedOrigins: ['*']
  
    staticClients:
    - id: microsoft
      redirectURIs:
      - 'https://ui.terrakube.azure.com'
      - 'http://localhost:10001/login'
      - 'http://localhost:10000/login'
      - '/device/callback'
      name: 'microsoft'
      public: true

    connectors:
    - type: microsoft
      id: microsoft
      name: microsoft
      config:
        clientID: "<<CHANGE_THIS>>"
        clientSecret: "<<CHANGE_THIS>>"
        redirectURI: "https://api.terrakube.azure.com/dex/callback"
        tenant: "<<CHANGE_THIS>>"
```

The firt step is to clone the repository.

```
git clone https://github.com/AzBuilder/terrakube-helm-chart.git
```

Replace *<\<CHANGE\_THIS>>* with the real values, create the values.yaml file and run the helm install

```
## Global Name
name: "terrakube"

## Terrakube Security
security:
  adminGroup: "<<CHANGE_THIS>>" # The value should be a valida azure ad group (example: TERRAKUBE_ADMIN)
  patSecret: "<<CHANGE_THIS>>"  # Sample Key 32 characters z6QHX!y@Nep2QDT!53vgH43^PjRXyC3X 
  internalSecret: "<<CHANGE_THIS>>" # Sample Key 32 characters Kb^8cMerPNZV6hS!9!kcD*KuUPUBa^B3 
  dexClientId: "microsoft"
  dexClientScope: "email openid profile offline_access groups"
  
## Terraform Storage
storage:
  azure:
    storageAccountName: "XXXXXXX" # <<CHANGE_THIS>>
    storageAccountResourceGroup: "XXXXXXX" # <<CHANGE_THIS>>
    storageAccountAccessKey: "XXXXXXX" # <<CHANGE_THIS>>

## Dex
dex:
  config:
    issuer: https://api.terrakube.azure.com/dex
    storage:
      type: memory
    oauth2:
      responseTypes: ["code", "token", "id_token"] 
      skipApprovalScreen: true
    web:
      allowedOrigins: ['*']
  
    staticClients:
    - id: microsoft
      redirectURIs:
      - 'https://ui.terrakube.azure.com'
      - 'http://localhost:10001/login'
      - 'http://localhost:10000/login'
      - '/device/callback'
      name: 'microsoft'
      public: true

    connectors:
    - type: microsoft
      id: microsoft
      name: microsoft
      config:
        clientID: "<<CHANGE_THIS>>"
        clientSecret: "<<CHANGE_THIS>>"
        redirectURI: "https://api.terrakube.azure.com/dex/callback"
        tenant: "<<CHANGE_THIS>>"

## API properties
api:
  enabled: true
  replicaCount: "1"
  serviceType: "ClusterIP"
  properties:
    databaseType: "H2"

## Executor properties
executor:
  enabled: true  
  replicaCount: "1"
  serviceType: "ClusterIP"
  properties:
    toolsRepository: "https://github.com/AzBuilder/terrakube-extensions"
    toolsBranch: "main"

## Registry properties
registry:
  enabled: true
  replicaCount: "1"
  serviceType: "ClusterIP"

## UI Properties
ui:
  enabled: true
  replicaCount: "1"
  serviceType: "ClusterIP"

## Ingress properties
ingress:
  useTls: true
  ui:
    enabled: true
    domain: "ui.terrakube.azure.com"
    path: "/(.*)"
    pathType: "Prefix" 
    annotations:
      kubernetes.io/ingress.class: nginx
      nginx.ingress.kubernetes.io/use-regex: "true"
      cert-manager.io/cluster-issuer: letsencrypt
  api:
    enabled: true
    domain: "api.terrakube.azure.com"
    path: "/(.*)"
    pathType: "Prefix"
    annotations:
      kubernetes.io/ingress.class: nginx
      nginx.ingress.kubernetes.io/use-regex: "true"
      nginx.ingress.kubernetes.io/configuration-snippet: "proxy_set_header Authorization $http_authorization;"
      cert-manager.io/cluster-issuer: letsencrypt
  registry:
    enabled: true
    domain: "registry.terrakube.azure.com"
    path: "/(.*)"
    pathType: "Prefix"
    annotations:
      kubernetes.io/ingress.class: nginx
      nginx.ingress.kubernetes.io/use-regex: "true"
      nginx.ingress.kubernetes.io/configuration-snippet: "proxy_set_header Authorization $http_authorization;"
      cert-manager.io/cluster-issuer: letsencrypt
  dex:
    enabled: true
    path: "/dex/(.*)"
    pathType: "Prefix"
    annotations:
      kubernetes.io/ingress.class: nginx
      nginx.ingress.kubernetes.io/use-regex: "true"
      nginx.ingress.kubernetes.io/configuration-snippet: "proxy_set_header Authorization $http_authorization;"
      cert-manager.io/cluster-issuer: letsencrypt

```

Run the installation

```bash
helm install --debug --values ./values.yaml terrakube ./terrakube-helm-chart/ -n terrakube
```

{% hint style="warning" %}
For any question or feedback please open an issue in our [helm chart repository](https://github.com/AzBuilder/terrakube-helm-chart)
{% endhint %}


# Google Cloud Identity

{% hint style="warning" %}
Google Identity Authentication with Dex connector require Terrakube >= 2.6.0 and Helm Chart >= 2.0.0
{% endhint %}

### Requirements

* Google Cloud Identity [here](https://cloud.google.com/identity/docs/set-up-cloud-identity-admin#sign-up-for-cloud-identity-free)
* Gooble Storage Bucket

For this example lets image that you will be using the following domains to deploy Terrakube.

* registry.terrakube.gcp.com
* ui.terrakube.gcp.com
* api.terrakube.gcp.com

### Setup Google Authentication

You need to complete the Google authentication setup for Dex. You can found information in this [link](https://dexidp.io/docs/connectors/google/)

You need to go to your GCP projet and create a new OAuth Application you can follow this steps: firts select "APIs & Services => Credentials"

<figure><img src="/files/MSPRFCk36vttDzFdVWl2" alt=""><figcaption></figcaption></figure>

Once inside the "Credentials" page, you will have to create a new OAuth Client

<figure><img src="/files/ftfUwgBpDV74CcP5EsCG" alt=""><figcaption></figcaption></figure>

The OAuth application should look like this with the redirect URL "[https://api.terrakube.gcp.com/dex/callback](https://api.terrakube.docker.com/dex/callback)"

<figure><img src="/files/cO4W8OdMFEpLItJFA5mb" alt=""><figcaption></figcaption></figure>

For Google authentication we need to get the GCP groups so you need to complete [this setup](https://dexidp.io/docs/connectors/google/#fetching-groups-from-google).

Include the Domain Wide Delegation inside the admin consol <https://admin.google.com/> for the OAuth application

<figure><img src="/files/ByJZEC5V8hJNaxZIHqkR" alt=""><figcaption></figcaption></figure>

Using the following permission "<https://www.googleapis.com/auth/admin.directory.group.readonly>"

<figure><img src="/files/pVefCYjdqgrZAPHMCdcg" alt=""><figcaption></figcaption></figure>

You can now generate the JSON credentials file for your application, you will use this file later in the helm chart.

<figure><img src="/files/Ef4QbfX8hB3kYs2Ww6mf" alt=""><figcaption></figcaption></figure>

Now you can create the DEX configuration, you will use this config later when deploying the helm chart.

```
## Dex
dex:
  enabled: true
  config:
    issuer: https://api.terrakube.gcp.com/dex #<<CHANGE_THIS>>
    storage:
      type: memory
    oauth2:
      responseTypes: ["code", "token", "id_token"]
    web:
      allowedOrigins: ["*"]

    staticClients:
    - id: google
      redirectURIs:
      - 'https://ui.terrakube.gcp.com' #<<CHANGE_THIS>>
      - 'http://localhost:3000'
      - 'http://localhost:10001/login'
      - 'http://localhost:10000/login'
      - '/device/callback'
      name: 'google'
      public: true

    connectors:
    - type: google
      id: google
      name: google
      config:
        clientID: "<<CHANGE_THIS>>"
        clientSecret: "<<CHANGE_THIS>>"
        redirectURI: "https://api.terrakube.gcp.com/dex/callback"
        serviceAccountFilePath: "/etc/gcp/secret/gcp-credentials" # GCP CREDENTIAL FILE WILL BE IN THIS PATH
        adminEmail: "<<CHANGE_THIS>>"
```

The firt step is to clone the repository.

```
git clone https://github.com/AzBuilder/terrakube-helm-chart.git
```

Replace *<\<CHANGE\_THIS>>* with the real values, create the values.yaml file and run the helm install

```
## Global Name
name: "terrakube"

## Terrakube Security
security:
  adminGroup: "<<CHANGE_THIS>>" # The value should be a gcp group (format: group_name@yourdomain.com example: terrakube_admin@terrakube.io)
  patSecret: "<<CHANGE_THIS>>"  # Sample Key 32 characters z6QHX!y@Nep2QDT!53vgH43^PjRXyC3X 
  internalSecret: "<<CHANGE_THIS>>" # Sample Key 32 characters Kb^8cMerPNZV6hS!9!kcD*KuUPUBa^B3 
  dexClientId: "google"
  dexClientScope: "email openid profile offline_access groups"
  gcpCredentials: |
    ## GCP JSON CREDENTIALS for service account with API Scope https://www.googleapis.com/auth/admin.directory.group.readonly
    {
      "type": "service_account",
      "project_id": "",
      "private_key_id": "",
      "private_key": "",
      "client_email": "",
      "client_id": "",
      "auth_uri": "",
      "token_uri": "",
      "auth_provider_x509_cert_url": "",
      "client_x509_cert_url": ""
    } 


## Terraform Storage
storage:
  gcp:
    projectId: "<<CHANGE_THIS>>"
    bucketName: "<<CHANGE_THIS>>"
    credentials: |
      ## GCP JSON CREDENTIALS for service account with access to write to the storage bucket
      {
        "type": "service_account",
        "project_id": "",
        "private_key_id": "",
        "private_key": "",
        "client_email": "",
        "client_id": "",
        "auth_uri": "",
        "token_uri": "",
        "auth_provider_x509_cert_url": "",
        "client_x509_cert_url": ""
      } 

## Dex
dex:
  enabled: true
  config:
    issuer: https://api.terrakube.gcp.com/dex #<<CHANGE_THIS>>
    storage:
      type: memory
    oauth2:
      responseTypes: ["code", "token", "id_token"]
    web:
      allowedOrigins: ["*"]

    staticClients:
    - id: google
      redirectURIs:
      - 'https://ui.terrakube.gcp.com' #<<CHANGE_THIS>>
      - 'http://localhost:3000'
      - 'http://localhost:10001/login'
      - 'http://localhost:10000/login'
      - '/device/callback'
      name: 'google'
      public: true

    connectors:
    - type: google
      id: google
      name: google
      config:
        clientID: "<<CHANGE_THIS>>"
        clientSecret: "<<CHANGE_THIS>>"
        redirectURI: "https://api.terrakube.gcp.com/dex/callback"
        serviceAccountFilePath: "/etc/gcp/secret/gcp-credentials" # GCP CREDENTIAL FILE WILL BE IN THIS PATH
        adminEmail: "<<CHANGE_THIS>>" 

## API properties
api:
  enabled: true
  replicaCount: "1"
  serviceType: "ClusterIP"
  properties:
    databaseType: "H2"

## Executor properties
executor:
  enabled: true  
  replicaCount: "1"
  serviceType: "ClusterIP"
  properties:
    toolsRepository: "https://github.com/AzBuilder/terrakube-extensions"
    toolsBranch: "main"

## Registry properties
registry:
  enabled: true
  replicaCount: "1"
  serviceType: "ClusterIP"

## UI Properties
ui:
  enabled: true
  replicaCount: "1"
  serviceType: "ClusterIP"

## Ingress properties
ingress:
  useTls: true
  ui:
    enabled: true
    domain: "terrakube-ui.yourdomain.com"
    path: "/(.*)"
    pathType: "Prefix" 
    annotations:
      kubernetes.io/ingress.class: nginx
      nginx.ingress.kubernetes.io/use-regex: "true"
      cert-manager.io/cluster-issuer: letsencrypt
  api:
    enabled: true
    domain: "terrakube-api.yourdomain.com"
    path: "/(.*)"
    pathType: "Prefix"
    annotations:
      kubernetes.io/ingress.class: nginx
      nginx.ingress.kubernetes.io/use-regex: "true"
      nginx.ingress.kubernetes.io/configuration-snippet: "proxy_set_header Authorization $http_authorization;"
      cert-manager.io/cluster-issuer: letsencrypt
  registry:
    enabled: true
    domain: "terrakube-reg.yourdomain.com"
    path: "/(.*)"
    pathType: "Prefix"
    annotations:
      kubernetes.io/ingress.class: nginx
      nginx.ingress.kubernetes.io/use-regex: "true"
      nginx.ingress.kubernetes.io/configuration-snippet: "proxy_set_header Authorization $http_authorization;"
      cert-manager.io/cluster-issuer: letsencrypt
  dex:
    enabled: true
    path: "/dex/(.*)"
    pathType: "Prefix"
    annotations:
      kubernetes.io/ingress.class: nginx
      nginx.ingress.kubernetes.io/use-regex: "true"
      nginx.ingress.kubernetes.io/configuration-snippet: "proxy_set_header Authorization $http_authorization;"
      cert-manager.io/cluster-issuer: letsencrypt
```

Run the installation

```bash
helm install --debug --values ./values.yaml terrakube ./terrakube-helm-chart/ -n terrakube
```

{% hint style="warning" %}
For any question or feedback please open an issue in our [helm chart repository](https://github.com/AzBuilder/terrakube-helm-chart)
{% endhint %}


# Amazon Cognito

{% hint style="warning" %}
AWS Cognito Authentication with Dex Connecor require Terrakube >= 2.6.0 and Helm Chart >= 2.0.0
{% endhint %}

### Requirements

* AWS Cognito
* AWS S3 Bucket

For this example lets image that you will be using the following domains to deploy Terrakube.

* registry.terrakube.aws.com
* ui.terrakube.aws.com
* api.terrakube.aws.com

### Setup AWS Cognito Authentication

You need to complete the AWS Cognito authentication setup for Dex using the OIDC connector. You can found information in this [link](https://dexidp.io/docs/connectors/oidc/)

You need to create a new Cognito user pool

<figure><img src="/files/3y2HAtVb4ZF8yPEenhdA" alt=""><figcaption></figcaption></figure>

You can keep the default values

<figure><img src="/files/ZH8KHXg4GCxS0oooWnMj" alt=""><figcaption></figcaption></figure>

Add the domain name to cognito

<figure><img src="/files/8ECjX6tgxGLJDuz5GAN3" alt=""><figcaption></figcaption></figure>

Once the user pool is created you will need to create a new application.

<figure><img src="/files/IzZxg0ivr5Je8cE15dfm" alt=""><figcaption></figcaption></figure>

Update the application configuration and update the redirect URL configuration.

<figure><img src="/files/ewtqj1DA4tELATWf2SFZ" alt=""><figcaption></figcaption></figure>

Now you can create the DEX configuration, you will use this config later when deploying the helm chart.

```
## Dex
dex:
  config:
    issuer: https://terrakube-api.yourdomain.com/dex #<<CHANGE_THIS>>
    storage:
      type: memory
    oauth2:
      responseTypes: ["code", "token", "id_token"]
      skipApprovalScreen: true
    web:
      allowedOrigins: ["*"]

    staticClients:
    - id: cognito
      redirectURIs:
      - 'https://ui.yourdomain.com' #<<CHANGE_THIS>>
      - 'http://localhost:3000'
      - 'http://localhost:10001/login'
      - 'http://localhost:10000/login'
      - '/device/callback'
      name: 'cognito'
      public: true

    connectors:
    - type: oidc
      id: cognito
      name: cognito
      config:
        issuer: "https://cognito-idp.XXXXX.amazonaws.com/XXXXXXX" #<<CHANGE_THIS>>
        clientID: "XXXX" #<<CHANGE_THIS>>
        clientSecret: "XXXXX" #<<CHANGE_THIS>>
        redirectURI: "https://terrakube-api.yourdomain.com/dex/callback" #<<CHANGE_THIS>>
        scopes:
          - openid
          - email
          - profile
        insecureSkipEmailVerified: true
        insecureEnableGroups: true
        userNameKey: "cognito:username"
        claimMapping:
          groups: "cognito:groups"
```

The firt step is to clone the repository.

```
git clone https://github.com/AzBuilder/terrakube-helm-chart.git
```

Replace *<\<CHANGE\_THIS>>* with the real values, create the values.yaml file and run the helm install

```
## Global Name
name: "terrakube"

## Terrakube Security
security:
  adminGroup: "<<CHANGE_THIS>>" # The value should be a valida azure ad group (example: TERRAKUBE_ADMIN)
  patSecret: "<<CHANGE_THIS>>"  # Sample Key 32 characters z6QHX!y@Nep2QDT!53vgH43^PjRXyC3X 
  internalSecret: "<<CHANGE_THIS>>" # Sample Key 32 characters Kb^8cMerPNZV6hS!9!kcD*KuUPUBa^B3 
  dexClientId: "cognito"
  dexClientScope: "email openid profile offline_access groups"
  
## Terraform Storage
storage:
  aws:
    accessKey: "XXXXX" #<<CHANGE_THIS>>
    secretKey: "XXXXX" #<<CHANGE_THIS>>
    bucketName: "XXXXX" #<<CHANGE_THIS>>
    region: "XXXXX" #<<CHANGE_THIS>>

## Dex
dex:
  config:
    issuer: https://terrakube-api.yourdomain.com/dex #<<CHANGE_THIS>>
    storage:
      type: memory
    oauth2:
      responseTypes: ["code", "token", "id_token"]
      skipApprovalScreen: true
    web:
      allowedOrigins: ["*"]

    staticClients:
    - id: cognito
      redirectURIs:
      - 'https://ui.yourdomain.com' #<<CHANGE_THIS>>
      - 'http://localhost:3000'
      - 'http://localhost:10001/login'
      - 'http://localhost:10000/login'
      - '/device/callback'
      name: 'cognito'
      public: true

    connectors:
    - type: oidc
      id: cognito
      name: cognito
      config:
        issuer: "https://cognito-idp.XXXXX.amazonaws.com/XXXXXXX" #<<CHANGE_THIS>>
        clientID: "XXXX" #<<CHANGE_THIS>>
        clientSecret: "XXXXX" #<<CHANGE_THIS>>
        redirectURI: "https://terrakube-api.yourdomain.com/dex/callback" #<<CHANGE_THIS>>
        scopes:
          - openid
          - email
          - profile
        insecureSkipEmailVerified: true
        insecureEnableGroups: true
        userNameKey: "cognito:username"
        claimMapping:
          groups: "cognito:groups"

## API properties
api:
  enabled: true
  replicaCount: "1"
  serviceType: "ClusterIP"
  properties:
    databaseType: "H2"

## Executor properties
executor:
  enabled: true 
  replicaCount: "1"
  serviceType: "ClusterIP"
  properties:
    toolsRepository: "https://github.com/AzBuilder/terrakube-extensions"
    toolsBranch: "main"

## Registry properties
registry:
  enabled: true
  replicaCount: "1"
  serviceType: "ClusterIP"

## UI Properties
ui:
  enabled: true
  replicaCount: "1"
  serviceType: "ClusterIP"

## Ingress properties
ingress:
  useTls: true
  ui:
    enabled: true
    domain: "ui.terrakube.azure.com"
    path: "/(.*)"
    pathType: "Prefix" 
    annotations:
      kubernetes.io/ingress.class: nginx
      nginx.ingress.kubernetes.io/use-regex: "true"
      cert-manager.io/cluster-issuer: letsencrypt
  api:
    enabled: true
    domain: "api.terrakube.azure.com"
    path: "/(.*)"
    pathType: "Prefix"
    annotations:
      kubernetes.io/ingress.class: nginx
      nginx.ingress.kubernetes.io/use-regex: "true"
      nginx.ingress.kubernetes.io/configuration-snippet: "proxy_set_header Authorization $http_authorization;"
      cert-manager.io/cluster-issuer: letsencrypt
  registry:
    enabled: true
    domain: "registry.terrakube.azure.com"
    path: "/(.*)"
    pathType: "Prefix"
    annotations:
      kubernetes.io/ingress.class: nginx
      nginx.ingress.kubernetes.io/use-regex: "true"
      nginx.ingress.kubernetes.io/configuration-snippet: "proxy_set_header Authorization $http_authorization;"
      cert-manager.io/cluster-issuer: letsencrypt
  dex:
    enabled: true
    path: "/dex/(.*)"
    pathType: "Prefix"
    annotations:
      kubernetes.io/ingress.class: nginx
      nginx.ingress.kubernetes.io/use-regex: "true"
      nginx.ingress.kubernetes.io/configuration-snippet: "proxy_set_header Authorization $http_authorization;"
      cert-manager.io/cluster-issuer: letsencrypt

```

Run the installation

```bash
helm install --debug --values ./values.yaml terrakube ./terrakube-helm-chart/ -n terrakube
```

{% hint style="warning" %}
For any question or feedback please open an issue in our [helm chart repository](https://github.com/AzBuilder/terrakube-helm-chart)
{% endhint %}


# Github

### Requirements <a href="#requirements" id="requirements"></a>

To run Terrakube in Docker Desktop you wil need the following:

* Create Github [Organization](https://docs.github.com/en/organizations/collaborating-with-groups-in-organizations/creating-a-new-organization-from-scratch)
* Create Github [Teams](https://docs.github.com/en/github-ae@latest/admin/user-management/managing-organizations-in-your-enterprise/creating-teams) and add some [members](https://docs.github.com/en/github-ae@latest/admin/user-management/managing-organizations-in-your-enterprise/adding-people-to-teams)
* Create a team called TERRAKUBE\_ADMIN and add the members
* Install [Docker Desktop](https://www.docker.com/products/docker-desktop/)
* Nginx Ingress for [Docker Desktop](https://kubernetes.github.io/ingress-nginx/deploy/#docker-desktop)
* Azure Storage Account/AWS S3 Bucket/GCP Storage Bucket

> To get more information about the Dex Configuration for Github you can check this [link](https://dexidp.io/docs/connectors/github/)

### Setup <a href="#setup" id="setup"></a>

* Create a new Github Oauth application with the authorization callback URL "<http://host.docker.internal/dex/callback>" in this [link](https://github.com/settings/developers)
* Copy the values for Client Id and Client Secret
* Update the HOSTS file adding the following

```
# Linux Path /etc/hosts
# Windows Path c:\Windows\System32\Drivers\etc\hosts


127.0.0.1 ui.terrakube.docker.com
127.0.0.1 registry.terrakube.docker.com
```

### YAML Example <a href="#yaml-example" id="yaml-example"></a>

Replace ***<\<CHANGE\_THIS>>*** with the real values, create the values.yaml file and run the helm install

```
## Global Name
name: "terrakube"

## Terrakube Security
security:
  adminGroup: "<<CHANGE_THIS>>" # This should be your Github team the format is OrganizationName:TeamName (Example: MyOrg:TERRAKUBE_ADMIN)
  patSecret: "<<CHANGE_THIS>>"  # Sample Key 32 characters z6QHX!y@Nep2QDT!53vgH43^PjRXyC3X 
  internalSecret: "<<CHANGE_THIS>>" # Sample Key 32 characters Kb^8cMerPNZV6hS!9!kcD*KuUPUBa^B3 
  dexClientId: "github"
  dexClientScope: "email openid profile offline_access groups"
  dexIssuerUri: "http://host.docker.internal/dex" # Change for your real domain

## Terraform Storage
storage:
  # SELECT THE TYPE OF STORAGE THAT YOU WANT TO USE AND REPLACE THE VALUES
  
  #azure:
  #  storageAccountName: "<<CHANGE_THIS>>"
  #  storageAccountResourceGroup: "<<CHANGE_THIS>>"
  #  storageAccountAccessKey: "<<CHANGE_THIS>>"
  #aws:
  #  accessKey: "<<CHANGE_THIS>>"
  #  secretKey: "<<CHANGE_THIS>>"
  #  bucketName: "<<CHANGE_THIS>>"
  #  region: "<<CHANGE_THIS>>"
  #gcp:
  #  projectId: "<<CHANGE_THIS>>"
  #  bucketName: "<<CHANGE_THIS>>"
  #  credentials: |
  #    ## GCP JSON CREDENTIALS for service account with access to read/write to the storage bucket
  #    {
  #      "type": "service_account",
  #      "project_id": "",
  #      "private_key_id": "",
  #      "private_key": "",
  #      "client_email": "",
  #      "client_id": "",
  #      "auth_uri": "",
  #      "token_uri": "",
  #      "auth_provider_x509_cert_url": "",
  #      "client_x509_cert_url": ""
  #    } 

## Dex
dex:
  enabled: true
  version: "v2.32.0"
  replicaCount: "1"
  serviceType: "ClusterIP"
  resources:
    limits:
      cpu: 512m
      memory: 256Mi
    requests:
      cpu: 256m
      memory: 128Mi
  properties:
    config:
      issuer: http://host.docker.internal/dex
      storage:
        type: memory
      oauth2:
        responseTypes: ["code", "token", "id_token"] 
        skipApprovalScreen: true
      web:
        allowedOrigins: ["*"]
  
      staticClients:
      - id: github
        redirectURIs:
        - 'http://ui.terrakube.docker.com'
        - 'http://localhost:10001/login'
        - 'http://localhost:10000/login'
        - '/device/callback'
        name: 'github'
        public: true

      connectors:
      - type: github
        id: github
        name: gitHub
        config:
          clientID: "<<CHANGE_THIS>>" 
          clientSecret: "<<CHANGE_THIS>>"
          redirectURI: "http://host.docker.internal/dex/callback"
          loadAllGroups: true

## API properties
api:
  enabled: true
  version: "2.6.0"
  replicaCount: "1"
  serviceType: "ClusterIP"
  properties:
    databaseType: "H2"

## Executor properties
executor:
  enabled: true
  version: "2.6.0"  
  replicaCount: "1"
  serviceType: "ClusterIP"
  properties:
    toolsRepository: "https://github.com/AzBuilder/terrakube-extensions"
    toolsBranch: "main"

## Registry properties
registry:
  enabled: true
  version: "2.6.0"
  replicaCount: "1"
  serviceType: "ClusterIP"

## UI Properties
ui:
  enabled: true
  version: "2.6.0"
  replicaCount: "1"
  serviceType: "ClusterIP"

## Ingress properties
ingress:
  useTls: false
  ui:
    enabled: true
    domain: "ui.terrakube.docker.com"
    path: "/(.*)"
    pathType: "Prefix" 
    annotations:
      kubernetes.io/ingress.class: nginx
      nginx.ingress.kubernetes.io/use-regex: "true"
      cert-manager.io/cluster-issuer: letsencrypt
  api:
    enabled: true
    domain: "host.docker.internal"
    path: "/(.*)"
    pathType: "Prefix"
    annotations:
      kubernetes.io/ingress.class: nginx
      nginx.ingress.kubernetes.io/use-regex: "true"
      nginx.ingress.kubernetes.io/configuration-snippet: "proxy_set_header Authorization $http_authorization;"
  registry:
    enabled: true
    domain: "registry.terrakube.docker.com"
    path: "/(.*)"
    pathType: "Prefix"
    annotations:
      kubernetes.io/ingress.class: nginx
      nginx.ingress.kubernetes.io/use-regex: "true"
      nginx.ingress.kubernetes.io/configuration-snippet: "proxy_set_header Authorization $http_authorization;"
  dex:
    enabled: true
    path: "/dex/(.*)"
    pathType: "Prefix"
    annotations:
      kubernetes.io/ingress.class: nginx
      nginx.ingress.kubernetes.io/use-regex: "true"
      nginx.ingress.kubernetes.io/configuration-snippet: "proxy_set_header Authorization $http_authorization;"
```

Run the installation

```bash
helm install --debug --values ./values.yaml terrakube ./terrakube-helm-chart/ -n terrakube
```

{% hint style="warning" %}
For any question please open an issue in our [helm chart repository](https://github.com/AzBuilder/terrakube-helm-chart)
{% endhint %}


# Keycloak

#### Requirements

* A working Keycloak server with a configured realm.

#### Steps for configuring Terrakube with Keycloak

For configuring Terrakube with Keycloak using Dex the following steps are involved:

* Keycloak client creation and configuration for Terrakube.
* Configure Terrakube so it works with Keycloak.
* Testing the configuration.

#### Keycloak client creation

Log in to Keycloak with admin credentials and select `Configure > Clients > Create`. Define the ID as `TerrakubeClient` and select `openid-connect` as its protocol. For `Root URL` use Terrakube's GUI URL. Then click `Save`.

<figure><img src="https://github.com/AzBuilder/docs/raw/main/.gitbook/assets/integration_with_keycloak/keycloak_terrakube_client_1.png" alt=""><figcaption></figcaption></figure>

A form for finishing the Terrakube client configuration will be displayed. These are the fields that must be fulfilled:

* **Name:** in this example it has the value of `TerrakubeClient`.
* **Client Protocol:** it must be set to `openid-connect`.
* **Access Type:** set it to `confidential`.
* **Root URL:** Terrakube's UI URL.
* **Valid Redirect URIs:** set it to `*`

Then click `Save`.

<figure><img src="https://github.com/AzBuilder/docs/raw/main/.gitbook/assets/integration_with_keycloak/keycloak_terrakube_client_2.png" alt=""><figcaption></figcaption></figure>

Notice that, since we set `Access Type` to `confidential`, we have an extra tab titled `Credentials`. Click the `Credentials` tab and copy the **Secret** value. It will be used later when we configure the Terrakube's connector.

<figure><img src="https://github.com/AzBuilder/docs/raw/main/.gitbook/assets/integration_with_keycloak/keycloak_terrakube_client_3.png" alt=""><figcaption></figcaption></figure>

Depending on your configuration, Terrakube might expect different client scopes, such as `openid`, `profile`, `email`, `groups`, etc. You can see if they are assigned to `TerrakubeClient` by clicking on the `Client Scopes` tab (in `TerrakubeClient`).

If they are not assigned, you can assign them by selecting the scopes and clicking on the `Add selected` button.

<figure><img src="https://github.com/AzBuilder/docs/raw/main/.gitbook/assets/integration_with_keycloak/keycloak_terrakube_client_4.png" alt=""><figcaption></figcaption></figure>

If some scope does not exist, you must create it before assigning it to the client. You do this by clicking on `Client Scopes`, then click on the `Create` button. This will lead you to a form where you can create the new scope. Then, you can assign it to the client.

<figure><img src="https://github.com/AzBuilder/docs/raw/main/.gitbook/assets/integration_with_keycloak/keycloak_terrakube_client_5.png" alt=""><figcaption></figcaption></figure>

#### Terrakube configuration

We have to configure a Dex connector to use with Keycloak. Add a new connector in Dex's configuration, so it looks like this:

```
      connectors: 
        - type: oidc
          id: TerrakubeClient
          name: TerrakubeClient
          config:
            issuer: "[http|https]://<KEYCLOAK_SERVER>/realms/<MY_REALM>"
            clientID: "TerrakubeClient"
            clientSecret: "<TerrakubeClient's secret>"
            redirectURI: "[http|https]://<TERRAKUBE-API URL>/dex/callback"
            insecureEnableGroups: true
```

This is the simpler configuration that we can use. Let's see some notes about this fields:

* **type:** must be `oidc` (OpenID Connect).
* **name:** this is the string shown in the connectors list in Terrakube GUI.
* **issuer:** it refers to the Keycloak server. It has the form `[http|https]://<KEYCLOAK_SERVER>/realms/<REALM_NAME>`
* **clientID:** refers to the Client ID configured in Keycloak. They must match.
* **clientSecret:** must be the secret in the Credentials tab in Keycloak..
* **redirectURI:** has the form `[http|https]://<TERRAKUBE_API>/dex/callback`. Notice this is the **Terrakube API** URL and not the UI URL.
* **insecureEnableGroups:** this is required to enable groups claims. This way groups defined in Keycloak are brought by Terrakube's Dex connector.

{% hint style="info" %} If your users do not have a name set (`First Name` field in Keycloak), you must tell oidc which attribute to use as the user's name. You can do this giving the `userNameKey`:

```
config:
  .....
  userNameKey: email
```

{% endhint %}

#### Testing Terrakube authentication

When we click on Terrakube's login button we are given the choice to select the connector we want to use:

<figure><img src="https://github.com/AzBuilder/docs/raw/main/.gitbook/assets/integration_with_keycloak/keycloak_terrakube_login_1.png" alt=""><figcaption></figcaption></figure>

Click on `Log in with TerrakubeClient`. You will be redirected to a login form in Keycloak:

<figure><img src="https://github.com/AzBuilder/docs/raw/main/.gitbook/assets/integration_with_keycloak/keycloak_terrakube_login_2.png" alt=""><figcaption></figcaption></figure>

After login, you are redirected back to Terrakube and a dialog asking you to grant access is shown

<figure><img src="/files/s0u0FeShPhGutnjuLI9t" alt=""><figcaption></figcaption></figure>

Click on `Grant Access`. That is the last step. If everything went right, now you should be logged in Terrakube.

Dex can be further configured by setting `dex.config.web.skipApprovalScreen` to avoid granting access everytime. It is also recommended to switch to a `database` mode instead of `memory` to avoid forcing all users to re-authenticate each time dex pod crashes. Switching to `database` mode will also allow you to run several dex pods for better availability.


# Organizations

Organizations are privately shared spaces for teams to collaborate on infrastructure. Basically are logical containers that you can use to define your company hierarchy to organize the workspaces, modules in the private registry and assign fine grained permissions to your teams.

In this section:

{% content-ref url="/pages/hPXiV9XmjfIhfxRON3FT" %}
[Creating an Organization](/user-guide/organizations/organizations)
{% endcontent-ref %}

{% content-ref url="/pages/0RGV9vSajEgKzH0FE3BP" %}
[Global Variables](/user-guide/organizations/global-variables)
{% endcontent-ref %}

{% content-ref url="/pages/RLzhhKy2NTQP4LrmJJp4" %}
[Team Management](/user-guide/organizations/team-management)
{% endcontent-ref %}

{% content-ref url="/pages/9mPSXJKhCzOUnEKZL7TF" %}
[API Tokens](/user-guide/organizations/api-tokens)
{% endcontent-ref %}

{% content-ref url="/pages/OXCISnyLTh1bZ6VjZOG9" %}
[Templates](/user-guide/organizations/templates)
{% endcontent-ref %}

{% content-ref url="/pages/bgnsg7xS7V1IbXXSngpk" %}
[Tags](/user-guide/organizations/tags)
{% endcontent-ref %}


# Creating an Organization

{% hint style="info" %}
Only users that belongs to Terrakube administrator group can create organizations. This group is defined in the terrakube settings during deployment, for more details see [Security](/getting-started/security#administrator-group)
{% endhint %}

Click the organizations list on the main menu and then click the **Create new organization** button

![](/files/fxRwnmyTZowlMhEyOPtk)

Provide organization name and description and click the Create organization button

![](/files/gkcK6S27yo8XrlMsJ1gp)

Then you will redirected to the Organization Settings page where you can define your teams, this is step is important so you can assign the permissions to users, otherwise you won't be able to create workspaces and modules inside the organization.

<figure><img src="/files/QFDPuWiqGTl0Qja21l0d" alt=""><figcaption></figcaption></figure>

{% hint style="info" %}
In order to start using your organization you must add at least one team. Terrakube will create some [default templates](/user-guide/organizations/templates/default-templates) but you can add more based on your needs. See [Creating a Team](/user-guide/organizations/team-management#creating-a-team) and [Templates](/user-guide/organizations/templates#creating-a-template) for further information.
{% endhint %}


# Global Variables

Global Variables allow you to define and apply variables one time across all workspaces within an organization. For example, you could define a global variable of provider credentials and automatically apply it to all workspaces.

{% hint style="warning" %}
Workspace variables have priority over global variables if the same name is used.
{% endhint %}

### Creating a Global Variable

{% hint style="info" %}
Only users that belongs to Terrakube administrator group can create global variables. This group is defined in the terrakube settings during deployment, for more details see [Security](/getting-started/security#administrator-group)
{% endhint %}

Once you are in the desired organization, click the **Settings** button, then in the left menu select the **Global Variables** option and click the **Add global variable** button

<figure><img src="/files/GWiFElCOlNwDWt6xxZno" alt=""><figcaption></figcaption></figure>

In the popup, provide the required values. Use the below table as reference:

| Field       | Description                                                                                                                               |
| ----------- | ----------------------------------------------------------------------------------------------------------------------------------------- |
| Key         | Unique variable name                                                                                                                      |
| Value       | Key value                                                                                                                                 |
| Category    | Category could be Terraform Variable or Environment Variable                                                                              |
| Description | Free text to document the reason for this global variable                                                                                 |
| HCL         | Parse this field as HashiCorp Configuration Language (HCL). This allows you to interpolate values at runtime.                             |
| Sensitive   | Sensitive variables are never shown in the UI or API. They may appear in Terraform logs if your configuration is designed to output them. |

Finally click the **Save global variable** button and the variable will be created

<figure><img src="/files/XTOZiN4rI3xikGRqK5QX" alt=""><figcaption></figcaption></figure>

You will see the new global variable in the list. And now the variable will be injected in all the workspaces within the organization

<figure><img src="/files/JQVDz4m3cG2qX1esSeKy" alt=""><figcaption></figcaption></figure>

### Edit a Global Variable

Click the **Edit** button next to the global variable you want to edit.

<figure><img src="/files/0LqRDB2KwYsCR1ZYQ0nP" alt=""><figcaption></figcaption></figure>

Change the fields you need and click the **Save global variable** button

{% hint style="warning" %}
For security, you can't change the **Sensitive** field. So if you want to change one global variable to sensitive you must delete the existing variable and create a new one
{% endhint %}

<figure><img src="/files/ccunE3kIjMhEyWqXuMrj" alt=""><figcaption></figcaption></figure>

### Delete a Global Variable

Click the **Delete** button next to the global variable you want to delete, and then click the Yes button to confirm the deletion. Please take in consideration the deletion is irreversible

<figure><img src="/files/0JlCANofXqrF8A3qPvV0" alt=""><figcaption></figcaption></figure>


# Team Management

In Terrakube you can define user permissions inside your organization using teams.

### Creating a Team

Once you are in the desired organization, click the **Settings** button and then in the left menu select the **Teams** option.

<figure><img src="/files/HdYqrwoKNgbxlHGkcz9K" alt=""><figcaption></figcaption></figure>

Click the **Create team** button

<figure><img src="/files/uGYZmgOMj6pHWFtrgdad" alt=""><figcaption></figcaption></figure>

In the popup, provide the team name and the permissions assigned to the team. Use the below table as reference:

<table><thead><tr><th width="341">Field</th><th>Description</th></tr></thead><tbody><tr><td>Name</td><td><p>Must be a valid group based on the Dex connector you are using to manage users and groups.</p><p>For example if you are using Azure Active Directory, you must use a valid Active Directory Group like TERRAKUBE_ADMIN, or if you are using Github the format should be MyGithubOrg:TERRAKUBE_ADMIN</p></td></tr><tr><td>Manage Workspaces</td><td>Allow members to create and administrate all workspaces within the organization</td></tr><tr><td>Manage Modules</td><td>Allow members to create and administrate all modules within the organization</td></tr><tr><td>Manage Providers</td><td>Allow members to create and administrate all providers within the organization</td></tr><tr><td>Manage <a href="/pages/OXCISnyLTh1bZ6VjZOG9">Templates</a></td><td>Allow members to create and administrate all <a href="/pages/OXCISnyLTh1bZ6VjZOG9">templates</a> within the organization</td></tr><tr><td>Manage <a href="/pages/Z6xkxFvAWHn4uA8EyNGT">VCS Settings</a></td><td>Allow members to create and administrate all <a href="/pages/Z6xkxFvAWHn4uA8EyNGT">VCS Providers</a> within the organization</td></tr><tr><td>Manage State</td><td>Allow members to see the terraform/tofu state from the UI</td></tr></tbody></table>

<figure><img src="/files/f6YXWOgNtZAyTEBSWxpO" alt=""><figcaption></figcaption></figure>

Finally click the **Create team** button and the team will be created

<figure><img src="/files/RVW8WP244fTRHkFuIun0" alt=""><figcaption></figcaption></figure>

Now all the users inside the team will be able to manage the specific resources within the organization based on the permissions you grantted.

### Edit a Team

Click the **Edit** button next to the team you want to edit

<figure><img src="/files/vo6GkkIEerPSSyYQfAVy" alt=""><figcaption></figcaption></figure>

Change the permissions you need and click the **Save team** button

<figure><img src="/files/nLHCLBnPtYXUmqV9PlNf" alt=""><figcaption></figcaption></figure>

### Delete a Team

Click the **Delete** button next to the team you want to delete, and then click the Yes button to confirm the deletion. Please take in consideration the deletion is irreversible

<figure><img src="/files/LFZoMf7QG6UNkSorCTB5" alt=""><figcaption></figcaption></figure>


# API Tokens

Terrakube has two kinds of API tokens: user and team. Each token type has a different access level and creation process, which are explained below.

API tokens are only shown once when you create them, and then they are hidden. You have to make a new token if you lose the old one.

### User API Tokens <a href="#user-api-tokens" id="user-api-tokens"></a>

API tokens may belong directly to a user. User tokens inherit permissions from the user they are associated with.

User API tokens can be generated inside the **User Settings**.

<figure><img src="/files/mHAOOz7NVWEgOYjDwryA" alt=""><figcaption></figcaption></figure>

Click the **Generate and API token** button

<figure><img src="/files/lioTAuBmC490GAey61Ev" alt=""><figcaption></figcaption></figure>

Add some small description to the token and the duration

<figure><img src="/files/YvaBbILuTDYscF7crFJl" alt=""><figcaption></figcaption></figure>

The new token will be showed and you can copy it to star calling the Terrakube API using Postman or some other tool.

<figure><img src="/files/5TUJzStdBa39gcuoBt7n" alt=""><figcaption></figcaption></figure>

#### Delete API Tokens <a href="#user-api-tokens" id="user-api-tokens"></a>

To delete an API token, navigate to the list of tokens, click the **Delete** button next to the token you wish to remove, and confirm the deletion.

<figure><img src="/files/zBEVM1LTTMe9iygVRvSR" alt=""><figcaption></figcaption></figure>

### Team API Tokens <a href="#user-api-tokens" id="user-api-tokens"></a>

API tokens may belong to a specific team. Team API tokens allow access Terrakube, without being tied to any specific user.

{% hint style="warning" %}
A team token can only be generated if you are member of the specified team.
{% endhint %}

To manage the API token for a team, go to **Settings > Teams > Edit button on the desired team**.

<figure><img src="/files/crYHDQSDtWrnCojUWO71" alt=""><figcaption></figcaption></figure>

Click the **Create a Team Token** button in the Team API Tokens section.

<figure><img src="/files/Uipyn6r7JjYxHH9ldJgP" alt=""><figcaption></figcaption></figure>

Add the token description and duration and click the **Generate token** button

<figure><img src="/files/lfcSQdxi9Rx0bFgLik6o" alt=""><figcaption></figcaption></figure>

The new token will be showed and you can copy it to star calling the Terrakube API using Postman or some other tool.

<figure><img src="/files/ohkQ4d5c4JJsYSYrc7LM" alt=""><figcaption></figcaption></figure>

#### Delete Team API Tokens <a href="#user-api-tokens" id="user-api-tokens"></a>

To delete an API token, navigate to the list of tokens, click the **Delete** button next to the token you wish to remove, and confirm the deletion.

<figure><img src="/files/JzvlWTWDsoopLTwQgzqZ" alt=""><figcaption></figcaption></figure>


# Templates

Templates allows you to customize the job workflow inside each workspace. You can define multiple templates inside each organization. Templates are written in yaml and you can specify each step to be executed once you use this template in the workspace. Lets see an example for a basic template:

#### Example 1:

```
flow:
  - name: "Plan"
    type: "terraformPlan"
    step: 100
  - name: "Apply"
    type: "terraformApply"
    step: 200
```

#### Example 2:

```
flow:
- type: "terraformPlanDestroy"
  name: "Terraform Plan Destroy from Terraform CLI"
  step: 100
- type: "approval"
  name: "Approve Plan from Terraform CLI"
  step: 150
  team: "TERRAFORM_CLI"
- type: "terraformApply"
  name: "Terraform Apply from Terraform CLI"
  step: 200
```

#### Example 3:

```
flow:
  - type: "terraformDestroy"
    step: 100
  - type: "disableWorkspace"
    step: 200
```

If you notice inside the **flow** section you can define any step required, for this case only 2 steps are defined. Using the **type** property you can specify the kind of step to be performed, in the above case we are using some default types like **terraformPlan** and **terraformApply.** However the power of terrakube is that you can extend your workflow to execute additional tasks using bash or groovy code. Lets see a more advanced template:

```
flow:
  - name: "Plan"
    type: "terraformPlan"
    step: 100
    commands:
      - runtime: "GROOVY"
        priority: 100
        before: true
        script: |
          @Grapes([
            @Grab('commons-io:commons-io:2.8.0'),
            @Grab('org.apache.commons:commons-compress:1.21'),
          ])

          import org.apache.commons.io.FileUtils
          
          class TerraTagDownloader {
            def downloadTerraTag(workingDirectory, version, os, arch) {
              String terraTagFile = "terratag_${version}_${os}_${arch}.tar.gz"
              String terraTagURL = "https://github.com/env0/terratag/releases/download/v${version}/${terraTagFile}"
              println "Downloading $terraTagURL"
              FileUtils.copyURLToFile(new URL(terraTagURL), new File("${workingDirectory}/${terraTagFile}"))
            }
          } 
          new TerraTagDownloader().downloadTerraTag("$workingDirectory", "0.1.29", "darwin", "amd64")
          "TerraTag Download Compledted..."
      - runtime: "BASH"
        priority: 200
        before: true
        script: |
          cd $workingDirectory;
          tar -xvf terratag_0.1.29_darwin_amd64.tar.gz;
          chmod +x terratag;
          ./terratag -tags="{\"environment_id\": \"development\"}"
  - name: "Apply"
    type: "terraformApply"
    step: 300
  - name: "Destroy"
    type: "terraformDestroy"
    step: 400
```

The previous example is using [Terratag](https://www.terratag.io/) to add the environment\_id to all the resources in the workspace. To acomplish that, the template defines some additional commands during the **Terraform Plan,** in this case a groovy class is utilized to download the Terratag binary, and a bash script is used to execute the terratag cli to append the required tags.

Using templates you can define all the business logic you need to execute in your workspace, basically you can integrate terrakube with any external tool. For example you can use [Infracost](https://www.infracost.io/) to calculate the cost of the resources to be created in your workspace or verify some policies using [Open Policy Agent](https://www.openpolicyagent.org/).

{% hint style="warning" %}
Terrakube extensions can be stored inside a GIT repository that you can configure when starting the platform. This is an example repository that you can fork or customiza to create your custom extensions <https://github.com/AzBuilder/terrakube-extensions>
{% endhint %}

There are some tools that are very common, and you don't want repeat the same code everytime or maybe other engineer already created the code and the logic to integrate with a specific tool. For these cases, inside the template is possible to reuse some logic using [Terrakube extensions](https://github.com/AzBuilder/terrakube-extensions). Basically if someone else developed an integration with an external third party service, you don't need to implement it again, you can use the extension. Let's see how the template looks like using the [Terratag extension](https://github.com/AzBuilder/terrakube-extensions/tree/main/groovy/TerraTag):

```
flow:
  - name: "Plan"
    type: "terraformPlan"
    step: 100
    commands:
      - runtime: "GROOVY"
        priority: 100
        before: true
        script: |
          import TerraTag
          new TerraTag().loadTool(
            "$workingDirectory",
            "$bashToolsDirectory",
            "0.1.30")
          "Terratag download completed"
```

If you notice the above script is more compact as is reusing some logic. If you want to simplify and reuse some templates in your organization, please check [Import Templates](/user-guide/organizations/templates/import-templates).

Using Templates you can even customize the UI for each job, see [UI templates](/user-guide/organizations/templates/ui-templates) for more details.

{% hint style="info" %}
To see the complete list for terrakube extensions see the [github repo](https://github.com/AzBuilder/terrakube-extensions). This repo is always growing so its possible the tool you need is already there. In this repo you can also see more templates examples for things like approvals, variable injection and so on.
{% endhint %}

### Persistent Context

If you need to store information generated on the steps defined in your template, you can use [persistent context](/user-guide/organizations/templates/persistent-context).

### Creating a Template

{% hint style="info" %}
**Manage VCS Templates** permission is required to perform this action, please check [Team Management](/user-guide/organizations/team-management) for more info
{% endhint %}

Once you are in the desired organization, click the **Settings** button, then in the left menu select the **Templates** option and click the **Add Template** button

<figure><img src="/files/5vxiZRbYonRlH7WVBIp7" alt=""><figcaption></figcaption></figure>

You will see a list of some predefined templates than you can utilize as a quick start or if you prefer you can click the **Blank Template** to start from scratch

<figure><img src="/files/As59vF9EjDhPUSgMFZal" alt=""><figcaption></figcaption></figure>

In the next screen you can define your template and when you are ready click the **Continue** button.

<figure><img src="/files/tdzUP5eBBScQLEZc4sOM" alt=""><figcaption></figcaption></figure>

Finally, you can assign a name and description to your template and click the **Create Template** button.

<figure><img src="/files/LgmQC8TG24gYpzJO4uGH" alt=""><figcaption></figcaption></figure>

Now you template is ready and you can start using it in any workspace within your organization.

<figure><img src="/files/yuGX5vSuauQ3Ei2F8X2k" alt=""><figcaption></figcaption></figure>

{% hint style="info" %}
By default Terrakube don't create any template, so you have to define the templates in your organization based on your requirements.
{% endhint %}

### Editing a Template

Click the **Edit** button next to the Template you would like to edit

<figure><img src="/files/LiohVmzuplH7EiNjtP4w" alt=""><figcaption></figcaption></figure>

Edit your template definition, description or name as desired and when you are ready click the **Save Template** button

<figure><img src="/files/ipoCPqU4bfIl53OU6jxy" alt=""><figcaption></figcaption></figure>

### Deleting a Template

Click the **Delete** button next to the Template you want to delete and then click **Yes** to confirm the deletion

<figure><img src="/files/fmcFauhu3pqzIg7dmtvM" alt=""><figcaption></figcaption></figure>


# Default Templates

Terrakube creates the following default templates:

## CLI-Driven Templates

Terrakube use job templates for all executions, Terrakube automatically create the following templates that are used when using the terraform remote state backend operations. This templates are created in all organizations.

<figure><img src="/files/51pVVMny6SEbFiZnzj1u" alt=""><figcaption></figcaption></figure>

#### Terraform Plan/Apply Cli Template

Will be used when you execute `terraform apply` using the terraform cli

```yaml
flow:
- type: "terraformPlan"
  name: "Terraform Plan from Terraform CLI"
  step: 100
- type: "approval"
  name: "Approve Plan from Terraform CLI"
  step: 150
  team: "TERRAFORM_CLI"
- type: "terraformApply"
  name: "Terraform Apply from Terraform CLI"
  step: 200
```

#### Terraform Plan/Destroy Cli Templates

Will be used when you execute `terraform destroy`using the terraform cli

```yaml
flow:
- type: "terraformPlanDestroy"
  name: "Terraform Plan Destroy from Terraform CLI"
  step: 100
- type: "approval"
  name: "Approve Plan from Terraform CLI"
  step: 150
  team: "TERRAFORM_CLI"
- type: "terraformApply"
  name: "Terraform Apply from Terraform CLI"
  step: 200

```

{% hint style="warning" %}
This templates can be updated if need it but in order for the terraform remote state backed to work properly the step number and the template names should not be changed. So if you delete or modify this templates
{% endhint %}


# Persistent Context

Persistent Context is helpfull when you need to save information from the job execution, for example it can be used to save the infracost or save the thread id when using the Slack extension. We can also use it to save any JSON information generated inside Terrakube Jobs.

#### Using Persistent Contexts with the Terrakube API

In order to save the information the terrakube API exposes the following endpoint

```
POST {{terrakubeApi}}/context/v1/{{jobId}}
{
  "slackThreadId": "12345667",
  "infracost": {}
}
```

{% hint style="warning" %}
Job context can only be updated when the status of the Job is running.
{% endhint %}

To get the context you can use the Terrakube API

```
GET {{terrakubeApi}}/context/v1/{{jobId}}
```

#### Using Persistent Contexts in Templates

The persistent context can be used using the [Context](https://github.com/AzBuilder/terrakube-extensions/tree/main/groovy/Context) extension from the Terrakube extension repository. It supports saving a JSON file or saving a new property inside the context JSON.

```
import Context
        
new Context("$terrakubeApi", "$terrakubeToken", "$jobId", "$workingDirectory").saveFile("infracost", "infracost.json")
new Context("$terrakubeApi", "$terrakubeToken", "$jobId", "$workingDirectory").saveProperty("slackId", "1234567890")
```

This is an example of a Terrakube template using the persistent job context to save the infracost information.

```
flow:
- type: "terraformPlan"
  step: 100
  commands:
    - runtime: "GROOVY"
      priority: 100
      after: true
      script: |
        import Infracost

        String credentials = "version: \"0.1\"\n" +
                "api_key: $INFRACOST_KEY \n" +
                "pricing_api_endpoint: https://pricing.api.infracost.io"

        new Infracost().loadTool(
           "$workingDirectory",
           "$bashToolsDirectory", 
           "0.10.12",
           credentials)
        "Infracost Download Completed..."
    - runtime: "BASH"
      priority: 200
      after: true
      script: |
        terraform show -json terraformLibrary.tfPlan > plan.json 
        INFRACOST_ENABLE_DASHBOARD=true infracost breakdown --path plan.json --format json --out-file infracost.json
    - runtime: "GROOVY"
      priority: 300
      after: true
      script: |
        import Context
        
        new Context("$terrakubeApi", "$terrakubeToken", "$jobId", "$workingDirectory").saveFile("infracost", "infracost.json")

        "Save context completed..."
```

You can use persistent context to customize the Job UI, see [UI templates ](/user-guide/organizations/templates/ui-templates)for more details.


# Import Templates

Templates can become big over time while adding steps to execute additional business logic.

Example before template import:

```yaml
flow:
- type: "terraformPlan"
  step: 100
  commands:
    - runtime: "GROOVY"
      priority: 100
      before: true
      script: |
        import TerraTag
        new TerraTag().loadTool(
          "$workingDirectory",
          "$bashToolsDirectory",
          "0.1.30")
        "Terratag download completed"
    - runtime: "BASH"
      priority: 200
      before: true
      script: |
        cd $workingDirectory
        terratag -tags="{\"environment_id\": \"development\"}"
- type: "terraformApply"
  step: 300
```

Terrakube supports having the template logic in an external git repository like the following:

{% hint style="info" %}
This feature is only available from Terrakube 2.11.0
{% endhint %}

```yaml
flow:
  - type: "terraformPlan"
    step: 100
    importComands:
      repository: "https://github.com/AzBuilder/terrakube-extensions"
      folder: "templates/terratag"
      branch: "import-template"
  - type: "terraformApply"
    step: 200
```

Using import templates become simply and we can reuse the logic accross several Terrakube organizations

The sample template can be found [here](https://github.com/AzBuilder/terrakube-extensions/blob/main/templates/terratag/commands.yaml).

{% hint style="info" %}
The import commands are using a public repository, we will add support for private repositories in the future.
{% endhint %}


# UI Templates

Terrakube allows you to customize the UI for each step inside your templates using standard HTML. So you can render any kind of content extracted from your Job execution in the Terrakube UI.

For example you can present the costs using Infracost in a friendly way:

<figure><img src="/files/biKcLoHhULJDli2N89nI" alt=""><figcaption></figcaption></figure>

Or present a table with the OPA policies

<figure><img src="/files/Ql7Lii55UDlWRWZEgeG7" alt=""><figcaption></figcaption></figure>

In order to use UI templates you will need to save the HTML for each template step using the [Persistent Context](/user-guide/organizations/templates/persistent-context). Terrakube expects the ui templates in the following format.

```
terrakubeUI :{
   "100" : "<span>Some Content</span>"
}
```

In the above example the 100 property in the JSON refers to the step number inside your template. In order to save this value from the template you can use the Context extension. For example:

```
flow:
  - type: "terraformPlan"
    step: 100
    name: "Plan"
    commands:
      - runtime: "GROOVY"
        priority: 300
        after: true
        script: |
          import Context
          
          def uiTemplate = '{"100":"<span>Simple Text</span>"}'
          new Context("$terrakubeApi", "$terrakubeToken", "$jobId", "$workingDirectory").saveProperty("terrakubeUI", uiTemplate)

          "Save context completed..."
  - type: "terraformApply"
    step: 200
    name: "Apply"
```


# Filter global variables in jobs

In some special cases it is necesarry to filter the global variables used inside the job execution, if the "inpursEnv" or "inpustTerraform" is not defined all global variables will be imported to the job context.

### Template Configuration

```
flow:
  - type: "customScripts"
    step: 100
    inputsEnv:
      INPUT_IMPORT1: $IMPORT1
      INPUT_IMPORT2: $IMPORT2
    commands:
      - runtime: "BASH"
        priority: 100
        before: true
        script: |
          echo $INPUT_IMPORT1
          echo $INPUT_IMPORT2
```

> $IMPORT1 and $IMPORT2 will be added to the job context as env variable INPUT\_IMPORT1 and INPUT\_IMPORT2

### Global Variables Setup

<figure><img src="https://user-images.githubusercontent.com/4461895/225455685-4b060f97-e802-44df-97c2-dd5c2be06b7a.png" alt=""><figcaption></figcaption></figure>

### Running Workspace

<figure><img src="https://user-images.githubusercontent.com/4461895/225455661-d6b0143b-c758-4ea4-b511-e943183aeaba.png" alt=""><figcaption></figcaption></figure>

### Other configuration Options.

#### Import terraform variables

```
flow:
  - type: "customScripts"
    step: 100
    inputsTerraform:
      INPUT_IMPORT1: $IMPORT1
      INPUT_IMPORT2: $IMPORT2
    commands:
      ....
```

#### Import when importing the template

```
flow:
  - type: "terraformPlan"
    step: 100
    importComands:
      repository: "https://github.com/AzBuilder/terrakube-extensions"
      folder: "templates/terratag"
      branch: "import-template"
      inputsEnv:
        INPUT_IMPORT1: $IMPORT1
        INPUT_IMPORT2: $IMPORT2
      inputsTerraform:
        INPUT_IMPORT1: $IMPORT1
        INPUT_IMPORT2: $IMPORT2
  - type: "terraformApply"
    step: 200
```

### Import Precedence

workspace env variables > importComands env variables > Flow env variables\
workspace terraform variables > importComands terraform variables > Flow terraform variables


# Template Scheduling in Jobs

When we deploy some infrastructure we can set some other template to execute in some specific time for example to destroy the infrascturture or resize it.

{% hint style="success" %}
This example will show the basic logic to accomplish but it is not creaing a real VM it just running some scripts that are showing the injected terraform variables when running the job.
{% endhint %}

### Example

Define the size as global terraform variables for example SIZE\_SMALL and SIZE\_BIG, this terraform variables will be injected in our future templates "schedule1" and "schedule2" as terraform variables dynamically.\\

<figure><img src="https://user-images.githubusercontent.com/4461895/225761283-27d0a9c2-6c3d-430c-9d80-66cb6a2d51d8.png" alt=""><figcaption></figcaption></figure>

We define a job template that creates the infrasctucture using some small size and create two schedule at the end of the template.

### Create Virtual Machine (Example)

```
flow:
  - type: "customScripts"
    step: 100
    inputsTerraform:
      SIZE: $SIZE_SMALL
    commands:
      - runtime: "BASH"
        priority: 100
        before: true
        script: |
          echo "SIZE : $SIZE"
  - type: "scheduleTemplates"
    step: 200
    templates:
      - name: "schedule1"
        schedule: "0 0/5 * ? * * *"
      - name: "schedule2"
        schedule: "0 0/10 * ? * * *"
```

{% hint style="info" %}
This will create our "virtual machine" using size small, after it will set two addtional schedules to run every 5 and 10 minutes to resize it.
{% endhint %}

We will have 3 templates, one to create the virtual machine and two to resize it

<figure><img src="https://user-images.githubusercontent.com/4461895/225761347-18b09e5d-29ae-4815-b27f-ea219db8ffa8.png" alt=""><figcaption></figcaption></figure>

Once the workspace is executed creating the infrasctructure two automatic shedules will be define

<figure><img src="https://user-images.githubusercontent.com/4461895/225761484-ad328fb4-7275-48b0-ab99-3a6a7a219488.png" alt=""><figcaption></figcaption></figure>

Differente jobs will be executed.

<figure><img src="/files/Bq5NUjzQUECeIr1POo9s" alt=""><figcaption></figcaption></figure>

### Resize Template (schedule1)

Inject the new size using global terraform variables

```
flow:
  - type: "customScripts"
    step: 100
    inputsTerraform:
      SIZE: $SIZE_SMALL
    commands:
      - runtime: "BASH"
        priority: 100
        before: true
        script: |
          echo "SIZE : $SIZE"
```

<figure><img src="https://user-images.githubusercontent.com/4461895/225762481-af2a0779-8383-472a-90a1-61fd362d0c50.png" alt=""><figcaption></figcaption></figure>

### Resize Template (schedule2)

Inject the new size using global terraform variables

```
flow:
  - type: "customScripts"
    step: 100
    inputsTerraform:
      SIZE: $SIZE_BIG
    commands:
      - runtime: "BASH"
        priority: 100
        before: true
        script: |
          echo "SIZE : $SIZE"
```

<figure><img src="https://user-images.githubusercontent.com/4461895/225762637-f18f0335-c49a-4761-9a25-446ae196f8d1.png" alt=""><figcaption></figcaption></figure>


# Tags

You can use tags to categorize, sort, and even filter workspaces based on the tags.

You can manage tags for the organization in the Settings panel. This section lets you create and remove tags. Alternatively, you can add existing tags or create new ones in the [Workspace overview page](/user-guide/workspaces/overview).

### Creating a Tag

Once you are in the desired organization, click the **Settings** button, then in the left menu select the **Tags** option and click the **Add global variable** button

<figure><img src="/files/yByg1ptd8BCU345AnS3A" alt=""><figcaption></figcaption></figure>

In the popup, provide the required values. Use the below table as reference:

| Field | Description     |
| ----- | --------------- |
| Name  | Unique tag name |

Finally click the **Save tag** button and the variable will be created

<figure><img src="/files/luSc843NoXoHLA7iLBfc" alt=""><figcaption></figcaption></figure>

You will see the new tag in the list. And now you can use the tag in the workspaces within the organization

<figure><img src="/files/BKYP8sLlIfPquxe0z7Dj" alt=""><figcaption></figcaption></figure>

### Edit a Tag

Click the **Edit** button next to the tag you want to edit.

<figure><img src="/files/QNmBbnO1U4av0TdiHv5W" alt=""><figcaption></figcaption></figure>

Change the fields you need and click the **Save tag** button

<figure><img src="/files/pArgrOoMVVgz1m7vVwJu" alt=""><figcaption></figcaption></figure>

### Delete a Tag

Click the **Delete** button next to the tag you want to delete, and then click the Yes button to confirm the deletion. Please take in consideration the deletion is irreversible and the tag will be removed from all the workspaces using it.

<figure><img src="/files/6s9j9OeuZbkJYRTBRCNB" alt=""><figcaption></figcaption></figure>


# Projects

Projects allow you to organize workspaces into logical groups within an organization. By grouping related workspaces together, you can manage team access at the project level rather than configuring permissions workspace by workspace.

In this section:

{% content-ref url="/pages/cleUzuTcNEgG5AWjXcvp" %}
[Creating Projects](/user-guide/projects/creating-projects)
{% endcontent-ref %}

{% content-ref url="/pages/bJ3lcF42r5QD053G4wXf" %}
[Team Access](/user-guide/projects/team-access)
{% endcontent-ref %}

{% content-ref url="/pages/w3BH87He4BC6QKhgdLhg" %}
[Workspace Assignment](/user-guide/projects/workspace-assignment)
{% endcontent-ref %}


# Creating Projects

Projects are logical groupings of workspaces within an organization. You can create multiple projects to reflect your team structure, environments, or application boundaries.

{% hint style="info" %}
You need the **Manage Workspaces** permission at the organization level to create, edit, or delete projects.
{% endhint %}

### Creating a Project

Click **Projects** in the main menu and then Click the **New project** button.

<figure><img src="/files/stfxUCYC3rBKXPoGOQ97" alt=""><figcaption></figcaption></figure>

Enter a name for the project and click **Create project**.

<figure><img src="/files/fHbl4aXFNQ2A0NGB8IOk" alt=""><figcaption></figcaption></figure>

The project will appear in your projects list. Before assigning workspaces, configure team access to grant the necessary permissions.

{% hint style="info" %}
Only organization members with organization-level Write permissions or higher can manage workspaces. To delegate workspace management to other teams, configure project-level team access first. See [Team Access](/user-guide/projects/team-access) for details.
{% endhint %}

### Editing a Project

Open the project you want to edit by clicking its name in the projects list. Navigate to the \*\* \*\* tab on the project detail page.

<figure><img src="/files/FtzxEYuflj0fBEVesFev" alt=""><figcaption></figcaption></figure>

Update the project name and click **Save**.

<figure><img src="/files/4Tno3YSj6gdAZhgr9Mnk" alt=""><figcaption></figcaption></figure>

### Deleting a Project

Open the project you want to delete and navigate to the **General** tab. Click the **Delete project** button.

<figure><img src="/files/grcnb8WwrIquscGUJqXa" alt=""><figcaption></figcaption></figure>

{% hint style="warning" %}
A project cannot be deleted while it still has workspaces assigned to it. Remove or reassign all workspaces before deleting the project.
{% endhint %}


# Team Access

Project-level team access lets you grant a team a specific role that applies to all workspaces within the project. This avoids having to configure permissions on each workspace individually.

### Permission Hierarchy

Permissions follow a three-tier hierarchy. The most permissive level takes precedence:

1. **Organization** — organization-level team permissions (Manage Workspaces, etc.)
2. **Project** — project-level role assigned on the Teams tab
3. **Workspace** — future workspace-level overrides

{% hint style="info" %}
Workspaces that are not assigned to any project remain visible to all members of the organization (backward-compatible behavior).
{% endhint %}

### Project Roles

| Role  | Manage Project | Manage Workspace | Create Workspace | Plan Job | Approve Job |
| ----- | :------------: | :--------------: | :--------------: | :------: | :---------: |
| Admin |        ✅       |         ✅        |         ✅        |     ✅    |      ✅      |
| Write |        ❌       |         ✅        |         ✅        |     ✅    |      ✅      |
| Plan  |        ❌       |         ❌        |         ❌        |     ✅    |      ❌      |
| Read  |        ❌       |         ❌        |         ❌        |     ❌    |      ❌      |

### Adding a Team

Open the project and click the **Teams** tab.

<figure><img src="/files/IL3D8NURR1NUBVQ3uXth" alt=""><figcaption></figcaption></figure>

Select a team from the dropdown, choose a role, and click **Add Team**.

<figure><img src="/files/DWnL4vunm7iDbCmVgCZW" alt=""><figcaption></figcaption></figure>

The team will appear in the access table and the selected role will be applied to all workspaces in the project.

### Changing a Team's Role

In the Team Access table, click the **Change** button on the row of the team you want to update. Select the new role from the dropdown.

<figure><img src="/files/oCWhYRO5AWIOHW9Cso8N" alt=""><figcaption></figcaption></figure>

{% hint style="info" %}
Hover over a role tag in the table to see a description of what the role allows.
{% endhint %}

### Removing a Team

Click the **Remove** button on the team's row in the Team Access table to revoke the team's access to the project.

<figure><img src="/files/f3FV5tQuU8cgRpspbMI7" alt=""><figcaption></figcaption></figure>


# Workspace Assignment

Workspaces can be optionally assigned to a project. Assigning a workspace to a project lets you apply project-level team permissions and keeps related workspaces organized together.

### Assigning a Project when Creating a Workspace

When going through the workspace creation wizard, select a project from the **Project** dropdown. This field is optional — selecting **(No project)** leaves the workspace unassigned.

<figure><img src="/files/w630CaTnoqcVbRYLvKEj" alt=""><figcaption></figcaption></figure>

### Changing a Workspace's Project

To move a workspace to a different project or remove its project assignment, open the workspace and go to its **Settings** page. Find the **Project** field and select a new project or clear the selection, then save.

<figure><img src="/files/Gwge3XAuek0iIGrvb9Uf" alt=""><figcaption></figcaption></figure>

{% hint style="info" %}
Moving a workspace between projects requires the **Manage Workspaces** permission at the organization level, regardless of your project-level role.
{% endhint %}

### Filtering Workspaces by Project

On the workspaces list page, use the **Project** dropdown filter to show only workspaces belonging to a specific project. Select **Unassigned** to show workspaces that have not been assigned to any project.

<figure><img src="/files/APTRCVZSejN0bHq1zTgD" alt=""><figcaption></figcaption></figure>

### Project Badge on Workspace Cards

Each workspace card in the list displays the name of its assigned project as a badge. Workspaces without a project assignment show no badge.

<figure><img src="/files/KTitmktaP9UEmvmCYSUq" alt=""><figcaption></figcaption></figure>


# VCS Providers

Terrakube empowers collaboration between different teams in your organization. To achieve this, you can integrate Terrakube with your version control system (VCS) provider. Although Terrakube can be used with public Git repositories or with private Git repositories using SSH, connecting to your Terraform code through a VCS provider is the preferred method. This allows for a more streamlined and secure workflow, as well as easier management of access control and permissions.

Terrakube supports the following VCS providers:

{% content-ref url="/pages/-MlVoTRr4DmnDChq5xzl" %}
[Github OAuth](/user-guide/vcs-providers/github.com)
{% endcontent-ref %}

{% content-ref url="/pages/oFePzKkpOxOg5yBfaDkE" %}
[Github Enterprise](/user-guide/vcs-providers/github-enterprise)
{% endcontent-ref %}

{% content-ref url="/pages/-MlVocmrlVXE4eFtFL7V" %}
[GitLab](/user-guide/vcs-providers/gitlab.com)
{% endcontent-ref %}

{% content-ref url="/pages/qfgnQcTydKSwav1BQ6xC" %}
[Gitlab EE and CE](/user-guide/vcs-providers/gitlab-ee-and-ce)
{% endcontent-ref %}

{% content-ref url="/pages/-MlVoWlWo0UCSRWbDoT4" %}
[Bitbucket](/user-guide/vcs-providers/bitbucket.com)
{% endcontent-ref %}

{% content-ref url="/pages/-MlVopbNgMX1xYiMTwtV" %}
[Azure DevOps](/user-guide/vcs-providers/azure-devops)
{% endcontent-ref %}

{% content-ref url="/pages/RfCzCMOu2v1dXg0o16Fw" %}
[SSH](/user-guide/vcs-providers/ssh)
{% endcontent-ref %}

### Webhooks <a href="#webhooks" id="webhooks"></a>

Terrakube uses webhooks to monitor new commits. This feature is not available for SSH-based repositories. Azure DevOps is supported via inbound service hooks by default, with an outbound polling fallback for private networks that the Azure DevOps cloud can't reach — see [Azure DevOps](/user-guide/vcs-providers/azure-devops#webhooks).

* When new commits are added to a branch, Terrakube workspaces based on that branch will automatically initiate a Terraform job. Terrakube will use the "Plan and apply" template by default, but you can specify a different Template during the Workspace creation.
* When you specify a directory in the Workspace. Terrakube will run the job only if a file changes in that directory
* For GitHub, GitLab, and Bitbucket, pull requests can also get plan/apply results posted as comments — see [Webhooks](/user-guide/workspaces/webhooks) for the full per-workspace webhook configuration.


# Github OAuth

For using repositories from GitHub.com with Terrakube workspaces and modules you will need to follow these steps:

{% hint style="info" %}
**Manage VCS Providers** permission is required to perform this action, please check [Team Management](/user-guide/organizations/team-management) for more info.
{% endhint %}

Navigate to the desired organization and click the **Settings** button, then on the left menu select **VCS Providers**

<figure><img src="/files/a9QAbsWKRTZzMR0mzvO0" alt=""><figcaption></figcaption></figure>

{% hint style="info" %}
If you prefer, you can add a new VCS Provider directly from the [Create workspace](/user-guide/workspaces/creating-workspaces) or Create Module screen.
{% endhint %}

Click the **Github button** and then click the **Github Cloud option.**

<figure><img src="/files/gmJbEcYJmddHVx0sXze6" alt=""><figcaption></figcaption></figure>

In the next screen click the link to [register a new OAuth Application](https://github.com/settings/applications/new) in Github

<figure><img src="/files/zxrAYNZXVhfMRoKk2xHq" alt=""><figcaption></figcaption></figure>

In the Github page, complete the required fields and click **Register application**

<table><thead><tr><th width="354">Field</th><th>Description</th></tr></thead><tbody><tr><td>Application Name</td><td>Your application name, for example you can use your organization name.</td></tr><tr><td>Homepage URL</td><td>The url for your application or website,</td></tr><tr><td>Application Description</td><td>Any description you choice</td></tr><tr><td>Authorization Callback URL</td><td>Copy the callback url from the Terrakube UI</td></tr></tbody></table>

{% hint style="info" %}
You can complete the fields using the information suggested by terrakube in the VCS provider screen
{% endhint %}

<figure><img src="/files/Xys0nZtan3iSKCjFkHiy" alt=""><figcaption></figcaption></figure>

Next, generate a new client secret

<figure><img src="/files/Pu1h591jQVE9u051aj2H" alt=""><figcaption></figcaption></figure>

Copy the **Client Id** and **Client Secret** from Github and go back to Terrakube to complete the required information. Then, click the **Connect and Continue** button

<figure><img src="/files/evnv4aUPg3ihTvjI820D" alt=""><figcaption></figcaption></figure>

You will see the Github page, click the **Authorize** button to complete the connection

<figure><img src="/files/7630tl5ptQOE4fU1lkBd" alt=""><figcaption></figcaption></figure>

Finally, if the connection was established successfully, you will be redirected to the VCS provider’s page in your organization. You should see the connection status with the date and the user that created the connection.

<figure><img src="/files/0ZJibf006ANNbwF1vqdQ" alt=""><figcaption></figcaption></figure>

And now, you will be able to use the connection in your workspaces and modules:

<figure><img src="/files/1vUUrIXLJt5f2H2vKRO9" alt=""><figcaption></figcaption></figure>


# Github App

{% hint style="info" %}
This feature is supported from Terrakube 2.23.0
{% endhint %}

{% hint style="warning" %}
NOTE: Token generation and refresh in 'Github App' mode are primarily driven by the `APP ID`. If multiple VCS instances share the same `APP ID`, the system will only regenerate the token for the first one encountered.

For more details, see: [Github Issue](https://github.com/terrakube-io/terrakube/issues/2938)
{% endhint %}

For using repositories from GitHub.com with Terrakube workspaces and modules you will need to follow these steps:

{% hint style="info" %}
**Manage VCS Providers** permission is required to perform this action, please check [Team Management](/user-guide/organizations/team-management) for more info.
{% endhint %}

Navigate to the desired organization and click the **Settings** button, then on the left menu select **VCS Providers**

<figure><img src="/files/a9QAbsWKRTZzMR0mzvO0" alt=""><figcaption></figcaption></figure>

Select the option for Github App

<figure><img src="/files/0Napd89760MO9dnTeseg" alt=""><figcaption></figcaption></figure>

In the next page click <https://github.com/settings/apps/new> to create a new application adding the required information

<figure><img src="/files/Ccig5IhNeHxihs9sxUSx" alt=""><figcaption></figcaption></figure>

Complete the information like the following:

<figure><img src="/files/YiKn9QfeQCb6jHTB35er" alt=""><figcaption></figcaption></figure>

Disable webhook option.

<figure><img src="/files/01irRdcgatJLVdXc0unh" alt=""><figcaption></figcaption></figure>

Grant the require repository, organization or account permissions and in which type of account you will do the installation.

<figure><img src="/files/QeXHzDh9Rd5FrvjL4Dta" alt=""><figcaption></figcaption></figure>

Add "Contents" with "Read-Only"

<figure><img src="/files/MiFNliN2tkofoKm2Bbgu" alt=""><figcaption></figcaption></figure>

Add "Webhooks" with "Read and Write"

<figure><img src="/files/JZnlYZFJQ9BDPHgAL2jS" alt=""><figcaption></figcaption></figure>

{% hint style="warning" %}
Webhooks are need it if you will create workspace with webhooks enabled
{% endhint %}

Add "Commit statuses" to "Read and write"

<figure><img src="/files/fGLfke098Hi0LmiMO1Fs" alt=""><figcaption></figcaption></figure>

Finally click "Create Github App"

<figure><img src="/files/dvTgOlAeGWqGcm3lnm2U" alt=""><figcaption></figcaption></figure>

After creating the application you need to copy the APP Id to the Terrakube UI

<figure><img src="/files/1kIvaBIC3gJHPiTc74y7" alt=""><figcaption></figcaption></figure>

Scroll down and search for "Generate Private Key" and generate a new private key.

<figure><img src="/files/EJqKmB9rFvs6Ili4GPKp" alt=""><figcaption></figcaption></figure>

After downloading the private key we need to to transform the key to PKCS8 using the following command:

```
openssl pkcs8 -topk8 -inform PEM -outform PEM -nocrypt -in my-terrakube-app.private-key.pem -out pkcs8.key
```

{% hint style="warning" %}
The above command assumes the downloaded key from github name is "my-terrakube-app.private-key.pem" and that you want to save the key to a file called "kcs8.key"
{% endhint %}

Now we can add the private key in the Terrakube UI.

<figure><img src="/files/5XtdB9MvDsa68koT3NR7" alt=""><figcaption></figcaption></figure>

The github app will be added to Terrakube and will be shown like this:

<figure><img src="/files/ecqc9DGx2eIMYNks2Jxu" alt=""><figcaption></figcaption></figure>

The final step will be to install the application to your Github account like this.

<figure><img src="/files/hjJHU7GC5Hpgo2qFnmFq" alt=""><figcaption></figcaption></figure>

And select which repositories will be used with terrakube

<figure><img src="/files/4wwiRwx5aPMOaCRHmvIB" alt=""><figcaption></figcaption></figure>

The installation should look like this

<figure><img src="/files/dTnlNFliB6W5kjQBP7mf" alt=""><figcaption></figcaption></figure>

Now to use the Github Application when creating a new workspace we just need to add our new connection.

<figure><img src="/files/rdd48iY3htaKc9XoQPxt" alt=""><figcaption></figcaption></figure>


# Github Enterprise

To use Terrakube’s VCS features with a self-hosted GitHub Enterprise, follow these instructions. For GitHub.com, [see the separate instructions](/user-guide/vcs-providers/github.com).

{% hint style="info" %}
**Manage VCS Providers** permission is required to perform this action, please check [Team Management](/user-guide/organizations/team-management) for more info.
{% endhint %}

* Got to the organization settings you want to configure. Select the **VCS Providers** on the left menu and click the **Add VCS provider** button on the top right corner..

<figure><img src="/files/QlGRmRfj2IzbHj92RqdS" alt=""><figcaption></figcaption></figure>

{% hint style="info" %}
If you prefer, you can add a new VCS Provider directly from the [Create workspace](/user-guide/workspaces/creating-workspaces) or Create Module screen.
{% endhint %}

* Click the **Github button** and then click the **Github Enterprise option.**

<figure><img src="/files/AN8YryUDFXeCKgJKJgtR" alt=""><figcaption></figcaption></figure>

* On the next screen, enter the following information about your Github Enterprise instance:

<table><thead><tr><th width="203">Field</th><th>Value</th></tr></thead><tbody><tr><td>HTTP URL</td><td><code>https://&#x3C;GITHUB INSTANCE HOSTNAME></code></td></tr><tr><td>API URL</td><td><code>https://&#x3C;GITHUB INSTANCE HOSTNAME>/api/v3</code></td></tr></tbody></table>

<figure><img src="/files/ZHy1bijHjuk52YHbtqzh" alt=""><figcaption></figcaption></figure>

* Use a different browser tab to access your GitHub Enterprise instance and sign in with the account that you want Terrakube to use. You should use a service user account for your organization, but you can also use a personal account.

{% hint style="info" %}
Note: The account that connects Terrakube with your GitHub Enterprise instance needs to have admin rights to any shared Terraform configuration repositories. This is because creating webhooks requires admin permissions.
{% endhint %}

* Navigate to GitHub's Register a New OAuth Application page. This page is located at `https://<GITHUB INSTANCE HOSTNAME>/settings/applications/new`
* In the Github Enterprise page, complete the required fields and click **Register application**

<table><thead><tr><th width="354">Field</th><th>Description</th></tr></thead><tbody><tr><td>Application Name</td><td>Your application name, for example you can use your organization name.</td></tr><tr><td>Homepage URL</td><td>The url for your application or website,</td></tr><tr><td>Application Description</td><td>Any description you choice</td></tr><tr><td>Authorization Callback URL</td><td>Copy the callback url from the Terrakube UI</td></tr></tbody></table>

{% hint style="info" %}
You can complete the fields using the information suggested by terrakube in the VCS provider screen
{% endhint %}

<figure><img src="/files/rN1JUda1uxOcTBIGwg8p" alt=""><figcaption></figcaption></figure>

Next, generate a new client secret

<figure><img src="/files/tY93qcgdPaxPGgkNIdGE" alt=""><figcaption></figcaption></figure>

Copy the **Client Id** and **Client Secret** from Github Enterprise and go back to Terrakube to complete the required information. Then, click the **Connect and Continue** button

<figure><img src="/files/aPqozlRkOIgEJB20eTci" alt=""><figcaption></figcaption></figure>

You will be redirected to Github Enterprise. Click the **Authorize** button to complete the connection.

<figure><img src="/files/IwD6q2q17OFyWnDfCZe2" alt=""><figcaption></figcaption></figure>

When the connection is successful, you will go back to the VCS provider’s page in your organization. You will see the connection status, the date, and the user who made the connection.

<figure><img src="/files/Ob0Wz3SYVS1AX5TtdZ8N" alt=""><figcaption></figcaption></figure>

You can now use the connection for your workspaces and modules.

<figure><img src="/files/05JHAWSRyEkS58ysIfAU" alt=""><figcaption></figcaption></figure>


# GitLab

For using repositories from Gitlab.com with Terrakube workspaces and modules you will need to follow these steps:

{% hint style="info" %}
**Manage VCS Providers** permission is required to perform this action, please check [Team Management](/user-guide/organizations/team-management) for more info.
{% endhint %}

Navigate to the desired organization and click the **Settings** button, then on the left menu select **VCS Providers**

<figure><img src="/files/a9QAbsWKRTZzMR0mzvO0" alt=""><figcaption></figcaption></figure>

{% hint style="info" %}
If you prefer, you can add a new VCS Provider directly from the [Create workspace](/user-guide/workspaces/creating-workspaces) or Create Module screen.
{% endhint %}

Click the **Gitlab** button

<figure><img src="/files/V9j3UarkVL0muLP4pIz1" alt=""><figcaption></figcaption></figure>

In the next screen click the link to [register a new OAuth Application](https://gitlab.com/-/profile/applications) in Gitlab

<figure><img src="/files/5E3jS30UURICt1S0F7Xn" alt=""><figcaption></figcaption></figure>

On Gitlab, complete the required fields and click **Save application** button

<table><thead><tr><th width="219">Field</th><th>Description</th></tr></thead><tbody><tr><td>Name</td><td>Your application name, for example you can use your organization name.</td></tr><tr><td>Redirect URI</td><td>Copy the Redirect URI from the UI</td></tr><tr><td>Scopes</td><td>Only <strong>api</strong> should be checked</td></tr></tbody></table>

{% hint style="info" %}
You can complete the fields using the information suggested by terrakube in the VCS provider screen
{% endhint %}

<figure><img src="/files/heFhtoTxTxBB8Rzo74Z9" alt=""><figcaption></figcaption></figure>

In the next screen, copy the **Application ID** and **Secret**

<figure><img src="/files/8ritglHWKs24nUwhjGWy" alt=""><figcaption></figcaption></figure>

Go back to Terrakube to enter the information you copied from the previous step. Then, click the **Connect and Continue** button.

<figure><img src="/files/E8D8NdB5ekvTNTsfxU7c" alt=""><figcaption></figcaption></figure>

You will see a Gitlab window, click the **Authorize** button to complete the connection

<figure><img src="/files/GVmuoRFcYQHRH6SHRu2K" alt=""><figcaption></figcaption></figure>

Finally, if the connection was established successfully, you will be redirected to the VCS provider’s page in your organization. You should see the connection status with the date and the user that created the connection.

<figure><img src="/files/JKb1jII8fVXSeaYCI6I5" alt=""><figcaption></figcaption></figure>

And now, you will be able to use the connection in your workspaces and modules:

<figure><img src="/files/5CVvti9EemOz8Cu4tj4h" alt=""><figcaption></figcaption></figure>


# Gitlab EE and CE

To use Terrakube’s VCS features with a self-hosted GitLab Enterprise Edition (EE) or GitLab Community Edition (CE), follow these instructions. For GitLab.com, [see the separate instructions](/user-guide/vcs-providers/gitlab.com).

{% hint style="info" %}
**Manage VCS Providers** permission is required to perform this action, please check [Team Management](/user-guide/organizations/team-management) for more info.
{% endhint %}

* Got to the organization settings you want to configure. Select the **VCS Providers** on the left menu and click the **Add VCS provider** button on the top right corner.

<figure><img src="/files/QlGRmRfj2IzbHj92RqdS" alt=""><figcaption></figcaption></figure>

{% hint style="info" %}
If you prefer, you can add a new VCS Provider directly from the [Create workspace](/user-guide/workspaces/creating-workspaces) or Create Module screen.
{% endhint %}

* Click the **Gitlab button** and then click the **GitLab Enterprise** optio&#x6E;**.**

<figure><img src="/files/BuoJwQ6bffNu4FMWF5rN" alt=""><figcaption></figcaption></figure>

* On the next screen, enter the following information about your GitLab instance:

<table><thead><tr><th width="302">Field</th><th>Value</th></tr></thead><tbody><tr><td>HTTP URL</td><td>https://&#x3C;GITLAB INSTANCE HOSTNAME></td></tr><tr><td>API URL</td><td>https://&#x3C;GITLAB INSTANCE HOSTNAME>/api/v4</td></tr></tbody></table>

<figure><img src="/files/r8iQd8di0JCOnSUTUSjp" alt=""><figcaption></figcaption></figure>

* Use a different browser tab to access your GitLab instance and sign in with the account that you want Terrakube to use. You should use a service user account for your organization, but you can also use a personal account.

{% hint style="info" %}
Note: To connect Terrakube, you need an account with admin (master) access to any shared repositories of Terraform configurations. This is because creating webhooks requires admin permissions. Make sure you create the application as a user-owned application, not as an administrative application. Terrakube needs user access to repositories to create webhooks and ingress configurations.
{% endhint %}

{% hint style="warning" %}
If you have GitLab CE or EE 10.6 or higher, you might also need to turn on Allow requests to the local network from hooks and services. You can find this option in the Admin area under Settings, in the “Outbound requests” section (/admin/application\_settings/network). For more details, see the [GitLab documentation](https://docs.gitlab.com/ee/security/webhooks.html#enable-local-requests-for-webhooks-and-services).
{% endhint %}

* Navigate to GitLab "User Settings > Applications" page. This page is located at `https://<GITLAB INSTANCE HOSTNAME>/profile/applications`
* In the GitLab page, complete the required fields and click **Save application**

<table><thead><tr><th width="219">Field</th><th>Description</th></tr></thead><tbody><tr><td>Name</td><td>Your application name, for example you can use your organization name.</td></tr><tr><td>Redirect URI</td><td>Copy the Redirect URI from the UI</td></tr><tr><td>Scopes</td><td>Only <strong>api</strong> should be checked</td></tr></tbody></table>

{% hint style="info" %}
You can complete the fields using the information suggested by terrakube in the VCS provider screen
{% endhint %}

<figure><img src="/files/l5uHhVx2NJLYBhbEpeOQ" alt=""><figcaption></figcaption></figure>

* On the next screen, copy the **Application ID** and **Secret**

<figure><img src="/files/2C3l86cXbrpTg1CTAKG9" alt=""><figcaption></figcaption></figure>

* Go back to Terrakube to enter the information you copied from the previous step. Then, click the **Connect and Continue** button.

<figure><img src="/files/E8D8NdB5ekvTNTsfxU7c" alt=""><figcaption></figcaption></figure>

You will be redirected to GitLab. Click the **Authorize** button to complete the connection.

<figure><img src="/files/V1how2uHUxmpdkyqseoS" alt=""><figcaption></figcaption></figure>

Finally, if the connection was established successfully, you will be redirected to the VCS provider’s page in your organization. You should see the connection status with the date and the user that created the connection.

<figure><img src="/files/dGbrqrzt80XnHyRbyEKk" alt=""><figcaption></figcaption></figure>

And now, you will be able to use the connection in your workspaces and modules:

<figure><img src="/files/iDz4wWNHDcjfvCCSRkuz" alt=""><figcaption></figcaption></figure>


# Bitbucket

Work in progress

For using repositories from Bitbucket.com with Terrakube workspaces and modules you will need to follow these steps:

{% hint style="info" %}
**Manage VCS Providers** permission is required to perform this action, please check [Team Management](/user-guide/organizations/team-management) for more info.
{% endhint %}

Navigate to the desired organization and click the **Settings** button, then on the left menu select **VCS Providers**

<figure><img src="/files/a9QAbsWKRTZzMR0mzvO0" alt=""><figcaption></figcaption></figure>

{% hint style="info" %}
If you prefer, you can add a new VCS Provider directly from the [Create workspace](/user-guide/workspaces/creating-workspaces) or Create Module screen.
{% endhint %}

Click the **Bitbucket** button and then click the **Bitbucket Cloud** option

<figure><img src="/files/h7Q0AcvRQbMOD9ryTwtZ" alt=""><figcaption></figcaption></figure>

Open [Bitbucket Cloud](https://bitbucket.org) and log in as whichever account you want Terrakube to use and click the **settings** button in your workspace

<figure><img src="/files/3rhQZ5lcWG0ghFd7528k" alt=""><figcaption></figcaption></figure>

Click the **OAuth consumers** menu and then click the **Add consumer** button

<figure><img src="/files/sV1Cs9AWoWJvb4OEFdiH" alt=""><figcaption></figcaption></figure>

Complete the required fields and click **Save** button

<table><thead><tr><th width="219">Field</th><th>Description</th></tr></thead><tbody><tr><td>Name</td><td>Your application name, for example you can use your organization name.</td></tr><tr><td>Description</td><td>Any description of your choice</td></tr><tr><td>Redirect URI</td><td>Copy the Redirect URI from the Terrakube UI</td></tr><tr><td>This is a private consumer (checkbox)</td><td>Checked</td></tr><tr><td>Permissions (checkboxes)</td><td><p>The following should be checked:</p><p><strong>Account</strong>: Write</p><p><strong>Repositories</strong>: Admin</p><p><strong>Pull requests</strong>: Write</p><p><strong>Webhooks</strong>: Read and write</p></td></tr></tbody></table>

{% hint style="info" %}
You can complete the fields using the information suggested by terrakube in the VCS provider screen
{% endhint %}

<figure><img src="/files/fOAPtmWh77iGPXu6N2a9" alt=""><figcaption></figcaption></figure>

In the next screen, copy the **Key** and **Secret**

<figure><img src="/files/ymeMYknpTxQ3O5KXYOSO" alt=""><figcaption></figcaption></figure>

Go back to Terrakube to enter the information you copied from the previous step. Then, click the **Connect and Continue** button.

<figure><img src="/files/14kUONxLIhdsdGLvpoNq" alt=""><figcaption></figcaption></figure>

You will see a Bitbucket window, click the **Grant Access** button to complete the connection

<figure><img src="/files/wykfYhhGGhCoar8DLvNf" alt=""><figcaption></figcaption></figure>

Finally, if the connection was established successfully, you will be redirected to the VCS provider’s page in your organization. You should see the connection status with the date and the user that created the connection.

<figure><img src="/files/c3luS1hBJAt7zKATh8O0" alt=""><figcaption></figcaption></figure>

And now, you will be able to use the connection in your workspaces and modules:

<figure><img src="/files/EXtxZ2OUrkyzbhvP163z" alt=""><figcaption></figcaption></figure>


# Azure DevOps

{% hint style="danger" %}
OAuth apps are deprecated in Azure DevOps.[https://devblogs.microsoft.com/devops/no-new-azure-devops-oauth-apps](https://devblogs.microsoft.com/devops/no-new-azure-devops-oauth-apps/) as an alternative for now a managed identity can be used but the setup is only available using the API, for more information please check:

<https://github.com/terrakube-io/terrakube/pull/2101>
{% endhint %}

For using repositories from Azure Devops with Terrakube workspaces and modules you will need to follow these steps:

{% hint style="info" %}
**Manage VCS Providers** permission is required to perform this action, please check [Team Management](/user-guide/organizations/team-management) for more info.
{% endhint %}

Navigate to the desired organization and click the **Settings** button, then on the left menu select **VCS Providers**

<figure><img src="/files/a9QAbsWKRTZzMR0mzvO0" alt=""><figcaption></figcaption></figure>

{% hint style="info" %}
If you prefer, you can add a new VCS Provider directly from the [Create workspace](/user-guide/workspaces/creating-workspaces) or Create Module screen.
{% endhint %}

Click the **Azure Devops** button

<figure><img src="/files/HI8SlCIUDU8ZpsZNrE8m" alt=""><figcaption></figcaption></figure>

In the next screen click the link to [register a new OAuth Application](https://aex.dev.azure.com/app/register?mkt=en-US) in Azure Devops

<figure><img src="/files/14mDHowrNKAn9aLncj5L" alt=""><figcaption></figcaption></figure>

In the Azure Devops page, complete the required fields and click **Create application**

<table><thead><tr><th width="354">Field</th><th>Description</th></tr></thead><tbody><tr><td>Company Name</td><td>Your company name.</td></tr><tr><td>Application name</td><td>The name of your application or you can use the Organization name</td></tr><tr><td>Application website</td><td>Your application or website url</td></tr><tr><td>Callback URL</td><td>Copy the Callback URL from the Terrakube URL</td></tr><tr><td>Authorized scopes (checkboxes)</td><td>Only the following should be checked: Code (read) Code (status)</td></tr></tbody></table>

{% hint style="info" %}
You can complete the fields using the information suggested by terrakube in the VCS provider screen
{% endhint %}

<figure><img src="/files/LmMJfxtBByD1ySSgzF2b" alt=""><figcaption></figcaption></figure>

In the next screen, copy the **App ID** and **Client Secret**

<figure><img src="/files/Dl197Vfvf2sQQ5UyFn3I" alt=""><figcaption></figcaption></figure>

Go back to Terrakube to enter the information you copied from the previous step. Then, click the **Connect and Continue** button.

<figure><img src="/files/UOwoV76iVbc8aIxLwEiT" alt=""><figcaption></figcaption></figure>

You will see an Azure Devops window, click the **Accept** button to complete the connection

<figure><img src="/files/kGBlshoVl4gXhimacZp6" alt=""><figcaption></figcaption></figure>

Finally, if the connection was established successfully, you will be redirected to the VCS provider’s page in your organization. You should see the connection status with the date and the user that created the connection.

<figure><img src="/files/cEIug1OhRz9Ix7XzBrk4" alt=""><figcaption></figcaption></figure>

And now, you will be able to use the connection in your workspaces and modules:

<figure><img src="/files/m6MR7Nfx8wS8DJpW8U67" alt=""><figcaption></figcaption></figure>

### Webhooks

Azure DevOps (`dev.azure.com` and Azure DevOps Server) supports triggering workspace runs from repository activity, using either connection type (OAuth/Personal Access Token, or Service Principal/Managed Identity). There are two ways to detect changes:

**Inbound service hooks (default).** When a workspace with an Azure DevOps VCS is saved, Terrakube creates an Azure DevOps [service hook](https://learn.microsoft.com/azure/devops/service-hooks/overview) subscription that posts to the Terrakube webhook endpoint. Each delivery is authenticated with a per-webhook token, and commit status is reported back to Azure DevOps as the run progresses. Supported events:

| Terrakube event      | Azure DevOps `eventType`                             |
| -------------------- | ---------------------------------------------------- |
| Push                 | `git.push`                                           |
| Pull Request         | `git.pullrequest.created`, `git.pullrequest.updated` |
| Pull Request comment | `ms.vss-code.git-pullrequest-comment-event`          |

Because service hooks are delivered from the Azure DevOps cloud, the Terrakube webhook endpoint must be reachable from the public internet, and the connection needs **Edit Subscriptions** permission to create them.

{% hint style="warning" %}
The [PR comment plan/apply workflow](/user-guide/workspaces/webhooks#posting-plan-and-apply-results-on-pull-requests) (Post Plan on PR / Allow Apply via PR Comment, `terrakube plan` / `terrakube apply` comments) is currently only available for GitHub, GitLab, and Bitbucket. Azure DevOps pull request events can trigger jobs, but results aren't posted back as PR comments yet.
{% endhint %}

**Outbound commit polling (opt-in).** If Terrakube runs on a private network that the Azure DevOps cloud can't reach, inbound service hooks will silently fail. Polling reverses the direction: Terrakube periodically makes an outbound call to fetch the tip commit of each Azure DevOps workspace branch and starts a run when it changes, reusing the same credentials already used for cloning — no inbound network exposure required. Polling is disabled by default; enable it with these API environment variables:

| Environment variable             | Default | Description                                               |
| -------------------------------- | ------- | --------------------------------------------------------- |
| `AzureDevOpsPollingEnabled`      | `false` | Enable outbound commit polling.                           |
| `AzureDevOpsPollingInterval`     | `15000` | Milliseconds between polls of each workspace branch.      |
| `AzureDevOpsPollingInitialDelay` | `10000` | Milliseconds to wait after startup before the first poll. |

The first observed commit for a branch only records a baseline and does not trigger a run. Branch and file-path filters on the workspace webhook are applied the same way as for inbound pushes.


# SSH

Terrakube can use SSH keys to authenticate to your private repositories. The SSH keys can be uploaded inside the settings menu.

<figure><img src="/files/YF9qBcO4BXy0CQWD42Mb" alt=""><figcaption></figcaption></figure>

To handle SSH keys inside Terrakube your team should have "Manage VCS settings" access

<figure><img src="/files/fubeHOvZG5513qleRtYm" alt=""><figcaption></figcaption></figure>

Terrakube support keys with RSA and ED25519

<figure><img src="/files/FBvZEqWkZpy66LiuHLoW" alt=""><figcaption></figcaption></figure>

SSH keys can be used to authenticate to private repositories where you can store modules or workspaces

Once SSH keys are added inside your organization you can use them like the following example:

### Modules:

<figure><img src="/files/dF4h2HO8OYikjrrlkPhk" alt=""><figcaption></figcaption></figure>

### Workspace:

<figure><img src="/files/KX9UK92HCx6RKe1iz4W4" alt=""><figcaption></figcaption></figure>

{% hint style="warning" %}
When using SSH keys make sure to use your repository URL using the ssh format. For github it is something like [***git@github.com***](mailto:git@github.com)***:AzBuilder/terrakube-docker-compose.git***
{% endhint %}

### SSH Key Injection

The selected SSH key will be used to clone the workspace information at runtime when running the job inside Terrakube, but it will also be injected to the job execution to be use inside our terraform code.

For example if you are using a module using a GIT connection like the following:

```
module "test" {
  source = "git@bitbucket.org:alfespa17/private-module.git"
}
```

When running the job, internally terraform will be using the selected SSH key to clone the necesary module dependencies like the below image:

<figure><img src="/files/V1l2USzGfPuG32bzjjR7" alt=""><figcaption></figcaption></figure>

When using a VCS connection you can select which SSH key should be injected when downloading modules in the workspace settings:

<figure><img src="/files/CRsUxIbvoohkiCHYDMxx" alt=""><figcaption></figcaption></figure>

This will allow to use modules using the git format inside a workspace with VCS connection like the following:

```
module "test" {
  source = "git@github.com:alfespa17/simple-terraform.git"
}
```


# Workspaces

When working with Terraform at Enterprise level, you need to organize your infrastructure in different collections. Terrakube manages infrastructure collections with **workspaces**. A workspace contains everything Terraform needs to manage a given collection of infrastructure, so you can easily organize all your resources based in your requirements.

For example, you can create a workspace for dev environment and a different workspace for production. Or you can separate your workspaces based in your resource types, so you can create a workspace for all your SQL Databases and anothers workspace for all your VMS.

<figure><img src="/files/Iyssgtqi9hVZcKEjLytj" alt=""><figcaption></figcaption></figure>

You can create unlimited workspaces inside each Terrakube Organization. In this section:

{% content-ref url="/pages/ceJ8rxvq2k3t7qW4KYbK" %}
[Creating Workspaces](/user-guide/workspaces/creating-workspaces)
{% endcontent-ref %}

{% content-ref url="/pages/wu8nyuJVgLuouuKTNEUI" %}
[Terraform State](/user-guide/workspaces/terraform-state)
{% endcontent-ref %}

{% content-ref url="/pages/X5okGK8CnJc7IxFbAHxe" %}
[Variables](/user-guide/workspaces/variables)
{% endcontent-ref %}

{% content-ref url="/pages/qekInFeiQ5f5BDnwymWD" %}
[Workspace scheduler](/user-guide/workspaces/workspace-scheduler)
{% endcontent-ref %}


# Overview

The workspace overview page provides you a summary of the current workspace state.

### Managing Workspace Tags

You can manage tags for the workspace in the overview page. The right panel lets you search existing tags or type a new tag name to add or remove tags from the workspace.

<figure><img src="/files/JvjfdvuN14JfSImoCoNs" alt=""><figcaption></figcaption></figure>


# Creating Workspaces

{% hint style="info" %}
**Manage Workspaces** permission is required to perform this action, please check [Team Management](/user-guide/organizations/team-management) for more info.
{% endhint %}

When creating a Workspace, Terrakube supports 3 workflows types and based on the selected workflow you will need to provide some parameters. Please refer to each workflow section for more reference.

* [Version Control workflow](#version-control-workflow): Store your Terraform configuration in a git repository, and trigger runs based on pull requests and merges.
* [CLI-driven workflow](#cli-driven-workflow): Trigger remote Terraform runs from your local command line.
* [API-driven workflow](#api-driven-workflow): A more advanced option. Integrate Terraform into a larger pipeline using the [Terrakube API](/api/getting-started).

### Version Control workflow

Click **Workspaces** in the main menu and then click the **New workspace** button

<figure><img src="/files/rphrcHRSlPi5ZwIhW0s5" alt=""><figcaption></figcaption></figure>

Select the IaC type for now we support terraform and open tofu

<figure><img src="/files/SvKGg5UhPJMEdPfrFWIB" alt=""><figcaption></figcaption></figure>

Choose the **Version control workflow**

<figure><img src="/files/rKFEzMRwFi49WiizCxHD" alt=""><figcaption></figcaption></figure>

Select an existing version control provider or click **Connect to a different VCS** to configure a new one. See [VCS Providers](/user-guide/vcs-providers) for more details.

<figure><img src="/files/PPVPptth9Kz6Yuqm4oBP" alt=""><figcaption></figcaption></figure>

Provide the git repository URL and click the **Continue** button.

{% hint style="info" %}
If you want to connect to a private git repo using SSH Keys you will need to provide the url in ssh format. Example <git@github.com>:jcanizalez/terraform-sample-repository.git. For more information see [SSH](/user-guide/vcs-providers/ssh)
{% endhint %}

<figure><img src="/files/hIe3S3uk4sYbCRyfds0D" alt=""><figcaption></figcaption></figure>

Configure the workspace settings.

| Field                       | Description                                                                                                                                                                                                       |
| --------------------------- | ----------------------------------------------------------------------------------------------------------------------------------------------------------------------------------------------------------------- |
| Workspace Name              | The name of your workspace is unique and used in tools, routing, and UI. Dashes, underscores, and alphanumeric characters are permitted.                                                                          |
| VCS branch                  | A list of branches separated by comma that jobs are allowed to kicked off from VCS webhook. This is not used for CLI workflow.                                                                                    |
| Terraform Working Directory | Default workspace directory. Use / for the root folder                                                                                                                                                            |
| Terraform Version           | The version of Terraform to use for this workspace. Check [Custom Terraform CLI Builds](/getting-started/deployment/custom-terraform-cli-builds) if you want to restrict the versions in your Terrakube instance. |

Once you fill the settings click the **Create Workspace** button.

<figure><img src="/files/MvVWAqWAySWSJfwSnXO5" alt=""><figcaption></figcaption></figure>

When using a VCS workflow you can select which branches, folder and action (aka, Default template (VCS push)) the runs will be triggered from when a git push action happens.

The `VCS branches` accepts a list of branches separated by comma, the first in the list is used as the default for the runs kicked off from UI. The branches are compared as prefixes against the branch included in the payload sent from VCS provider.

<figure><img src="/files/U9wx9SzySsRIFiVnXixV" alt=""><figcaption></figcaption></figure>

You will be redirected to the Workspace page

<figure><img src="/files/cp1tREZ30ibJpLlYvLku" alt=""><figcaption></figcaption></figure>

And if you navigate to the **Workspace** menu, you will see the workspace in the Workspaces list

<figure><img src="/files/mNFSdUPHwAjKk4BscuWZ" alt=""><figcaption></figcaption></figure>

Once you create your workspace, Terrakube sets up a webhook with your VCS. This webhook runs a job based on the selected template every time you push new changes to the set workspace branches. See [Webhooks](/user-guide/workspaces/webhooks) for how to configure additional events (pull requests, releases) and the PR comment workflow.

### CLI-driven Workflow

Click **Workspaces** in the main menu and then click the **New workspace** button

<figure><img src="/files/6U1GpKZ5ey4852nrOQfE" alt=""><figcaption></figcaption></figure>

Choose the **CLI-driven workflow**

<figure><img src="/files/GnPR4PSyO2shLtE8bhrf" alt=""><figcaption></figcaption></figure>

Configure the workspace settings.

| Field             | Description                                                                                                                                                                                                       |
| ----------------- | ----------------------------------------------------------------------------------------------------------------------------------------------------------------------------------------------------------------- |
| Workspace Name    | The name of your workspace is unique and used in tools, routing, and UI. Dashes, underscores, and alphanumeric characters are permitted.                                                                          |
| Terraform Version | The version of Terraform to use for this workspace. Check [Custom Terraform CLI Builds](/getting-started/deployment/custom-terraform-cli-builds) if you want to restrict the versions in your Terrakube instance. |

Once you fill the settings click the **Create Workspace** button.

<figure><img src="/files/Hfx93jt9gLTlayT5JhY2" alt=""><figcaption></figcaption></figure>

You will be redirected to the Workspace page.

{% hint style="info" %}
The overview page for CLI-driven workspaces show the step to connect to the workspace using the Terraform CLI. For more details see [CLI-driven Workflow](/user-guide/workspaces/cli-driven-workflow)
{% endhint %}

<figure><img src="/files/a8WfcBNtF5Tj8K9B1guk" alt=""><figcaption></figcaption></figure>

And if you navigate to the **Workspace** menu you will see the workspace in the Workspaces list

<figure><img src="/files/ZH8KHXg4GCxS0oooWnMj" alt=""><figcaption></figcaption></figure>

### API-driven Workflow

Click **Workspaces** in the main menu and then click the **New workspace** button

<figure><img src="/files/rphrcHRSlPi5ZwIhW0s5" alt=""><figcaption></figcaption></figure>

Choose the **API-driven workflow**

<figure><img src="/files/PzfAAu8mdA4mFMSdkrrY" alt=""><figcaption></figcaption></figure>

Configure the workspace settings.

| Field             | Description                                                                                                                                                                                                       |
| ----------------- | ----------------------------------------------------------------------------------------------------------------------------------------------------------------------------------------------------------------- |
| Workspace Name    | The name of your workspace is unique and used in tools, routing, and UI. Dashes, underscores, and alphanumeric characters are permitted.                                                                          |
| Terraform Version | The version of Terraform to use for this workspace. Check [Custom Terraform CLI Builds](/getting-started/deployment/custom-terraform-cli-builds) if you want to restrict the versions in your Terrakube instance. |

Once you fill the settings click the **Create Workspace** button.

<figure><img src="/files/qZJfP4tNgWG4rOTZavM2" alt=""><figcaption></figcaption></figure>

ou will be redirected to the Workspace page.

{% hint style="info" %}
For more details how to use the Terrakube API. See [API-driven Workflow](/user-guide/workspaces/api-driven-workflow)
{% endhint %}

<figure><img src="/files/aJji3QVNU2p6beeV49Pp" alt=""><figcaption></figcaption></figure>

And if you navigate to the **Workspace** menu you will see the workspace in the Workspaces list

<figure><img src="/files/8er38tW5NWdWx7YSiFiJ" alt=""><figcaption></figcaption></figure>


# Webhooks

{% hint style="info" %}
**Manage Workspaces** permission is required to perform this action, please check [Team Management](/user-guide/organizations/team-management) for more info.
{% endhint %}

Webhooks let a Version Control workflow workspace react automatically to activity in its git repository: kicking off a plan/apply job on a push, or posting plan and apply results as comments on a pull request. This page covers the **Webhook** tab inside a workspace's settings. For connecting Terrakube to your VCS account in the first place, see [VCS Providers](/user-guide/vcs-providers).

### Enabling the webhook

Open a workspace, go to **Settings > Webhook**, and turn on **Enable VCS Webhook?**. Once enabled, Terrakube registers a webhook with your VCS provider and shows its remote ID.

On GitHub repositories you can optionally click **Migrate to Shared Webhook** to consolidate the webhooks for every workspace pointed at the same repository into a single shared webhook, instead of one per workspace. This is experimental; **Revert** switches a workspace back to its own per-workspace webhook.

### Webhook events

Each row in the events table matches a specific kind of repository activity to a template:

| Field          | Description                                                                                                                                                                                                     |
| -------------- | --------------------------------------------------------------------------------------------------------------------------------------------------------------------------------------------------------------- |
| Priority       | When more than one event row of the same type could match a payload, Terrakube evaluates them in ascending priority order and uses the first one whose branch and file filters match.                           |
| Event          | `Push`, `Pull Request`, or `Release`. See provider support below — not every VCS supports every event type.                                                                                                     |
| Branch/release | Comma-separated list of branch or release names, matched as a regex against the branch/release in the payload.                                                                                                  |
| Path Type      | `Pattern` for simple wildcards like `terraform/*` or `modules/**`, or `Regex` for full regular-expression matching against changed files. Branch/release matching always uses regex regardless of this setting. |
| File           | The pattern or regex list (depending on Path Type) that changed files must match for the job to run. Useful for monorepos so unrelated changes don't trigger a run.                                             |
| Template       | The [Templates](/user-guide/organizations/templates) to run when this event matches.                                                                                                                            |

### Posting plan and apply results on pull requests

For `Pull Request` events, two independent switches control an Atlantis/TFE-style PR comment workflow:

| Toggle                         | Effect                                                                                                                                                |
| ------------------------------ | ----------------------------------------------------------------------------------------------------------------------------------------------------- |
| **Post Plan on PR**            | Terrakube posts the plan output as a comment on the pull request, and accepts `terrakube plan` PR comments to re-run the plan.                        |
| **Allow Apply via PR Comment** | Accepts `terrakube apply` PR comments to run the workspace's default template with `auto-apply`. Only selectable once **Post Plan on PR** is enabled. |

If **Allow Apply via PR Comment** is off, the plan comment shows a notice instead of the apply instructions, and a `terrakube apply` comment gets a reply explaining apply is disabled rather than being silently ignored:

{% hint style="info" %}
Ask a workspace admin to enable **Allow Apply via PR Comment** in the Webhook settings, or apply the plan from the Terrakube UI.
{% endhint %}

**What a plan comment looks like:**

* A header with the workspace name, status, and a link back to the run in the Terrakube UI.
* A status icon (✅ / ❌ / ⚠️) and a one-line summary (e.g. `Plan: 2 to add, 0 to change, 0 to destroy.` or `No changes.`).
* The full plan output in a collapsible, diff-highlighted block.
* A footer inviting `terrakube apply` (only when enabled) and `terrakube plan` to re-run.

**Replans update the existing comment.** Pushing new commits to the same PR edits the existing plan comment in place instead of posting a new one every time — if the edit fails (for example the original comment was deleted), Terrakube falls back to posting a new comment. Apply results always post as their own separate comment, so the apply history is never overwritten.

**Command acknowledgment.** As soon as Terrakube recognizes a `terrakube plan` or `terrakube apply` comment, it reacts to that comment with 👀 so you know it was seen. Once the triggered job finishes, the reaction updates to ✅ (success) or ❌ (failure). Bitbucket has no comment-reaction API, so acknowledgment is a no-op there — Bitbucket users still get the plan/apply result comment itself.

<figure><img src="https://github.com/user-attachments/assets/e40adb29-82db-442f-aa5e-5cc7f08cffff" alt=""><figcaption><p>GitHub pull request with a Terrakube plan comment</p></figcaption></figure>

<figure><img src="https://github.com/user-attachments/assets/02aa0b0b-293c-4068-b7f3-4e9db1f267ac" alt=""><figcaption><p>GitLab merge request with a Terrakube plan comment</p></figcaption></figure>

### Provider support

| Provider                                                                                                    | Push | Pull Request | Release |   Post Plan on PR / Apply via PR Comment   |
| ----------------------------------------------------------------------------------------------------------- | :--: | :----------: | :-----: | :----------------------------------------: |
| [GitHub](/user-guide/vcs-providers/github.com)                                                              |   ✅  |       ✅      |    ✅    |          ✅ (with 👀→✅/❌ reactions)         |
| [GitHub Enterprise](/user-guide/vcs-providers/github-enterprise)                                            |   ✅  |       ✅      |    ✅    |          ✅ (with 👀→✅/❌ reactions)         |
| [GitLab](/user-guide/vcs-providers/gitlab.com) / [GitLab EE/CE](/user-guide/vcs-providers/gitlab-ee-and-ce) |   ✅  |       ✅      |    ✅    |         ✅ (with 👀→✅/❌ award emoji)        |
| [Bitbucket](/user-guide/vcs-providers/bitbucket.com)                                                        |   ✅  |       ✅      |    ✅    | ✅ (no reactions — no comment-reaction API) |
| [Azure DevOps](/user-guide/vcs-providers/azure-devops)                                                      |   ✅  |       ✅      |    –    |              Not yet supported             |
| [SSH](/user-guide/vcs-providers/ssh)                                                                        |   –  |       –      |    –    |                      –                     |

Azure DevOps triggers push and pull-request jobs via service hooks (or outbound polling on private networks — see [Azure DevOps](/user-guide/vcs-providers/azure-devops#webhooks)), but the PR comment plan/apply workflow above is currently only available for GitHub, GitLab, and Bitbucket. SSH-based repositories have no webhook support at all; runs must be triggered manually, via the API, or on a [schedule](/user-guide/workspaces/workspace-scheduler).


# Terraform State

Each Terrakube workspace has its own separate state data, used for jobs within that workspace. In Terrakube you can see the Terraform state in the standard [JSON format](#json-state) provided by the Terraform cli or you can see a [Visual State](#visual-state), this is a diagram created by Terrakube to represent the resources inside the JSON state.

### JSON State

Go to the workspace and click the **States** tab and then click in the specific state you want to see.

<figure><img src="/files/iB9INQo8ThV3rkJ04IJ2" alt=""><figcaption></figcaption></figure>

You will see the state in JSON format

<figure><img src="/files/lDHsFXWcRMiA6Rvoe5ce" alt=""><figcaption></figcaption></figure>

You can click the **Download** button to get a copy of the JSON state file

<figure><img src="/files/QIYmOq05B1XwyF6RF7n3" alt=""><figcaption></figcaption></figure>

### Visual State

Inside the **states** page, click the **diagram** tab and you will see the visual state for your terraform state.

<figure><img src="/files/dr5NBijay5VkVj5pgz2v" alt=""><figcaption></figcaption></figure>

The visual state will also show some information if you click each element like the following:

<figure><img src="/files/H9JIl6mJKtbLuKmkS09D" alt=""><figcaption></figcaption></figure>

### Resources

All the resources can be shown in the overview page inside the workspace:

<figure><img src="/files/TFFahIKOr4MVxhLmmY1E" alt=""><figcaption></figcaption></figure>

If you click the resources you can check the information about each resouce like the folloing

<figure><img src="/files/p4IpZyudhPDMxsGshUPd" alt=""><figcaption></figcaption></figure>


# Share Workspace State

Terrakube support sharing the terraform state between workspaces using the following data block.

```
data "terraform_remote_state" "remote_creation_time" {
  backend = "remote"
  config = {
    organization = "simple"
    hostname = "8080-azbuilder-terrakube-vg8s9w8fhaj.ws-us102.gitpod.io"
    workspaces = {
      name = "simple_tag1"
    }
  }
}
```

For example it can be used in the following way:

```
data "terraform_remote_state" "remote_creation_time" {
  backend = "remote"
  config = {
    organization = "simple"
    hostname = "8080-azbuilder-terrakube-vg8s9w8fhaj.ws-us102.gitpod.io"
    workspaces = {
      name = "simple_tag1"
    }
  }
}

resource "null_resource" "previous" {}

resource "time_sleep" "wait_30_seconds" {
  depends_on = [null_resource.previous]

  create_duration = data.terraform_remote_state.remote_creation_time.outputs.creation_time
}

resource "null_resource" "next" {
  depends_on = [time_sleep.wait_30_seconds]
}
```

{% hint style="info" %}
This feature is supported from Terrakube 2.15.0
{% endhint %}


# Provider Cache

The component use to execute terraform/opentofu configuration is stateless so everytime that it is executing a job will try to download the terraform/opentofu providers, in order to speed up the execution the following environment variable can be added to have a provider cache.

```
TF_PLUGIN_CACHE_DIR=/home/cnb/.terraform.d/plugin-cache
```

<figure><img src="/files/uu7sKpvkXyOt653puyr5" alt=""><figcaption></figcaption></figure>

When deploying the helm chart the following can be used to add an emptyDir volume to cache the providers.

```
executor:
  volumes:
    - name: cache-volume
      emptyDir:
        sizeLimit: 1024Mi
  volumeMounts:
  - mountPath: /home/cnb/.terraform.d/plugin-cache
    name: cache-volume
```

When running tofu init, temporary files such as .terraform.lock.hcl are generated based on the current machine’s architecture. On subsequent runs, OpenTofu verifies that the required providers match the architecture specified in the lock file to decide whether a new download is necessary.

However, when working locally on macOS, the architecture (e.g., darwin/amd64 or darwin/arm64) differs from the architecture used by remote Terrakube jobs (linux/arm64). This mismatch forces OpenTofu to redownload providers each time.

If you want to avoid that issue you need to run this command to generate lock file for Terrakube's image architecture.

```
tofu providers lock -platform=linux_amd64
```

{% hint style="warning" %}
Make sure to use the correct size for the volume mount, in the example is only using 1024Mi, more information can be found in this [link](https://developer.hashicorp.com/terraform/cli/config/config-file#provider-plugin-cache)
{% endhint %}

{% hint style="warning" %}
If you want to use cache with EphemeralJob you will need to provision a volume with in ReadWriteMany as several jobs can be writing to the cache at the same time.
{% endhint %}


# Variables

Terrakube workspace variables let you customize configurations and store information like static provider credentials. You can also reference this variables inside your Templates.

You can set [variables specifically for each workspace](#workspace-specific-variables) or you can create [Global Variables](/user-guide/organizations/global-variables) to reuse the same variables across multiple workspaces.

### Workspace-Specific Variables <a href="#workspace-specific-variables" id="workspace-specific-variables"></a>

To view and manage a workspace's variables, go to the workspace and click the **Variables** tab.

The **Variables** page appears, showing all workspace-specific variables. This is where you can add, edit, and delete workspace-specific variables.

There are 2 kinds of Variables:

* [Terraform Variables](#terraform-variables)
* [Environment Variables](#environment-variables)

### Terraform Variables

These Terraform variables are set using a terraform.tfvars file. To use interpolation or set a non-string value for a variable, click its HCL checkbox.

#### Add a Terraform Variable <a href="#add-a-variable" id="add-a-variable"></a>

Go to the workspace **Variables** page and in the *Terraform Variables* section click the **Add variable** button.

<figure><img src="/files/QRUWU2ZC3eepc2NDTuF1" alt=""><figcaption></figcaption></figure>

In the popup, provide the required values. Use the below table as reference:

| Field       | Description                                                                                                                               |
| ----------- | ----------------------------------------------------------------------------------------------------------------------------------------- |
| Key         | Unique variable name                                                                                                                      |
| Value       | Key value                                                                                                                                 |
| Description | Free text to document the reason for this global variable                                                                                 |
| HCL         | Parse this field as HashiCorp Configuration Language (HCL). This allows you to interpolate values at runtime.                             |
| Sensitive   | Sensitive variables are never shown in the UI or API. They may appear in Terraform logs if your configuration is designed to output them. |

Finally click the **Save variable** button and the variable will be created.

<figure><img src="/files/saol2PBMOvqJBMOjLaOV" alt=""><figcaption></figcaption></figure>

#### Edit a Terraform Variable

Click the **Edit** button next to the variable you want to edit.

<figure><img src="/files/gv7r4VlMwBxajmrlQZIM" alt=""><figcaption></figcaption></figure>

Make any desired changes and click **Save variable.**

#### Delete a Terraform Variable

Click the **Delete** button next to the variable you want to delete.

<figure><img src="/files/qM4YHmbOQyQXaTHAgEvl" alt=""><figcaption></figcaption></figure>

Click **Yes** to confirm your action.

<figure><img src="/files/qeiCD5XcOMjGDQsOycEv" alt=""><figcaption></figcaption></figure>

### Environment Variables

These variables are set in Terraform's shell environment using export.

#### Add an Environment Variable <a href="#add-a-variable" id="add-a-variable"></a>

Go to the workspace **Variables** page and in the *Environment Variables* section click the **Add variable** button.

<figure><img src="/files/m8cpmfHJcLfjexLQCzqg" alt=""><figcaption></figcaption></figure>

In the popup, provide the required values. Use the below table as reference:

| Field       | Description                                                                                                                               |
| ----------- | ----------------------------------------------------------------------------------------------------------------------------------------- |
| Key         | Unique variable name                                                                                                                      |
| Value       | Key value                                                                                                                                 |
| Description | Free text to document the reason for this global variable                                                                                 |
| HCL         | Parse this field as HashiCorp Configuration Language (HCL). This allows you to interpolate values at runtime.                             |
| Sensitive   | Sensitive variables are never shown in the UI or API. They may appear in Terraform logs if your configuration is designed to output them. |

Finally click the **Save variable** button and the variable will be created.

<figure><img src="/files/GbkhwgCrOnfEJJPYWd1J" alt=""><figcaption></figcaption></figure>

#### Edit an Environment Variable

Click the **Edit** button next to the variable you want to edit.

<figure><img src="/files/EAOahWUNR7IIJ9A0jffd" alt=""><figcaption></figcaption></figure>

Make any desired changes and click **Save variable.**

#### Delete an Environment Variable

Click the **Delete** button next to the variable you want to delete.

<figure><img src="/files/Y0d7LOUFfDSmhqHyOWoW" alt=""><figcaption></figcaption></figure>

Click **Yes** to confirm your action.


# Dynamic Provider Credentials

{% hint style="info" %}
This feature is available from version 2.21.0
{% endhint %}

### Generate Public and Private Key.

To use Dynamic Provider credentials we need to genera a public and private key that will be use to generate a validate the federated tokens, we can use the following commands

```
openssl genrsa -out private_temp.pem 2048
openssl rsa -in private_temp.pem -outform PEM -pubout -out public.pem
```

You need to make sure the private key starts with "-----BEGIN PRIVATE KEY-----" if not the following command can be used to transform the private key to the correct format

```
openssl pkcs8 -topk8 -inform PEM -outform PEM -nocrypt -in private_temp.pem -out private.pem
```

The public and private key need to be mounted inside the container and the path should be specify in the following environment variables

* DynamicCredentialPublicKeyPath
* DynamicCredentialPrivateKeyPath

### Kubernetes Deployment

To enable dynamic credentials when using the helm chart add the following values.

```yaml
api:
  dynamicCredentials:
    enabled: true
    publicKey: |
      -----BEGIN PUBLIC KEY-----
      REDACTED
      -----END PUBLIC KEY-----
    privateKey: |
      -----BEGIN PRIVATE KEY-----
      REDACTED
      -----END PRIVATE KEY-----
  volumes:
    - name: dynamic-credentials
      secret:
        secretName: terrakube-dynamic-credentials
        items:
          - key: public-key.pem
            path: public-key.pem
          - key: private-key.pem
            path: private-key.pem
  volumeMounts:
  - name: dynamic-credentials
    mountPath: /etc/terrakube/credentials
    readOnly: true
```

### Public Endpoints Requirements

To use Dynamic Provider credentials the following public endpoints were added. This endpoint needs to be accessible for your different cloud providers.

```
GET https://TERRAKUBE.MYSUPERDOMAIN.COM/.well-known/openid-configuration
{
  "issuer": "https://TERRAKUBE.MYSUPERDOMAIN.COM",
  "jwks_uri": "https://TERRAKUBE.MYSUPERDOMAIN.COM/.well-known/jwks",
  "response_types_supported": [
    "id_token"
  ],
  "claims_supported": [
    "sub",
    "aud",
    "exp",
    "iat",
    "iss",
    "jti",
    "terrakube_workspace_id",
    "terrakube_organization_id",
    "terrakube_job_id"
  ],
  "id_token_signing_alg_values_supported": [
    "RS256"
  ],
  "scopes_supported": [
    "openid"
  ],
  "subject_types_supported": [
    "public"
  ]
}
```

```
GET https://TERRAKUBE.MYSUPERDOMAIN.COM/.well-known/jwks
{
  "keys": [
    {
      "kty": "RSA",
      "use": "sig",
      "n": "ALEzGE4Rn2WhxOhIuXAzq7e-WvRLCJfoqrHMUXtpt6gefNmWGo9trbea84KyeKdvzE9wBwWxnz_U5d_utmLLztVA2FLdDfnndh7pF4Fp7hB-lhaT1hV2EsiFsc9oefCYmkzXmHylfNQOuqNlRA_2Xu5pHovrF79WW01hWSjhGTkpj6pxFG4t7Tl54SWnJ83CvGDAKuoO9c1M1iTKikB3ENMK8WfU-wZJ4oLTAfhSydqZxZuGRhiwPGsEQOpRynyHJ54XWZHmFdsWs_eGRsfs1iTPbiQSBZbaEwz36HF4QdqFzzLGd67sTtZku_YEsUbJW8cbK6nOFEdR0BSTtSV-lPk=",
      "e": "AQAB",
      "kid": "03446895-220d-47e1-9564-4eeaa3691b42",
      "alg": "RS256"
    }
  ]
}
```

### Terrakube Environment Variables:

The following environment variables can be used to customize the dynamic credentials configuration:

* DynamicCredentialId = This will be the kid in the JWKS endpoint (Default value: 03446895-220d-47e1-9564-4eeaa3691b42)
* DynamicCredentialTtl= The TTL for the federated token generated internally in Terrakube (Defafult: 30)
* DynamicCredentialPublicKeyPath= The path to the public key to validate the federated tokens
* DynamicCredentialPrivateKeyPath=The path to the private key to generate the federated tokens

### Token structure

Terrakube will generate a JWT token internally, this token will be used to authenticate to your cloud provider.

The token structure looks like the following for Azure

```
JWT HEADER
{
  "kid": "12345",
  "alg": "RS256"
}
JWT BODY
{
  "sub": "organization:TERRAKUBE_ORG_NAME:workspace:TERRAKUBE_WORKSPACE_NAME",
  "aud": "api://AzureADTokenExchange",
  "jti": "12345678",
  "terrakube_workspace_id": "1",
  "terrakube_organization_id": "2",
  "terrakube_job_id": "3",
  "iat": 1713397293,
  "iss": "https://terrakube-api.example.com",
  "exp": 1713397353
}
SIGNATURE
```

The token structure looks like the following for GCP

```
JWT HEADER
{
  "kid": "03446895-220d-47e1-9564-4eeaa3691b42",
  "alg": "RS256"
}
JWT BODY
{
  "sub": "organization:TERRAKUBE_ORG_NAME:workspace:TERRAKUBE_WORKSPACE_NAME",
  "aud": "https://iam.googleapis.com/projects/xxxxx/locations/global/workloadIdentityPools/xxxxx/providers/xxxxx",
  "jti": "d4432299-5dad-4b1e-9756-544639e84cec",
  "terrakube_workspace_id": "d9b58bd3-f3fc-4056-a026-1163297e80a8",
  "terrakube_organization_id": "8abe206b-29a8-4ed8-8a3b-30237e295659",
  "terrakube_job_id": "1",
  "iat": 1713915600,
  "iss": "https://terrakube-api.example.com",
  "exp": 1713917400
}
SIGNATURE
```

The token structure looks like the following for AWS

```
JWT HEADER
{
  "kid": "03446895-220d-47e1-9564-4eeaa3691b42",
  "alg": "RS256"
}
JWT BODY
{
  "sub": "organization:TERRAKUBE_ORG_NAME:workspace:TERRAKUBE_WORKSPACE_NAME",
  "aud": "aws.workload.identity",
  "jti": "d4432299-5dad-4b1e-9756-544639e84cec",
  "terrakube_workspace_id": "d9b58bd3-f3fc-4056-a026-1163297e80a8",
  "terrakube_organization_id": "8abe206b-29a8-4ed8-8a3b-30237e295659",
  "terrakube_job_id": "1",
  "iat": 1713915600,
  "iss": "https://terrakube-api.example.com",
  "exp": 1713917400
}
SIGNATURE
```


# AWS Dynamic Provider Credentials

### Requirements

The dynamic provider credential setup in AWS can be done with the Terrraform code available in the following link:

<https://github.com/AzBuilder/terrakube/tree/main/dynamic-credential-setup/aws>

{% hint style="warning" %}
The code will also create a sample workspace with all the require environment variables that can be used to test the functionality using the CLI driven workflow.
{% endhint %}

Make sure to mount your public and private key to the API container as explained [here](https://docs.terrakube.io/user-guide/workspaces/dynamic-provider-credentials#generate-public-and-private-key)

{% hint style="info" %}
Mare sure the private key is in ***"pkcs8"*** format
{% endhint %}

Validate the following terrakube api endpoints are working:

* <https://terrakube-api.mydomain.com/.well-known/jwks>
* <https://terrakube-api.mydomain.com/.well-known/openid-configuration>

Set terraform variables using: ***"variables.auto.tfvars"***

```
terrakube_token = "TERRAKUBE_PERSONAL_ACCESS_TOKEN"
terrakube_api_hostname = "TERRAKUBE-API.MYCLUSTER.COM"
terrakube_federated_credentials_audience="aws.workload.identity"
terrakube_organization_name="simple"
terrakube_workspace_name = "dynamic-workspace-aws"
aws_region = "us-east-1"
```

{% hint style="info" %}
To generate the API token check [here](https://docs.terrakube.io/user-guide/organizations/api-tokens)
{% endhint %}

Run Terraform apply to create all the federated credential setup in AWS and a sample workspace in terrakube for testing

To test the following terraform code can be used:

```
terraform {

  cloud {
    organization = "terrakube_organization_name"
    hostname = "terrakube-api.mydomain.com"

    workspaces {
      name = "terrakube_workspace_name"
    }
  }
}

provider "aws" {


}

resource "aws_s3_bucket" "example" {
  bucket = "my-tf-superbucket-awerqerq"

  tags = {
    Name        = "My bucket"
    Environment = "Dev"
  }
}
```

<figure><img src="/files/zoSBIiXWyEaRNkfL1FaW" alt=""><figcaption></figcaption></figure>

<figure><img src="/files/Rlub1IHFejP1StJEFZw7" alt=""><figcaption></figcaption></figure>


# Azure Dynamic Provider Credentials

### Requirements

The dynamic provider credential setup in Azure can be done with the Terrraform code available in the following link:

<https://github.com/AzBuilder/terrakube/tree/main/dynamic-credential-setup/azure>

{% hint style="warning" %}
The code will also create a sample workspace with all the require environment variables that can be used to test the functionality using the CLI driven workflow.
{% endhint %}

Make sure to mount your public and private key to the API container as explained [here](https://docs.terrakube.io/user-guide/workspaces/dynamic-provider-credentials#generate-public-and-private-key)

{% hint style="info" %}
Mare sure the private key is in ***"pkcs8"*** format
{% endhint %}

Validate the following terrakube api endpoints are working:

* <https://terrakube-api.mydomain.com/.well-known/jwks>
* <https://terrakube-api.mydomain.com/.well-known/openid-configuration>

Set terraform variables using: ***"variables.auto.tfvars"***

```
terrakube_token                          = "TERRAKUBE_PERSONAL_ACCESS_TOKEN"
terrakube_api_hostname                   = "TERRAKUBE-API.MYCLUSTER.COM"
terrakube_federated_credentials_audience = "api://AzureADTokenExchange"
terrakube_organization_name              = "simple"
terrakube_workspace_name                 = "dynamic-azure"
```

{% hint style="info" %}
To generate the API token check [here](https://docs.terrakube.io/user-guide/organizations/api-tokens)
{% endhint %}

Run Terraform apply to create all the federated credential setup in AWS and a sample workspace in terrakube for testing

To test the following terraform code can be used:

```
terraform {

  cloud {
    organization = "terrakube_organization_name"
    hostname = "terrakube-api.mydomain.com"

    workspaces {
      name = "terrakube_workspace_name"
    }
  }
}

provider "azurerm" {
  features {}
}

 resource "azurerm_resource_group" "example" {
  name     = "randomstring-aejthtyu"
  location = "East US 2"
}


```

### Running Example:

<figure><img src="/files/U0rgfw8olx46yeVQQP0W" alt=""><figcaption></figcaption></figure>

When running a job Terrakube will correctly authenticate to Azure without any credentials inside the workspace

<figure><img src="/files/33jl8CRBgjSXay7ls94Y" alt=""><figcaption></figcaption></figure>


# GCP Dynamic Provider Credentials

### Requirements

The dynamic provider credential setup in GCP can be done with the Terrraform code available in the following link:

<https://github.com/AzBuilder/terrakube/tree/main/dynamic-credential-setup/gcp>

{% hint style="warning" %}
The code will also create a sample workspace with all the require environment variables that can be used to test the functionality using the CLI driven workflow.
{% endhint %}

Make sure to mount your public and private key to the API container as explained [here](https://docs.terrakube.io/user-guide/workspaces/dynamic-provider-credentials#generate-public-and-private-key)

{% hint style="info" %}
Mare sure the private key is in ***"pkcs8"*** format
{% endhint %}

Validate the following terrakube api endpoints are working:

* <https://terrakube-api.mydomain.com/.well-known/jwks>
* <https://terrakube-api.mydomain.com/.well-known/openid-configuration>

Set terraform variables using: ***"variables.auto.tfvars"***

```
terrakube_token = "TERRAKUBE_PERSONAL_ACCESS_TOKEN"
terrakube_hostname = "terrakube-api.mydomain.com"
terrakube_organization_name = "simple"
terrakube_workspace_name = "dynamic-workspace"
gcp_project_id = "my-gcp-project"

```

{% hint style="info" %}
To generate the API token check [here](https://docs.terrakube.io/user-guide/organizations/api-tokens)
{% endhint %}

Run Terraform apply to create all the federated credential setup in GCP and a sample workspace in terrakube for testing

To test the following terraform code can be used:

```
terraform {

  cloud {
    organization = "terrakube_organization_name"
    hostname = "terrakube-api.mydomain.com"

    workspaces {
      name = "terrakube_workspace_name"
    }
  }
}

provider "google" {
  project     = "my-gcp-project"
  region      = "us-central1"
  zone        = "us-central1-c"
}

resource "google_storage_bucket" "auto-expire" {
  name          = "mysuperbukcetname"
  location      = "US"
  force_destroy = true

  public_access_prevention = "enforced"
}
```

### Running Example

<figure><img src="/files/ug4Bai9mSU6oIi30j5at" alt=""><figcaption></figcaption></figure>


# OpenBao/Vault

### Requirementes

The dynamic provider credential setup in OpenBao/Vault can be found inside the following link:

<https://github.com/AzBuilder/terrakube/tree/main/dynamic-credential-setup/openbao-vault>

{% hint style="warning" %}
The code will also create a sample workspace with all the require environment variables that can be used to test the functionality using the CLI driven workflow.
{% endhint %}

Make sure to mount your public and private key to the API container as explained [here](https://docs.terrakube.io/user-guide/workspaces/dynamic-provider-credentials#generate-public-and-private-key)

{% hint style="info" %}
Mare sure the private key is in ***"pkcs8"*** format
{% endhint %}

Validate the following terrakube api endpoints are working:

* <https://terrakube-api.mydomain.com/.well-known/jwks>
* <https://terrakube-api.mydomain.com/.well-known/openid-configuration>

Setup OpenBao/Vault

Running openbao in development mode

```
bao server -dev -dev-root-token-id="dev-only-token" 
```

Use the following openbao policy

```
# Allow tokens to query themselves
path "auth/token/lookup-self" {
  capabilities = ["read"]
}

# Allow tokens to renew themselves
path "auth/token/renew-self" {
  capabilities = ["update"]
}

# Allow tokens to revoke themselves
path "auth/token/revoke-self" {
  capabilities = ["update"]
}

# Configure the actual secrets the token should have access to
path "shared/data/kv/creds" {
  capabilities = ["read"]
}
```

JWT Role

```
{
  "policies": ["tfc-policy"],
  "role_type": "jwt",
  "bound_audiences": ["vault.workload.identity"],
  "bound_claims_type": "glob",
  "user_claim": "terrakube_workspace_name",
  "bound_claims": {
    "sub":"organization:simple:workspace:vault"
  },
  "token_ttl": "20m"
}
```

Adding test values, policy and jwt role to openbao with the following:

```
export VAULT_ADDR='http://localhost:8200'
bao login dev-only-token
bao auth enable userpass
bao write auth/userpass/users/terrakube password=p@ssw0rd
bao auth enable approle
bao write auth/approle/role/terrakube-role secret_id_ttl=10m token_ttl=20m token_max_ttl=30m
bao secrets enable -path shared -version 2 kv
bao kv put -mount shared kv/creds username=terrakube password=p@ssw0rd
bao auth enable jwt
bao write auth/jwt/config oidc_discovery_url="https://terrakube-api.platform.local" bound_issuer="https://terrakube-api.platform.local" 
bao policy write tfc-policy terrakube-policy.hcl
bao write auth/jwt/role/tfc-role @vault-jwt-auth-role.json
```

At the workspace level we need to define the following environment variables:

```
ENABLE_DYNAMIC_CREDENTIALS_VAULT=1
WORKLOAD_IDENTITY_VAULT_AUDIENCE=vault.workload.identity
VAULT_ADDR=http://localhost:8200
WORKLOAD_IDENTITY_VAULT_ROLE=tfc-role
```

Example:

<figure><img src="/files/VQ4iy2mmfgV1i3trJ203" alt=""><figcaption></figcaption></figure>

Now running cli driven workflow with the following terraform code to test

```
terraform {
  cloud {
    hostname = "terrakube-api.platform.local"
    organization = "simple"
    workspaces {
      name = "vault"
    }
  }
}

provider vault {
  skip_tls_verify = true
  skip_child_token = true
  }

data "vault_kv_secret_v2" "password" {
  mount = "shared"
  name  = "kv/creds"
}
```

It will show the following:

```
user@pop-os:~/git/terrakube/vault$ terraform plan

Running plan in Terraform Cloud. Output will stream here. Pressing Ctrl-C
will stop streaming the logs, but will not stop the plan running remotely.

Preparing the remote plan...

To view this run in a browser, visit:
https://terrakube-api.platform.local/app/simple/vault/runs/run-1

Waiting for the plan to start...

***************************************
Running Terraform PLAN
***************************************
data.vault_kv_secret_v2.password: Reading...
data.vault_kv_secret_v2.password: Read complete after 0s [id=shared/data/kv/creds]

No changes. Your infrastructure matches the configuration.
```


# Workspace scheduler

Terrakube allows to schedule a job inside workspaces, this will allow to execute a specific [template](/user-guide/organizations/templates) in an specific time.

To create a workspace schedule click the "schedule" tab and click "Add schedule" like the following image.

<figure><img src="/files/ksZSIK7hRhIHKmMRJuQk" alt=""><figcaption></figcaption></figure>

This is usefull for example when you want to destroy your infrastructure by the end of every week to save some money with your cloud provider and recreate it every monday morning.

Example.

Lets destroy the workspace every friday at 6 pm

{% hint style="info" %}
Cron expression will be 30 18 \* \* 5
{% endhint %}

<figure><img src="/files/WhjTFFSUk6qOnnczPHey" alt=""><figcaption></figcaption></figure>

Lets create the workspace every monday at 5:30 am

{% hint style="info" %}
Cron expression will be 30 5 \* \* 1
{% endhint %}

<figure><img src="/files/MmSmQQerl38Pe7i9hmZZ" alt=""><figcaption></figcaption></figure>


# API-driven Workflow

In progress


# CLI-driven Workflow

With the CLI integration, you can use Terrakube’s collaboration features in the Terraform CLI workflow that you are already familiar with. This gives you the best of both worlds as a developer who uses the Terraform CLI, and it also works well with your existing CI/CD pipelines.

You can initiate runs with the usual terraform plan and terraform apply commands and then monitor the run progress from your terminal. These runs run remotely in Terrakube.

{% hint style="info" %}
Terrakube creates default templates for CLI-Driven workflow when you create a new organization, if you delete those templates you won't be able to run this workflow, check [default templates](/user-guide/organizations/templates/default-templates#cli-driven-templates) for more information.
{% endhint %}

{% hint style="warning" %}
At the moment all the terraform operations are executed remotely in Terrakube
{% endhint %}

### Configuration

To use the CLI-driven workflow the firts step will be to setup our project to use the terraform remote backend or the `cloud` block as the following example:

{% tabs %}
{% tab title="remote backend" %}

```
terraform {
  backend "remote" {
    hostname = "terrakube-api.example.com"
    organization = "simple"
    workspaces {
      name = "workspace1"
    }
  }
}

resource "random_string" "random" {
  length           = 16
  special          = true
  override_special = "/@£$"
}
```

{% endtab %}

{% tab title="cloud block" %}

```
terraform {
  cloud {
    organization = "simple"
    hostname = "terrakube-api.example.com"
    workspaces {
      name = "samplecloud"
    }
  }
}

resource "random_string" "random" {
  length           = 16
  special          = true
  override_special = "/@£$"
}
```

{% endtab %}

{% tab title="cloud block tags" %}

```
terraform {
  cloud {
    organization = "simple"
    hostname = "terrakube-api.example.com"

    workspaces {
      tags = ["development", "networking"]
    }
  }
}

resource "random_string" "random" {
  length           = 16
  special          = true
  override_special = "/@£$"
}
```

{% endtab %}
{% endtabs %}

* Hostname
  * This should be the Terrakube API
* Organization
  * This should be the Terrakube organization where the workspace will be created.
* Workspace
  * The name of the workspace to be created. Or you can use an existing workspace created in the UI using the API or CLI driven workflow.

{% hint style="warning" %}
The `cloud` block is available in Terraform v1.1 and later. Previous versions can use the remote bakced to configure the CLI workflow and migrate state. Using tags in the `cloud` block is not yet supported
{% endhint %}

### Terraform login.

Once we have added the terraform remote state configuration we will need to authenticate to Terrakube using the following command with the Terrakube API as the following:

```
terraform login 8080-azbuilder-terrakube-3xqsq270uq1.ws-us82.gitpod.io
```

The output will look something like the following:

<figure><img src="/files/KhVlmMA2jhq106doh9qz" alt=""><figcaption></figcaption></figure>

```
terraform login 8080-azbuilder-terrakube-po7evw1u15x.ws-us86.gitpod.io
Terraform will request an API token for 8080-azbuilder-terrakube-po7evw1u15x.ws-us86.gitpod.io using OAuth.

This will work only if you are able to use a web browser on this computer to
complete a login process. If not, you must obtain an API token by another
means and configure it in the CLI configuration manually.

If login is successful, Terraform will store the token in plain text in
the following file for use by subsequent commands:
    C:\Users\XXXXXX\AppData\Roaming\terraform.d\credentials.tfrc.json

Do you want to proceed?
  Only 'yes' will be accepted to confirm.

  Enter a value: yes

Terraform must now open a web browser to the login page for 8080-azbuilder-terrakube-po7evw1u15x.ws-us86.gitpod.io.

If a browser does not open this automatically, open the following URL to proceed:
    https://5556-azbuilder-terrakube-po7evw1u15x.ws-us86.gitpod.io/dex/auth?scope=openid+profile+email+offline_access+groups&client_id=example-app&code_challenge=YYe059U9HyeMy1-RmuEzSajPJYGdcY4IkNr0pZz4LZ8&code_challenge_method=S256&redirect_uri=http%3A%2F%2Flocalhost%3A10000%2Flogin&response_type=code&state=f8b6da79-35f3-2b92-d8d8-179cda386f91

Terraform will now wait for the host to signal that login was successful.


---------------------------------------------------------------------------------

Success! Terraform has obtained and saved an API token.

The new API token will be used for any future Terraform command that must make
authenticated requests to 8080-azbuilder-terrakube-po7evw1u15x.ws-us86.gitpod.io.
```

### Terraform Init

After the authentication is completed you can run the following command to initialized the workspace

```
terraform init
```

The output will look like this:

```
terraform init

Initializing the backend...

Initializing provider plugins...
- Reusing previous version of hashicorp/random from the dependency lock file
- Using previously-installed hashicorp/random v3.4.3

Terraform has been successfully initialized!

You may now begin working with Terraform. Try running "terraform plan" to see
any changes that are required for your infrastructure. All Terraform commands
should now work.

If you ever set or change modules or backend configuration for Terraform,
rerun this command to reinitialize your working directory. If you forget, other
commands will detect it and remind you to do so if necessary.
```

If the initialization is successfull you should be able to see something like this:

### Implicit Workspace Creation <a href="#implicit-workspace-creation" id="implicit-workspace-creation"></a>

Terrakube will create a new workspace with the name you specify in the cloud block if it doesn’t already exist in your organization. You will see a message about this when you run terraform init.

### Terraform Plan

Once the terraform initialization is completed we should be able to run a terraform plan remotely using the following:

```
terraform plan
```

```
Running plan in the remote backend. Output will stream here. Pressing Ctrl-C
will stop streaming the logs, but will not stop the plan running remotely.

Preparing the remote plan...

To view this run in a browser, visit:
https://8080-azbuilder-terrakube-po7evw1u15x.ws-us86.gitpod.io/app/simple/workspace1/runs/1

Waiting for the plan to start...

Terrakube Remote Plan Execution


Terraform used the selected providers to generate the following execution
plan. Resource actions are indicated with the following symbols:
  + create

Terraform will perform the following actions:

  # random_string.random will be created
  + resource "random_string" "random" {
      + id               = (known after apply)
      + length           = 16
      + lower            = true
      + min_lower        = 0
      + min_numeric      = 0
      + min_special      = 0
      + min_upper        = 0
      + number           = true
      + numeric          = true
      + override_special = "/@£$"
      + result           = (known after apply)
      + special          = true
      + upper            = true
    }

Plan: 1 to add, 0 to change, 0 to destroy.
```

{% hint style="info" %}
You can use .tfvars file inside the workspace to upload the variables to the workspace automatically
{% endhint %}

If you go to the Terrakube UI, you will be able to see the workspace plan execution.

<figure><img src="/files/felWKFiRjAFBNBSmsBjx" alt=""><figcaption></figcaption></figure>

### Terraform Apply

You can also execute a terraform apply and it will run inside Terrakube remotely.

```
terraform apply
Running apply in the remote backend. Output will stream here. Pressing Ctrl-C
will cancel the remote apply if it's still pending. If the apply started it
will stop streaming the logs, but will not stop the apply running remotely.

Preparing the remote apply...

To view this run in a browser, visit:
https://8080-azbuilder-terrakube-po7evw1u15x.ws-us86.gitpod.io/app/simple/workspace1/runs/2

Waiting for the plan to start...

Terrakube Remote Plan Execution


Terraform used the selected providers to generate the following execution
plan. Resource actions are indicated with the following symbols:
  + create

Terraform will perform the following actions:

  # random_string.random will be created
  + resource "random_string" "random" {
      + id               = (known after apply)
      + length           = 16
      + lower            = true
      + min_lower        = 0
      + min_numeric      = 0
      + min_special      = 0
      + min_upper        = 0
      + number           = true
      + numeric          = true
      + override_special = "/@£$"
      + result           = (known after apply)
      + special          = true
      + upper            = true
    }

Plan: 1 to add, 0 to change, 0 to destroy.


Do you want to perform these actions in workspace "workspace1"?
  Terraform will perform the actions described above.
  Only 'yes' will be accepted to approve.

  Enter a value: yes

random_string.random: Creating...
random_string.random: Creation complete after 0s [id=QvsEmtO7WoeJJcAJ]

Apply complete! Resources: 1 added, 0 changed, 0 destroyed.
```

<figure><img src="/files/5QbEdhyEo2EUFzeRNKI6" alt=""><figcaption></figcaption></figure>

{% hint style="warning" %}
The terraform apply can only be approved using the terraform CLI. You wont be able to approve the job inside the UI.
{% endhint %}

Terraform Destroy

Executing the terraform destroy is also possible.

```
terraform destroy
Running apply in the remote backend. Output will stream here. Pressing Ctrl-C
will cancel the remote apply if it's still pending. If the apply started it
will stop streaming the logs, but will not stop the apply running remotely.

Preparing the remote apply...

To view this run in a browser, visit:
https://8080-azbuilder-terrakube-po7evw1u15x.ws-us86.gitpod.io/app/simple/workspace1/runs/3

Waiting for the plan to start...

Terrakube Remote Plan Execution


random_string.random: Refreshing state... [id=QvsEmtO7WoeJJcAJ]

Terraform used the selected providers to generate the following execution
plan. Resource actions are indicated with the following symbols:
  - destroy

Terraform will perform the following actions:

  # random_string.random will be destroyed
  - resource "random_string" "random" {
      - id               = "QvsEmtO7WoeJJcAJ" -> null
      - length           = 16 -> null
      - lower            = true -> null
      - min_lower        = 0 -> null
      - min_numeric      = 0 -> null
      - min_special      = 0 -> null
      - min_upper        = 0 -> null
      - number           = true -> null
      - numeric          = true -> null
      - override_special = "/@£$" -> null
      - result           = "QvsEmtO7WoeJJcAJ" -> null
      - special          = true -> null
      - upper            = true -> null
    }

Plan: 0 to add, 0 to change, 1 to destroy.


Do you really want to destroy all resources in workspace "workspace1"?
  Terraform will destroy all your managed infrastructure, as shown above.
  There is no undo. Only 'yes' will be accepted to confirm.

  Enter a value: yes

random_string.random: Destroying... [id=QvsEmtO7WoeJJcAJ]
random_string.random: Destruction complete after 0s

Apply complete! Resources: 0 added, 0 changed, 1 destroyed.
```

Inside the UI the terraform destroy operation will look like this.

<figure><img src="/files/QwP6XHumh5Vqsyf2RRrR" alt=""><figcaption></figcaption></figure>

{% hint style="warning" %}
The terraform destroy can only be approved using the terraform CLI. You wont be able to approve the job inside the UI.
{% endhint %}


# Ephemeral Workspaces

The following will show how easy is to implement an ephemeral workspace using Terrakube custom schedules and templates with the remote CLI-driven workflow.

The first step will be to create a new organization, lets call it "playground".

<figure><img src="/files/Y26Y6xXUtbOqJMMoJ9oc" alt=""><figcaption></figcaption></figure>

Once we have the playground organization, we need to add a team with access to create templates like the following:

<figure><img src="/files/1BjSeqHwLA4pnqEuYgrd" alt=""><figcaption></figcaption></figure>

We will also need a team with access to create/delete a workspace only, like the following:

<figure><img src="/files/T0ClLmMEjZFGg07L5Tzk" alt=""><figcaption></figcaption></figure>

{% hint style="warning" %}
Teams names will depend on your Dex configuration.
{% endhint %}

Once we have the two teams in our new playground organization, we can proceed and create a new template that we will be using to auto destroy all the workspace:

<figure><img src="/files/CkOs1GXfuwwBVhj4bogf" alt=""><figcaption></figcaption></figure>

Lets call it "delete-playground" and it will have the following code:

```yaml
flow:
  - type: "terraformDestroy"
    name: "Destroy Playground"
    step: 100
  - type: "disableWorkspace"
    name: "Delete Workspace"
    step: 200

```

<figure><img src="/files/EC35pznw2QG5KlotHcbT" alt=""><figcaption></figcaption></figure>

Now we can update the default template that is used when we are using the remote CLI-driven workflow, this template is inside every organization by default and is called "**Terraform-Plan/Apply-Cli**", usually we don't need to update this template but we will do some small changes to enable ephemeral workspaces in the playground organization.

We need to go the the templates inside the organization settings and edit the template

<figure><img src="/files/HYJbeX9XoLD553oqaqFC" alt=""><figcaption></figcaption></figure>

We will add a new step in the template, this will allow to schedule a job that will be using the "delete-playground" template that we have created above.

<figure><img src="/files/eCf34YzlLFgr9epY0Ieo" alt=""><figcaption></figcaption></figure>

We need to use the following template code:

```yaml
flow:
- type: "terraformPlan"
  name: "Terraform Plan from Terraform CLI"
  step: 100
- type: "approval"
  name: "Approve Plan from Terraform CLI"
  step: 150
  team: "TERRAFORM_CLI"
- type: "terraformApply"
  name: "Terraform Apply from Terraform CLI"
  step: 200
- type: "scheduleTemplates"
  step: 300
  name: "Setup auto destroy"
  templates:
    - name: "delete-playground"
      schedule: "0 0/5 * ? * * *"

```

If we pay special attention we just add a new section where we define that the schedule will run every five minutes after the Terraform apply is completed.

In this example we will schedule the template every five minutes for testing purposes.

```yaml
  name: "Setup auto destroy"
  templates:
    - name: "delete-playground"
      schedule: "0 0/5 * ? * * *"
```

{% hint style="info" %}
The schedule is using Quartz format, to learn more about this use this [link](https://www.freeformatter.com/cron-expression-generator-quartz.html).
{% endhint %}

Now we need to define our Terraform code, lets use the following simple example:

```
terraform {
  cloud {
    organization = "playground"
    hostname = "8080-azbuilder-terrakube-h128dcdc7l1.ws-us105.gitpod.io"

    workspaces {
      tags = ["myplayground", "example"]
    }
  }
}

resource "null_resource" "previous" {}

resource "time_sleep" "wait_5_seconds" {
  depends_on = [null_resource.previous]

  create_duration = "5s"
}

resource "null_resource" "next" {
  depends_on = [time_sleep.wait_5_seconds]
}

output "creation_time" {
    value = time_sleep.wait_5_seconds.create_duration
}
```

Run **terraform login** to connect to our Terrakube instance:

```
terraform login 8080-azbuilder-terrakube-h128dcdc7l1.ws-us105.gitpod.io
```

Now we can run **terraform init** to initialize our workspace inside the playground organization, lets use "myplayground" for the name of our new workspace

<figure><img src="/files/3mxRFl6gGDNcI0BYhjHF" alt=""><figcaption></figcaption></figure>

Let's run terraform apply and create our resources:

```bash
Preparing the remote apply...

To view this run in a browser, visit:
https://8080-azbuilder-terrakube-h128dcdc7l1.ws-us105.gitpod.io/app/playground/myplayground/runs/1

Waiting for the plan to start...

***************************************
Running Terraform PLAN
***************************************

Terraform used the selected providers to generate the following execution
plan. Resource actions are indicated with the following symbols:
  + create

Terraform will perform the following actions:

  # null_resource.next will be created
  + resource "null_resource" "next" {
      + id = (known after apply)
    }

  # null_resource.previous will be created
  + resource "null_resource" "previous" {
      + id = (known after apply)
    }

  # time_sleep.wait_5_seconds will be created
  + resource "time_sleep" "wait_5_seconds" {
      + create_duration = "5s"
      + id              = (known after apply)
    }

Plan: 3 to add, 0 to change, 0 to destroy.

Changes to Outputs:
  + creation_time = "5s"

Do you want to perform these actions in workspace "myplayground"?
  Terraform will perform the actions described above.
  Only 'yes' will be accepted to approve.

  Enter a value: yes

null_resource.previous: Creating...
null_resource.previous: Creation complete after 0s [id=7198759863280029870]
time_sleep.wait_5_seconds: Creating...
time_sleep.wait_5_seconds: Creation complete after 5s [id=2023-10-18T16:05:14Z]
null_resource.next: Creating...
null_resource.next: Creation complete after 0s [id=855270182201609076]

Apply complete! Resources: 3 added, 0 changed, 0 destroyed.

Outputs:

creation_time = "5s"

```

Our new workspace is created and if we go the organization we can see all the information

<figure><img src="/files/7ifXjIdVWUvzhqwEWu0j" alt=""><figcaption></figcaption></figure>

The job will be running to create the resources:

<figure><img src="/files/cbaBiPRobkPLRbMgAa3M" alt=""><figcaption></figcaption></figure>

We can see that our job is completed and the setup auto destroy have created a new schedule for our workspace:

<figure><img src="/files/FNXsanJkYWYdzeI6BJ2e" alt=""><figcaption></figcaption></figure>

We could go to the schedules tab:

<figure><img src="/files/DfkNMmXJ1S7PezLPf2xl" alt=""><figcaption></figcaption></figure>

This schedule will run in 5 minutes:

<figure><img src="/files/Pt3Z7LAN3Hv17sIKPv2k" alt=""><figcaption></figcaption></figure>

After waiting for 5 minutes we will see that Terrakube have created a new Job automatically

<figure><img src="/files/Cf2iti3T1dskqwaD19df" alt=""><figcaption></figcaption></figure>

If we check the details for the new job we can see that a terraform destroy will be executed:

<figure><img src="/files/DRFshS01CMesRTHpRurf" alt=""><figcaption></figcaption></figure>

All of the workspace resources are deleted and the workspace will be deleted automatically after the destroy is completed.

<figure><img src="/files/PGBEURbNnvWxQINDHYYw" alt=""><figcaption></figcaption></figure>

Once the Job is completed, our workspace information is deleted from Terrakube

<figure><img src="/files/ipt65aLqSgNKMkZHSgMi" alt=""><figcaption></figcaption></figure>

If we are using AWS, AZURE, GCP or any other terraform provider that allow to inject the credentials using environment variables we could use "global variables" to define those.

Global variables will be injected automatically to any workspace inside the playground organization.

<figure><img src="/files/Z5NVqoywieAzcETkScqu" alt=""><figcaption></figcaption></figure>

<figure><img src="/files/O2O6Tyv2AUbz8oS2LDmw" alt=""><figcaption></figcaption></figure>


# Actions

{% hint style="info" %}
Only users that belongs to Terrakube administrator group can create and edit actions. This group is defined in the terrakube settings during deployment, for more details see [Security](/getting-started/security#administrator-group)
{% endhint %}

Terrakube actions allow you to extend the UI in Workspaces, functioning similarly to plugins. These actions enable you to add new functions to your Workspace, transforming it into a hub where you can monitor and manage your infrastructure and gain valuable insights. With Terrakube actions, you can quickly observe your infrastructure and apply necessary actions.

### **Key Benefits of Terrakube Actions:**

* **Extend Functionality:** Customize your Workspace with additional functions specifics to your needs.
* **Monitor Infrastructure:** Gain real-time insights into your infrastructure with various metrics and monitoring tools.
* **Manage Resources:** Directly manage and interact with your resources from within the Workspace.
* **Flexibility:** Quickly disable an action if it is not useful for your organization or set conditions for actions to appear, such as if a resource is hosted in GCP or if the workspace is `Dev`.
* **Cloud-Agnostic Hub:** Manage multi-cloud infrastructure from a single point, providing observability and actionability without needing to navigate individual cloud portals.

### **Examples of Terrakube Actions:**

* **Manage Infrastructure:** Restart your Azure VM or add an action to quickly navigate to the resource in the Azure portal directly from Terrakube.

<figure><img src="/files/kA1qQHAshiZNinYTbKbD" alt=""><figcaption></figcaption></figure>

* **Monitor Metrics:** Track and display resource metrics for performance monitoring using tools like Prometheus, Azure Monitor or AWS Cloudwatch.

<figure><img src="/files/f6rlOrEnr36ZyTSVwjfH" alt=""><figcaption></figcaption></figure>

* **Integrate with Tools:** Seamlessly integrate with tools like Infracost to display resource and Workspace costs.
* **AI Integration:** Use AI to diagnose issues in your Workspaces. By integrating with models like OpenAI, Claude, and Gemini, you can quickly resolve errors in your infrastructure.

<figure><img src="/files/4IBGUZxgEN8aRTiKSm7p" alt=""><figcaption></figcaption></figure>

* **Project and Incident Management:** Integrate with Jira, GitHub Issues, and ServiceNow to identify Workspaces with pending work items or reported errors.
* **Documentation:** Link your Confluence documentation or wiki pages in your preferred tool, allowing quick access to documents related to your Workspace infrastructure.

### Built-in Actions

Terrakube provides several [built-in actions](/user-guide/workspaces/actions/built-in-actions) that you can start using some are enabled by default. Please refer to the documentation for detailed information on each action, including usage and setup instructions.

### Developing Actions

If you are interested in creating your own actions, you only need knowledge of JavaScript and React, as an action is essentially a React component. For more details please check our [quick start guide](/user-guide/workspaces/actions/developing-actions/quick-start), or visit our [GitHub Terrakube Actions repository](https://github.com/AzBuilder/terrakube-actions) to see some examples, contribute new actions or suggest improvements.

### Creating an Action

After you develop your action. To create a new action in Terrakube:

1. Navigate to the settings in any Terrakube organization.

<figure><img src="/files/yzC1P7KaaxhiGO4PbMVQ" alt=""><figcaption></figcaption></figure>

2. Click the `Add Action` button.

<figure><img src="/files/KvV99l054VZf4sdtLsBx" alt=""><figcaption></figcaption></figure>

3. Provide the required information as detailed in the table below:

| Field Name       | Description                                                                                                                                                                                                                             |
| ---------------- | --------------------------------------------------------------------------------------------------------------------------------------------------------------------------------------------------------------------------------------- |
| ID               | A unique ID for your action. Example: `terrakube.demo-action` or `myorg.my-action`                                                                                                                                                      |
| Name             | A unique name for your action.                                                                                                                                                                                                          |
| Type             | Defines the section where this action will appear. Refer to [Action Types ](/user-guide/workspaces/actions/developing-actions/action-types)to see the specific area where the action will be rendered.                                  |
| Label            | For tabs actions, this will be displayed as the tab name. For action buttons, it should be displayed as the button name.                                                                                                                |
| Category         | This helps to organize the actions based on their function. Example: General, Azure, Cost, Monitor.                                                                                                                                     |
| Version          | Must follow semantic versioning (e.g., 1.0.0).                                                                                                                                                                                          |
| Description      | A brief description of the action.                                                                                                                                                                                                      |
| Display Criteria | Defines the conditions under which the action should appear based on the context. For more details, check the [Display Criteria ](/user-guide/workspaces/actions/developing-actions/display-criteria)documentation.                     |
| Action           | A JavaScript function equivalent to a React component. Receives the context with some data related to the context. See our [quick start ](/user-guide/workspaces/actions/developing-actions/quick-start)guide to start creating actions |
| Active           | Enables or disables an action.                                                                                                                                                                                                          |

4. Click the `Save` button.

<figure><img src="/files/osN3QQbZ8IuJXJIqse9h" alt=""><figcaption></figcaption></figure>

\\


# Developing Actions

In this section:

{% content-ref url="/pages/dTKLEdiMansvmTyosb5B" %}
[Quick start](/user-guide/workspaces/actions/developing-actions/quick-start)
{% endcontent-ref %}

{% content-ref url="/pages/hlgFvwFtxfj9ohN28Xji" %}
[Display Criteria](/user-guide/workspaces/actions/developing-actions/display-criteria)
{% endcontent-ref %}

{% content-ref url="/pages/l3p5vUK59tz9BxZ7Eyhc" %}
[Action Types](/user-guide/workspaces/actions/developing-actions/action-types)
{% endcontent-ref %}

{% content-ref url="/pages/2d4ukzp2V06AhKGEWPfo" %}
[Action Context](/user-guide/workspaces/actions/developing-actions/action-context)
{% endcontent-ref %}

{% content-ref url="/pages/LjZybuqCzuqIeXnHNMnP" %}
[Action Proxy](/user-guide/workspaces/actions/developing-actions/action-proxy)
{% endcontent-ref %}


# Quick start

### Hello Actions

Let's start writing our Hello World action. This action will include a single button with the text "Quick Start".

```javascript
({ context }) => {
   return (
      <Button>
         Quick Start
      </Button>
   );
};
```

As you can see, an action is essentially some JavaScript code, specifically a React component. If you are not familiar with JavaScript and React, I recommend [learning the basics of React](https://react.dev/learn) before continuing.

This component contains only one button and receives a `context` parameter. We will discuss more about the `context` later. For now, you only need to know that the `context` provides some data related to the area where the action will appear.

Terrakube uses [Ant Design (antd) components](https://ant.design/components/overview), so by default, all antd components are available when you are developing an action.

### Testing our Hello world action

To create the action in your Terrakube instance, navigate to the Organization settings and click the `Create Action` button

<figure><img src="/files/q7LSNSl8CQBHDCrcNFAf" alt=""><figcaption></figcaption></figure>

Add the following data and click the save button.

| Field Name       | Description                                                                         |
| ---------------- | ----------------------------------------------------------------------------------- |
| ID               | terrakube.quick-start                                                               |
| Name             | Quick Start                                                                         |
| Type             | Workspace/Action                                                                    |
| Label            | Quick Start                                                                         |
| Category         | General                                                                             |
| Version          | 1.0.0                                                                               |
| Description      | Quick Start action                                                                  |
| Display Criteria | Add a new display criteria and enter true. This means the action will appear always |
| Action           | Add the above code                                                                  |
| Active           | Enable                                                                              |

<figure><img src="/files/QKP23F7o8Q8OjNeV2eW0" alt=""><figcaption></figcaption></figure>

If you go to any workspace, the quick start button should appear.

<figure><img src="/files/cDWwdsxGGL6KuB9PNEQd" alt=""><figcaption></figcaption></figure>

### Adding Interaction to the Action

Now let's add some interaction to the button. In the next example, we will use the Ant Design Messages component.

```javascript
({ context }) => {
  const [messageApi, contextHolder] = message.useMessage();

  const showMessage = () => {
    messageApi.success('Hello Actions');
  };

  return (
    <>
      {contextHolder}
      <Button onClick={showMessage}>
        Quick Start
      </Button>
    </>
  );
};
```

Now, if you update the action code, navigate to any workspace, and click the `Quick Start` button, you will see the `Hello Actions` message.

<figure><img src="/files/JLqd4EreadmH9ijFSGzr" alt=""><figcaption></figcaption></figure>

### Using the context to access workspace data

To make this action more useful, you can make use of the context. The context is an object that contains data based on the [Action Type](/user-guide/workspaces/actions/developing-actions/action-types). If you want to see all the data available for every action type, check the [Action Context documentation](/user-guide/workspaces/actions/developing-actions/action-context).

For our quick start action, we will add the name of the workspace to the message.

```javascript
({ context }) => {
  const [messageApi, contextHolder] = window.antd.message.useMessage();

  const showMessage = () => {
    messageApi.success(`Hello ${context.workspace.attributes.name}`);
  };

  return (
    <>
      {contextHolder}
      <Button onClick={showMessage}>
        Quick Start
      </Button>
    </>
  );
};
```

Update the action code using the code above, click the `Quick Start` button, and you will see the message now displays the Workspace Name.

<figure><img src="/files/q5ZT1P1LuvPAFoWz5jgL" alt=""><figcaption></figcaption></figure>

### Using display criteria

f you view a couple of workspaces in the organization, you will see the "Quick Start" button always appears. This is useful if your action serves a general purpose, but there are scenarios where you want to display the action only for workspaces in a specific organization, with a specific version of Terraform, and so on.

In those cases, you will use display criteria, which provides a powerful way to decide when an action will appear or not. If you remember, we set the display criteria to `true` before. Now let's modify the criteria to show the action only if the workspace contains a specific name.

Navigate to the Actions settings and change the display criteria to:

```javascript
context.workspace.attributes.name === "sample_simple"
```

(You can use another workspace name if you don't have the "sample\_simple" workspace.)

Now the button will appear only for the `sample_simple` workspace. If you notice, the display criteria is a conditional JavaScript code. So you can use any JavaScript code to display the action based on a regular expression, for organizations starting with certain names, or even combine multiple conditions.

<figure><img src="/files/qfVVYFhWUhSCSo4ngVUe" alt=""><figcaption><p>Button appears</p></figcaption></figure>

<figure><img src="/files/JmTBkhLevZb050uVvRy9" alt=""><figcaption><p>Button doesn't appear</p></figcaption></figure>

At this moment, our action only interacts with Terrakube data. However, a common requirement is to access other APIs to get some data, for example, to connect to the GitHub API to get the issues related to the workspace, or to connect to a cloud provider to interact with their APIs.

In these cases, we can make use of the Action Proxy. The proxy provides a way to connect to other backend services without needing to directly configure CORS for the API. The proxy also provides a secure way to use credentials without exposing sensitive data to the client.

Let's add a simple interaction using mock data from the JSONPlaceholder API that reads the comments from a post.

```javascript
({ context }) => {
  const [dialogVisible, setDialogVisible] = useState(false);
  const [loading, setLoading] = useState(false);
  const [comments, setComments] = useState([]);

  const fetchData = async () => {
    setLoading(true);
    try {
      const response = await axiosInstance.get(`${context.apiUrl}/proxy/v1`, {
        params: {
          targetUrl: 'https://jsonplaceholder.typicode.com/posts/1/comments',
          proxyheaders: JSON.stringify({
            'Content-Type': 'application/json',
          }),
          workspaceId: context.workspace.id
        }
      });

      setComments(response.data);
      setDialogVisible(true);
    } catch (error) {
      console.error('Error fetching data:', error);
      message.error('Error fetching data');
    } finally {
      setLoading(false);
    }
  };

  const closeDialog = () => {
    setDialogVisible(false);
  };

  return (
    <>
      <Button
        type="default"
        onClick={fetchData}
        loading={loading}
      >
        Quick Start
      </Button>

      <Modal
        title="Comments"
        visible={dialogVisible}
        onCancel={closeDialog}
        footer={[
          <Button key="close" onClick={closeDialog}>
            Close
          </Button>,
        ]}
      >
        {comments.map((comment) => (
          <div key={comment.id} style={{ marginBottom: '10px' }}>
            <p><b>ID:</b> {comment.id}</p>
            <p><b>Name:</b> {comment.name}</p>
            <p><b>Email:</b> {comment.email}</p>
            <p><b>Comment:</b> {comment.body}</p>
          </div>
        ))}
      </Modal>
    </>
  );
};
```

Now if you click the Quick Start button, you will see a dialog with the comments data from the API. The proxy allows to interact with external apis and securely manage credentials. To know more about the Actions proxy check the documentation.

<figure><img src="/files/X1ZTXWhcaRJUzSIYVKa9" alt=""><figcaption></figcaption></figure>

Now, if you click the `Quick Start` button, you will see a dialog with the comments data from the API. The proxy allows you to interact with external APIs and securely manage credentials. To learn more about the Actions proxy, check the [documentation](/user-guide/workspaces/actions/developing-actions/action-proxy).

### Summary

Actions in Terrakube allow you to enhance the Workspace experience by creating custom interactions and functionalities tailored to your needs. You can start by exploring the [Built-in Actions ](/user-guide/workspaces/actions/built-in-actions)to understand their implementation and gain more experience.

Actions are React components, and you define an [Action Type](/user-guide/workspaces/actions/developing-actions/action-types) to determine where the action will appear within the interface. Using [Display Criteria](/user-guide/workspaces/actions/developing-actions/display-criteria), you can specify the precise conditions under which an action should be displayed, such as for specific organizations or Terraform versions.

Additionally, the [Action Proxy](/user-guide/workspaces/actions/developing-actions/action-proxy) enables integration with external APIs, securely managing credentials without requiring CORS configuration on the Terrakube front end. This is particularly useful when you don't have control over the external API's CORS settings.


# Display Criteria

Display Criteria offer a flexible way to determine when an action will appear. While you can add logic inside your component to show or hide the action, using display criteria provides additional advantages:

* **Optimize Rendering:** Save on the loading cost of each component.
* **Multiple Criteria:** Add multiple display criteria based on your requirements.
* **Conditional Settings:** Define settings to be used when the criteria are met.

A display criteria is a JavaScript condition where you can use the data from the [Action Contex](/user-guide/workspaces/actions/developing-actions/action-context)t to decide if the action will appear.

### Examples

#### Always display the action

```javascript
true
```

#### Display the action for Workspaces with specific Terraform version.

```javascript
context.workspace.attributes.terraformVersion === "1.0.0"
```

#### Display the action for Azure resources

```javascript
context.state.provider.includes("azurerm")
```

#### Display the action only for Azure VM

```javascript
context.state.type.includes("azurerm_virtual_machine")
```

### Display Criteria Settings

You can set specific settings for each display criteria, which is useful when the action provides configurable options. For example, suppose you have an action that queries GitHub issues using the GitHub API and you want to display the issues using GraphQL. Your issues are stored in two different repositories: one for production and one for non-production.

In this case, you can create settings based on the display criteria to select the repository name. This approach allows your action code to be reusable. You only need to change the settings based on the criteria, rather than modifying the action code itself.

For instance:

* **Production Environment:** For workspaces starting with prod, use the repository name for production issues.

```javascript
context.workspace.attributes.startsWith("prod")
```

* **Non-Production Environment:** Use the repository name for non-production issues

```javascript
context.workspace.attributes.startsWith("dev")
```

By setting these configurations, you ensure that your action dynamically adapts to different environments or conditions, enhancing reusability and maintainability.

<figure><img src="/files/Jmdl7v8XO1U5Ekom4iiG" alt=""><figcaption><p>Multiple conditions using settings</p></figcaption></figure>

### Sensitive Settings

You might be tempted to store secrets inside settings; however, display criteria settings don't provide a secure way to store sensitive data. For cases where you need to use different credentials for an action based on your workspace, organization or any other condition, you should use template notation instead. This approach allows you to use[ Workspace Variables](/user-guide/terrakube-cli/commands/terrakube-workspace/workspace-variable) or [Global Variables](/user-guide/organizations/global-variables) to store sensitive settings securely.

For example, instead of directly storing an API key in the settings, you can reference a variable:

* For the development environment: `${{var.dev_api_key}}`
* For the production environment: `${{var.prod_api_key}}`

<figure><img src="/files/mIp5XRTmtkmB2DI6F5Ea" alt=""><figcaption></figcaption></figure>

For the previous example, you will need to create the variables at workspace level or use global variables with the names `dev_api_key`and `prod_api_key`

For more details about using settings in your action and template variables check [Action Proxy](/user-guide/workspaces/actions/developing-actions/action-proxy).

### Multiple Display Actions

You can define multiple display criteria for your actions. In this case, the first criteria to be met will be applied, and the corresponding settings will be provided via the context.


# Action Types

Action Types define where an action will appear in Terrakube. Here is the list of supported types:

### Workspace/Action

The action will appear on the Workspace page, next to the Lock button. Actions are not limited to buttons, but this section is particularly suitable for adding various kinds of buttons. Use this type for actions that involves interaction with the Workspace

<figure><img src="/files/dUDUq54fTP8bbcU2BoUS" alt=""><figcaption></figcaption></figure>

### Workspace/ResourceDrawer/Action

The action will appear for each resource when you click on a resource using the Overview Workspace page or the Visual State Diagram. Use this when an action applies to specific resources, such as restarting a VM or any actions that involve interaction with the resource. \\

<figure><img src="/files/QAd55BrA84xRcYiE5vIh" alt=""><figcaption></figcaption></figure>

### Workspace/ResourceDrawer/Tab

The action will appear for each resource when you click on a resource using the Overview Workspace page or the Visual State Diagram. Use this when you want to display additional data for the resource, such as activity history, costs, metrics, and more.

For this type, the`Label` property will be used as the name of the Tab pane.

<figure><img src="/files/h2n28UGnpb1FUTjs45yr" alt=""><figcaption></figcaption></figure>


# Action Context

The context object contains data related to the Workspace that you can use inside the action. The properties depends on the [Action Type](/user-guide/workspaces/actions/developing-actions/action-types).

{% hint style="info" %}
Tip

Inside your action you can use console.log(context) to quickly explore the available properties for the context
{% endhint %}

## **context.workspace**

Contains the workspace information in the Terrakube api format. See the [docs](/api/methods/workspace) for more details on the properties available.

#### Examples

* **context.workspace.id**: Id of the workspace
* **context.workspace.attributes.name**: Name of the workspace
* **context.workspace.attributes.terraformVersion**: Terraform version

#### Available for action types

* workspace/action
* workspace/resourcedrawer/action
* workspace/resourcedrawer/tab

## **context.settings**

Contains the settings that you configured in the display criteria.

#### Examples

* **context.settings.Repository:** the value of repository that you set for the setting. Example:

<figure><img src="/files/2W9TAnUvdAOAQnazk0RO" alt=""><figcaption></figcaption></figure>

#### Available for action types

* workspace/action
* workspace/resourcedrawer/action
* workspace/resourcedrawer/tab

## **context.state**

For `workspace/action` this property contains the full terraform or open tofu state. For `workspace/resourcedrawer/action` and `workspace/resourcedrawer/tab` contains only the section of the resource

#### Available for action types

* workspace/action
* workspace/resourcedrawer/action
* workspace/resourcedrawer/tab

## **context.apiUrl**

Contains the Terrakube api Url. Useful if you want to use the [Action Proxy ](/user-guide/workspaces/actions/developing-actions/action-proxy)or execute a call to the Terrakube API.

#### Available for action types

* workspace/action
* workspace/resourcedrawer/action
* workspace/resourcedrawer/tab


# Action Proxy

The Action Proxy allows you to call other APIs without needing to add the Terrakube frontend to the CORS settings, which is particularly useful if you don't have access to configure CORS. Additionally, it can be used to inject Workspace variables and Global variables into your requests.

### **Calling the Action Proxy**

The proxy supports POST, GET, PUT, and DELETE methods. You can access it using the `axiosInstance` variable, which contains an [Axios](https://axios-http.com/docs/intro) object.

To invoke the proxy, use the following URL format: `${context.apiUrl}/proxy/v1`

```javascript
({ context }) => {
   const fetchData = async () => {
    try {
      const response = await axiosInstance.get(`${context.apiUrl}/proxy/v1`, {
        params: {
          targetUrl: 'https://jsonplaceholder.typicode.com/posts/1/comments',
          proxyheaders: JSON.stringify({
            'Content-Type': 'application/json',
          }),
          workspaceId: context.workspace.id
        }
      });

      console.log(response.data);
    } catch (error) {
      console.error('Error fetching data:', error);
    }
 
  };
```

When calling the Action Proxy, use the following required parameters:

* **targetUrl:** Contains the URL that you want to invoke.
* **proxyHeaders:** Contains the headers that you want to send to the target URL.
* **workspaceId:** The workspace ID that will be used for some validations from the proxy side

### **Injecting Variables via the Action Proxy**

If you need to access sensitive keys or passwords from your API call, you can inject variables using the template notation `${{var.variable_name}}`, where `variable_name` represents a [Workspace variable](/user-guide/terrakube-cli/commands/terrakube-workspace/workspace-variable) or a[ Global variable](/user-guide/organizations/global-variables).

{% hint style="info" %}
If you have a Global variable and a Workspace variable with the same name, the Workspace variable value will take priority.
{% endhint %}

**Example Usage**

```javascript
const response = await axiosInstance.post(`${context.apiUrl}/proxy/v1`, {
  targetUrl: 'https://api.openai.com/v1/chat/completions',
  proxyHeaders: JSON.stringify({
    'Content-Type': 'application/json',
    'Authorization': 'Bearer ${{var.OPENAI_API_KEY}}'
  }),
  workspaceId: context.workspace.id,
  proxyBody: JSON.stringify({
    model: 'gpt-4',
    messages: updatedMessages,
  })
}, {
  headers: {
    'Content-Type': 'application/json',
  }
});

```

In this example:

* `${{var.OPENAI_API_KEY}}` is a placeholder for a sensitive key that will be injected by the proxy.
* `proxyBody` contains the data to be sent in the request body.
* `proxyHeaders` contains the headers to be sent to the target URL.
* `targetUrl` specifies the API endpoint to be invoked.
* `workspaceId` is used for validations on the proxy side.

By using the Action Proxy, you can easily interact with external APIs while using Terrakube's capabilities to manage and inject necessary variables securely.


# Built-in Actions

The following actions are added by default in Terrakube. However, not all actions are enabled by default. Please refer to the documentation below if you are interested in activating these actions.

### **General**

* [Open Documentation](/user-guide/workspaces/actions/built-in-actions/terrakube.open-documentation): Adds a button to quickly navigate to the Terraform registry documentation for a specific resource.
* [Resource Details](/user-guide/workspaces/actions/built-in-actions/terrakube.resource-details): Adds a new panel to visualize the state attributes and dependencies for a resource.

### **Azure**

* [Open in Azure Portal:](/user-guide/workspaces/actions/built-in-actions/terrakube.open-azure) Adds a button to quickly navigate to the resource in the Azure Portal.
* [Restart Azure VM](/user-guide/workspaces/actions/built-in-actions/restart-azure-vm): Adds a button to restart the Azure VM directly from the workspace overview.

### **Monitor**

* [Azure Monitor](/user-guide/workspaces/actions/built-in-actions/terrakube.azure-monitor): Adds a panel to visualize the metrics for the resource.

### **AI**

* [Open AI](/user-guide/workspaces/actions/built-in-actions/terrakube.open-ai): Adds a button to ask questions or get recommendations using OpenAI based on the workspace data.


# Open Documentation

### Description

The Open Documentation action is designed to provide quick access to the Terraform registry documentation for a specific provider and resource type. By using the context of the current state, this action constructs the appropriate URL and presents it as a clickable button.

### Display Criteria

By default this Action is enabled and will appear for all the resources. If you want to display this action only for certain resources, please check [display criteria](#display-criteria).

### Usage

* Navigate to the `Workspace Overview` or the `Visual State` and click a resource name.

<figure><img src="/files/ipmf3Y36y3krB2QzWi62" alt=""><figcaption><p>Workspace Overview</p></figcaption></figure>

<figure><img src="/files/5Mf1NVJVXGL46JYdAnyd" alt=""><figcaption><p>Visual State</p></figcaption></figure>

* In the Resource Drawer, Click the `Open documentation` button

<figure><img src="/files/ZwbECmUAXTPX60cVGTmb" alt=""><figcaption></figcaption></figure>

* You will be able to see the documentation for that resource in the Terraform registry

<figure><img src="/files/CNWYyL5btGjVcnEFp0L2" alt=""><figcaption></figcaption></figure>


# Resource Details

### Description

The Resource Details action is designed to show detailed information about a specific resource within the workspace. By using the context of the current state, this action provides a detailed view about the properties and dependencies in a tab within the resource drawer.

### Display Criteria

By default this Action is enabled and will appear for all the resources. If you want to display this action only for certain resources, please check [filtering actions](/user-guide/workspaces/actions/developing-actions/display-criteria).

### Usage

* Navigate to the `Workspace Overview` or the `Visual State` and click a resource name.

<figure><img src="/files/ipmf3Y36y3krB2QzWi62" alt=""><figcaption><p>Workspace Overview</p></figcaption></figure>

<figure><img src="/files/5Mf1NVJVXGL46JYdAnyd" alt=""><figcaption><p>Visual State</p></figcaption></figure>

* In the Resource Drawer, you will see a new tab `Details` with the resource attributes and dependencies.

<figure><img src="/files/opiFHTkBpwFV2Df7KtPh" alt=""><figcaption></figcaption></figure>


# Open in Azure Portal

### Description

The Open In Azure Portal action is designed to provide quick access to the Azure portal for a specific resource. By using the context of the current state, this action constructs the appropriate URL and presents it as a clickable button.

### Display Criteria

By default, this Action is disabled and when enabled will appear for all the azurerm resources. If you want to display this action only for certain resources, please check [display criteria](#display-criteria).

### Usage

* Navigate to the `Workspace Overview` or the `Visual State` and click a resource name.

<figure><img src="/files/XUL1Ags2TKKum81Tn8Xo" alt=""><figcaption></figcaption></figure>

<figure><img src="/files/WmrYfAN078mJLUMwJtb3" alt=""><figcaption></figcaption></figure>

* In the Resource Drawer, click the Open in Azure button.

<figure><img src="/files/zz7TQ2efRayDfv3uMDaA" alt=""><figcaption></figcaption></figure>

* You will be able to see the Azure portal for that resource.

<figure><img src="/files/SQhyC6qrBwGu8aUXlzJK" alt=""><figcaption></figcaption></figure>


# Restart Azure VM

### Description

The Restart VM action is designed to restart a specific virtual machine in Azure. By using the context of the current state, this action fetches an Azure access token and issues a restart command to the specified VM. The action ensures that the VM is restarted successfully and provides feedback on the process.

### Display Criteria

By default, this Action is disabled and when enabled will appear for all resources that have resource type `azurerm_virtual_machine`. If you want to display this action only for certain resources, please check [display criteria](#display-criteria).

### Setup

This action requires the following variables as [Workspace Variables](/user-guide/workspaces/variables#workspace-specific-variables) or [Global Variables](/user-guide/organizations/global-variables) in the Workspace Organization:

* `ARM_CLIENT_ID`: The Azure Client ID used for authentication.
* `ARM_CLIENT_SECRET`: The Azure Client Secret used for authentication.
* `ARM_TENANT_ID`: The Azure Tenant ID associated with your subscription.
* `ARM_SUBSCRIPTION_ID`: The Azure Subscription ID where the VM is located.

{% hint style="info" %}
The Client ID should have at least Virtual Machine Contributor access on the VM or resource group.
{% endhint %}

### Usage

* Navigate to the `Workspace Overview` or the `Visual State` and click on a resource name.

<figure><img src="/files/XUL1Ags2TKKum81Tn8Xo" alt=""><figcaption></figcaption></figure>

<figure><img src="/files/WmrYfAN078mJLUMwJtb3" alt=""><figcaption></figcaption></figure>

* In the Resource Drawer, click the "Restart" button.

<figure><img src="/files/4GlxIOFVPL1DnWY1QcER" alt=""><figcaption></figcaption></figure>

* The VM will be restarted, and a success or error message will be displayed.

<figure><img src="/files/kobl59ezqVxH37k7ElQE" alt=""><figcaption></figcaption></figure>


# Azure Monitor

### Description

The Azure Monitor Metrics action allows users to fetch and visualize metrics from Azure Monitor for a specified resource.

### Display Criteria

By default, this Action is disabled and when enabled will appear for all the `azurerm` resources. If you want to display this action only for certain resources, please check [display criteria](#display-criteria).

### Setup

This action requires the following variables as [Workspace Variables](/user-guide/workspaces/variables#workspace-specific-variables) or [Global Variables](/user-guide/organizations/global-variables) in the Workspace Organization:

* `ARM_CLIENT_ID`: The Azure Client ID used for authentication.
* `ARM_CLIENT_SECRET`: The Azure Client Secret used for authentication.
* `ARM_TENANT_ID`: The Azure Tenant ID associated with your subscription.
* `ARM_SUBSCRIPTION_ID`: The Azure Subscription ID where the VM is located.

{% hint style="info" %}
The Client ID should have at least **Monitoring Reader** or **Reader** access on resource group or subscription.
{% endhint %}

### Usage

* Navigate to the `Workspace Overview` or the `Visual State` and click on a resource name.

<figure><img src="/files/XUL1Ags2TKKum81Tn8Xo" alt=""><figcaption></figcaption></figure>

<figure><img src="/files/WmrYfAN078mJLUMwJtb3" alt=""><figcaption></figcaption></figure>

* Click the **Monitor** tab to view metrics for the selected resource.

<figure><img src="/files/AHwYkR7Ez1IdOSZHFJZ0" alt=""><figcaption></figcaption></figure>

* You can view additional details for the metrics using the tooltip.

<figure><img src="/files/Z9RdzPeKMK3HDl15swRw" alt=""><figcaption></figcaption></figure>

* You can see more details for each chart by navigating through it.

<figure><img src="/files/MvFarOg7RhDnT99kzxDJ" alt=""><figcaption></figcaption></figure>


# Open AI

{% hint style="warning" %}
**Security Warning**

The current action shares the state with the OpenAI API, so it's not recommended for sensitive workspaces. Future versions will provide a mask method before sending the data.
{% endhint %}

### Description

The Ask Workspace action allows users to interact with OpenAI's GPT-4o model to ask questions and get assistance related to their Terraform Workspace. This action provides a chat interface where users can ask questions about their Workspace's Terraform state and receive helpful responses from the AI.

### Display Criteria

By default, this Action is disabled and when enabled will appear for all resources. If you want to display this action only for certain resources, please check [display criteria](#display-criteria).

### Setup

This action requires the following variables as [Workspace Variables](/user-guide/workspaces/variables#workspace-specific-variables) or [Global Variables](/user-guide/organizations/global-variables) in the Workspace Organization:

* **OPENAI\_API\_KEY**: The API key to authenticate requests to the OpenAI API. Please check [this guide](https://platform.openai.com/docs/quickstart/step-2-set-up-your-api-key) in how to get an OPEN AI api key

### Usage

* Navigate to the `Workspace` and click on the `Ask Workspace` button.

<figure><img src="/files/1RmxTpYjKZLkKbmM3KJ7" alt=""><figcaption></figcaption></figure>

* Enter your questions and click the **Send** button or press the **Enter** key.

<figure><img src="/files/K8ElgUpRkgG7ANEdNtZy" alt=""><figcaption></figcaption></figure>


# Private Registry

Terraform provides a public registry, where you can share and reuse your terraform modules or providers, but sometimes you need to define a Terraform module that can be accessed only within your organization.

Terrakube provides a private registry that works similarly to the [public Terraform Registry](https://developer.hashicorp.com/terraform/registry) and helps you share [Terraform providers](https://developer.hashicorp.com/terraform/language/providers) and [Terraform modules](https://developer.hashicorp.com/terraform/language/modules) privately across your organization. You can use any of the main [VCS providers](/user-guide/vcs-providers) to maintain your terraform module code.

{% hint style="info" %}
At the moment the Terrakube UI only supports [publish private modules,](/user-guide/private-registry/publishing-private-modules) but you can publish providers using the [Terrakube API](/api/methods/provider)
{% endhint %}

In this section:

{% content-ref url="/pages/vOnmliCIxsBaBUhCNooO" %}
[Publishing Private Modules](/user-guide/private-registry/publishing-private-modules)
{% endcontent-ref %}

{% content-ref url="/pages/mGbyG4dOq3DyCGqtPMsm" %}
[Using Private Modules](/user-guide/private-registry/using-private-modules)
{% endcontent-ref %}


# Publishing Private Modules

{% hint style="info" %}
**Manage Modules** permission is required to perform this action, please check [Team Management](/user-guide/organizations/team-management) for more info.
{% endhint %}

Click **Registry** in the main menu and then click the **Publish module** button

<figure><img src="/files/dgiWzenLAIga8kFaXICH" alt=""><figcaption></figcaption></figure>

Select an existing version control provider or click **Connect to a different VCS** to configure a new one. See [VCS Providers](/user-guide/vcs-providers) for more details.

<figure><img src="/files/M9L0U7SIG7xHJe9q3zl8" alt=""><figcaption></figcaption></figure>

Provide the git repository URL and click the **Continue** button.

<figure><img src="/files/WJZDLG2Y46sOmmMec7y6" alt=""><figcaption></figcaption></figure>

In the next screen, configure the required fields and click the **Publish Module** button.

<figure><img src="/files/WWJMCT5uG56JUAJ2eSuH" alt=""><figcaption></figcaption></figure>

The module will be published inside the specified organization. On the details page, you can view available versions, read documentation, and copy a usage example.

<figure><img src="/files/3y2HAtVb4ZF8yPEenhdA" alt=""><figcaption></figcaption></figure>

### Releasing New Versions of a Module <a href="#releasing-new-versions-of-a-module" id="releasing-new-versions-of-a-module"></a>

To release a new version of a module, create a new release tag to its VCS repository. The registry automatically imports the new version.

### Deleting Modules <a href="#deleting-versions-and-modules" id="deleting-versions-and-modules"></a>

In the Module details page click the **Delete Module** button and then click the **Yes** button to confirm

<figure><img src="/files/Kt09gyFMqqhSs31V3W3Y" alt=""><figcaption></figcaption></figure>


# Using Private Modules

All users in an organization with **Manage Modules** permission can view the Terrakube private registry and use the available providers and modules.

### Using private modules

Click **Registry** in the main menu. And then click the module you want to use.

<figure><img src="/files/tu0J87HSAyXUt8QYuSPY" alt=""><figcaption></figcaption></figure>

In the module page, select the version in the dropdown list

<figure><img src="/files/MiuDb7bTxjDz1VCwFAKz" alt=""><figcaption></figcaption></figure>

You can copy the code reference from the module page

<figure><img src="/files/WyK5Gs3xxFZ8NaIbBVBx" alt=""><figcaption></figcaption></figure>

For example:

```
module "google-network" { 
  source = "8075-azbuilder-terrakube-gmnub6flawx.ws-us89b.gitpod.io/terrakube/google-network/google" 
  version = "v6.0.1" 
  # insert required variables here 
}
```

### **Submodules**

If your repository has submodules, Terrakube will scan the **modules** folder to identify all the submodules. Then, you will see a dropdown list with the submodules in the UI.

<figure><img src="/files/fexuNF32VQUNEi0EhwAs" alt=""><figcaption></figcaption></figure>

To view the readme file, inputs, outputs, resources and other information for any submodule, you can choose the submodule you want.

<figure><img src="/files/Q5Ea8qjubcPFv1wWfxYF" alt=""><figcaption></figcaption></figure>

You can also copy the details of how to configure any submodule, just like the main module. Example:

```
module "iam" { 
  source = "8075-azbuilder-terrakube-7qovhyoq3u9.ws-eu105.gitpod.io/aws/iam/aws//modules/iam-account" 
  version = "v5.30.0" 
  # insert required variables here 
}
```

In the submodule view you can switch to the differents submodules.

<figure><img src="/files/ZTuFTrbijnclAKmoRQS6" alt=""><figcaption></figcaption></figure>

Or you can back to the main module with the **Back** button on the top of the page.

<figure><img src="/files/eszxNwxsed3Wk4Ozx5Oj" alt=""><figcaption></figcaption></figure>

### **Configure Authentication**

When running Terraform on the CLI, you must configure credentials in [.terraformrc or terraform.rc ](https://developer.hashicorp.com/terraform/cli/config/config-file)to access the private modules.

For example:

```
credentials "8075-azbuilder-terrakube-gmnub6flawx.ws-us89b.gitpod.io" { 
  # valid user API token:
  token = "xxxxxx.yyyyyy.zzzzzzzzzzzzz"
}
```

To get the API token you can check [API Tokens](/user-guide/organizations/api-tokens).

As an alternative you can run the [terraform login](https://developer.hashicorp.com/terraform/cli/commands/login) command to obtain and save an user API token.

```
terraform login [terrakube hostname]
```


# Using Providers

The following will explain how to add a provider to Terrakube.

{% hint style="danger" %}
The provider needs to be added using the API, currently there is no support to do it using the UI and if you want to upload a private provider you will need to upload the provider binary and related files to some domain that you can manage.
{% endhint %}

Lets add the `random provider version 3.0.1` to terrakube, we can get the information that we need from the following endpoints:

```shell
GET https://registry.terraform.io/v1/providers/hashicorp/random/versions
GET https://registry.terraform.io/v1/providers/hashicorp/random/3.0.1/download/linux/amd64
```

Create the provider inside the organization:

```
POST https://terrakube-api.minikube.net/api/v1/organization/d9b58bd3-f3fc-4056-a026-1163297e80a8/provider
Content-Type: application/vnd.api+json
Authorization: Bearer (PAT TOKEN)
{
    "data": {
        "type": "provider",
        "attributes": {
          "name": "random",
          "description": "random provider"
        }
    }
}
```

Create the provider version

```
POST https://terrakube-api.minikube.net/api/v1/organization/d9b58bd3-f3fc-4056-a026-1163297e80a8/provider/950ce3fd-3f11-46e4-8ef2-34ec3718de3e/version
Content-Type: application/vnd.api+json
Authorization: Bearer (PAT TOKEN)
{
    "data": {
        "type": "version",
        "attributes": {
          "versionNumber": "3.0.1",
          "protocols": "5.0"
        }
    }
}
```

Create the provider implementation

```
POST https://terrakube-api.minikube.net/api/v1/organization/d9b58bd3-f3fc-4056-a026-1163297e80a8/provider/950ce3fd-3f11-46e4-8ef2-34ec3718de3e/version/8bc7127a-3215-486a-ac68-45fb8676f5a2/implementation
Content-Type: application/vnd.api+json
Authorization: Bearer (PAT TOKEN)
{
    "data": {
        "type": "implementation",
        "attributes": {
          "os": "linux",
          "arch": "amd64",
          "filename": "terraform-provider-random_3.0.1_linux_amd64.zip",
          "downloadUrl": "https://releases.hashicorp.com/terraform-provider-random/3.0.1/terraform-provider-random_3.0.1_linux_amd64.zip",
          "shasumsUrl": "https://releases.hashicorp.com/terraform-provider-random/3.0.1/terraform-provider-random_3.0.1_SHA256SUMS",
          "shasumsSignatureUrl": "https://releases.hashicorp.com/terraform-provider-random/3.0.1/terraform-provider-random_3.0.1_SHA256SUMS.72D7468F.sig",
          "shasum": "e385e00e7425dda9d30b74ab4ffa4636f4b8eb23918c0b763f0ffab84ece0c5c",
          "keyId": "34365D9472D7468F",
          "asciiArmor": "-----BEGIN PGP PUBLIC KEY BLOCK-----\n\nmQINBGB9+xkBEACabYZOWKmgZsHTdRDiyPJxhbuUiKX65GUWkyRMJKi/1dviVxOX\nPG6hBPtF48IFnVgxKpIb7G6NjBousAV+CuLlv5yqFKpOZEGC6sBV+Gx8Vu1CICpl\nZm+HpQPcIzwBpN+Ar4l/exCG/f/MZq/oxGgH+TyRF3XcYDjG8dbJCpHO5nQ5Cy9h\nQIp3/Bh09kET6lk+4QlofNgHKVT2epV8iK1cXlbQe2tZtfCUtxk+pxvU0UHXp+AB\n0xc3/gIhjZp/dePmCOyQyGPJbp5bpO4UeAJ6frqhexmNlaw9Z897ltZmRLGq1p4a\nRnWL8FPkBz9SCSKXS8uNyV5oMNVn4G1obCkc106iWuKBTibffYQzq5TG8FYVJKrh\nRwWB6piacEB8hl20IIWSxIM3J9tT7CPSnk5RYYCTRHgA5OOrqZhC7JefudrP8n+M\npxkDgNORDu7GCfAuisrf7dXYjLsxG4tu22DBJJC0c/IpRpXDnOuJN1Q5e/3VUKKW\nmypNumuQpP5lc1ZFG64TRzb1HR6oIdHfbrVQfdiQXpvdcFx+Fl57WuUraXRV6qfb\n4ZmKHX1JEwM/7tu21QE4F1dz0jroLSricZxfaCTHHWNfvGJoZ30/MZUrpSC0IfB3\niQutxbZrwIlTBt+fGLtm3vDtwMFNWM+Rb1lrOxEQd2eijdxhvBOHtlIcswARAQAB\ntERIYXNoaUNvcnAgU2VjdXJpdHkgKGhhc2hpY29ycC5jb20vc2VjdXJpdHkpIDxz\nZWN1cml0eUBoYXNoaWNvcnAuY29tPokCVAQTAQoAPhYhBMh0AR8KtAURDQIQVTQ2\nXZRy10aPBQJgffsZAhsDBQkJZgGABQsJCAcCBhUKCQgLAgQWAgMBAh4BAheAAAoJ\nEDQ2XZRy10aPtpcP/0PhJKiHtC1zREpRTrjGizoyk4Sl2SXpBZYhkdrG++abo6zs\nbuaAG7kgWWChVXBo5E20L7dbstFK7OjVs7vAg/OLgO9dPD8n2M19rpqSbbvKYWvp\n0NSgvFTT7lbyDhtPj0/bzpkZEhmvQaDWGBsbDdb2dBHGitCXhGMpdP0BuuPWEix+\nQnUMaPwU51q9GM2guL45Tgks9EKNnpDR6ZdCeWcqo1IDmklloidxT8aKL21UOb8t\ncD+Bg8iPaAr73bW7Jh8TdcV6s6DBFub+xPJEB/0bVPmq3ZHs5B4NItroZ3r+h3ke\nVDoSOSIZLl6JtVooOJ2la9ZuMqxchO3mrXLlXxVCo6cGcSuOmOdQSz4OhQE5zBxx\nLuzA5ASIjASSeNZaRnffLIHmht17BPslgNPtm6ufyOk02P5XXwa69UCjA3RYrA2P\nQNNC+OWZ8qQLnzGldqE4MnRNAxRxV6cFNzv14ooKf7+k686LdZrP/3fQu2p3k5rY\n0xQUXKh1uwMUMtGR867ZBYaxYvwqDrg9XB7xi3N6aNyNQ+r7zI2lt65lzwG1v9hg\nFG2AHrDlBkQi/t3wiTS3JOo/GCT8BjN0nJh0lGaRFtQv2cXOQGVRW8+V/9IpqEJ1\nqQreftdBFWxvH7VJq2mSOXUJyRsoUrjkUuIivaA9Ocdipk2CkP8bpuGz7ZF4uQIN\nBGB9+xkBEACoklYsfvWRCjOwS8TOKBTfl8myuP9V9uBNbyHufzNETbhYeT33Cj0M\nGCNd9GdoaknzBQLbQVSQogA+spqVvQPz1MND18GIdtmr0BXENiZE7SRvu76jNqLp\nKxYALoK2Pc3yK0JGD30HcIIgx+lOofrVPA2dfVPTj1wXvm0rbSGA4Wd4Ng3d2AoR\nG/wZDAQ7sdZi1A9hhfugTFZwfqR3XAYCk+PUeoFrkJ0O7wngaon+6x2GJVedVPOs\n2x/XOR4l9ytFP3o+5ILhVnsK+ESVD9AQz2fhDEU6RhvzaqtHe+sQccR3oVLoGcat\nma5rbfzH0Fhj0JtkbP7WreQf9udYgXxVJKXLQFQgel34egEGG+NlbGSPG+qHOZtY\n4uWdlDSvmo+1P95P4VG/EBteqyBbDDGDGiMs6lAMg2cULrwOsbxWjsWka8y2IN3z\n1stlIJFvW2kggU+bKnQ+sNQnclq3wzCJjeDBfucR3a5WRojDtGoJP6Fc3luUtS7V\n5TAdOx4dhaMFU9+01OoH8ZdTRiHZ1K7RFeAIslSyd4iA/xkhOhHq89F4ECQf3Bt4\nZhGsXDTaA/VgHmf3AULbrC94O7HNqOvTWzwGiWHLfcxXQsr+ijIEQvh6rHKmJK8R\n9NMHqc3L18eMO6bqrzEHW0Xoiu9W8Yj+WuB3IKdhclT3w0pO4Pj8gQARAQABiQI8\nBBgBCgAmFiEEyHQBHwq0BRENAhBVNDZdlHLXRo8FAmB9+xkCGwwFCQlmAYAACgkQ\nNDZdlHLXRo9ZnA/7BmdpQLeTjEiXEJyW46efxlV1f6THn9U50GWcE9tebxCXgmQf\nu+Uju4hreltx6GDi/zbVVV3HCa0yaJ4JVvA4LBULJVe3ym6tXXSYaOfMdkiK6P1v\nJgfpBQ/b/mWB0yuWTUtWx18BQQwlNEQWcGe8n1lBbYsH9g7QkacRNb8tKUrUbWlQ\nQsU8wuFgly22m+Va1nO2N5C/eE/ZEHyN15jEQ+QwgQgPrK2wThcOMyNMQX/VNEr1\nY3bI2wHfZFjotmek3d7ZfP2VjyDudnmCPQ5xjezWpKbN1kvjO3as2yhcVKfnvQI5\nP5Frj19NgMIGAp7X6pF5Csr4FX/Vw316+AFJd9Ibhfud79HAylvFydpcYbvZpScl\n7zgtgaXMCVtthe3GsG4gO7IdxxEBZ/Fm4NLnmbzCIWOsPMx/FxH06a539xFq/1E2\n1nYFjiKg8a5JFmYU/4mV9MQs4bP/3ip9byi10V+fEIfp5cEEmfNeVeW5E7J8PqG9\nt4rLJ8FR4yJgQUa2gs2SNYsjWQuwS/MJvAv4fDKlkQjQmYRAOp1SszAnyaplvri4\nncmfDsf0r65/sd6S40g5lHH8LIbGxcOIN6kwthSTPWX89r42CbY8GzjTkaeejNKx\nv1aCrO58wAtursO1DiXCvBY7+NdafMRnoHwBk50iPqrVkNA8fv+auRyB2/G5Ag0E\nYH3+JQEQALivllTjMolxUW2OxrXb+a2Pt6vjCBsiJzrUj0Pa63U+lT9jldbCCfgP\nwDpcDuO1O05Q8k1MoYZ6HddjWnqKG7S3eqkV5c3ct3amAXp513QDKZUfIDylOmhU\nqvxjEgvGjdRjz6kECFGYr6Vnj/p6AwWv4/FBRFlrq7cnQgPynbIH4hrWvewp3Tqw\nGVgqm5RRofuAugi8iZQVlAiQZJo88yaztAQ/7VsXBiHTn61ugQ8bKdAsr8w/ZZU5\nHScHLqRolcYg0cKN91c0EbJq9k1LUC//CakPB9mhi5+aUVUGusIM8ECShUEgSTCi\nKQiJUPZ2CFbbPE9L5o9xoPCxjXoX+r7L/WyoCPTeoS3YRUMEnWKvc42Yxz3meRb+\nBmaqgbheNmzOah5nMwPupJYmHrjWPkX7oyyHxLSFw4dtoP2j6Z7GdRXKa2dUYdk2\nx3JYKocrDoPHh3Q0TAZujtpdjFi1BS8pbxYFb3hHmGSdvz7T7KcqP7ChC7k2RAKO\nGiG7QQe4NX3sSMgweYpl4OwvQOn73t5CVWYp/gIBNZGsU3Pto8g27vHeWyH9mKr4\ncSepDhw+/X8FGRNdxNfpLKm7Vc0Sm9Sof8TRFrBTqX+vIQupYHRi5QQCuYaV6OVr\nITeegNK3So4m39d6ajCR9QxRbmjnx9UcnSYYDmIB6fpBuwT0ogNtABEBAAGJBHIE\nGAEKACYCGwIWIQTIdAEfCrQFEQ0CEFU0Nl2UctdGjwUCYH4bgAUJAeFQ2wJAwXQg\nBBkBCgAdFiEEs2y6kaLAcwxDX8KAsLRBCXaFtnYFAmB9/iUACgkQsLRBCXaFtnYX\nBhAAlxejyFXoQwyGo9U+2g9N6LUb/tNtH29RHYxy4A3/ZUY7d/FMkArmh4+dfjf0\np9MJz98Zkps20kaYP+2YzYmaizO6OA6RIddcEXQDRCPHmLts3097mJ/skx9qLAf6\nrh9J7jWeSqWO6VW6Mlx8j9m7sm3Ae1OsjOx/m7lGZOhY4UYfY627+Jf7WQ5103Qs\nlgQ09es/vhTCx0g34SYEmMW15Tc3eCjQ21b1MeJD/V26npeakV8iCZ1kHZHawPq/\naCCuYEcCeQOOteTWvl7HXaHMhHIx7jjOd8XX9V+UxsGz2WCIxX/j7EEEc7CAxwAN\nnWp9jXeLfxYfjrUB7XQZsGCd4EHHzUyCf7iRJL7OJ3tz5Z+rOlNjSgci+ycHEccL\nYeFAEV+Fz+sj7q4cFAferkr7imY1XEI0Ji5P8p/uRYw/n8uUf7LrLw5TzHmZsTSC\nUaiL4llRzkDC6cVhYfqQWUXDd/r385OkE4oalNNE+n+txNRx92rpvXWZ5qFYfv7E\n95fltvpXc0iOugPMzyof3lwo3Xi4WZKc1CC/jEviKTQhfn3WZukuF5lbz3V1PQfI\nxFsYe9WYQmp25XGgezjXzp89C/OIcYsVB1KJAKihgbYdHyUN4fRCmOszmOUwEAKR\n3k5j4X8V5bk08sA69NVXPn2ofxyk3YYOMYWW8ouObnXoS8QJEDQ2XZRy10aPMpsQ\nAIbwX21erVqUDMPn1uONP6o4NBEq4MwG7d+fT85rc1U0RfeKBwjucAE/iStZDQoM\nZKWvGhFR+uoyg1LrXNKuSPB82unh2bpvj4zEnJsJadiwtShTKDsikhrfFEK3aCK8\nZuhpiu3jxMFDhpFzlxsSwaCcGJqcdwGhWUx0ZAVD2X71UCFoOXPjF9fNnpy80YNp\nflPjj2RnOZbJyBIM0sWIVMd8F44qkTASf8K5Qb47WFN5tSpePq7OCm7s8u+lYZGK\nwR18K7VliundR+5a8XAOyUXOL5UsDaQCK4Lj4lRaeFXunXl3DJ4E+7BKzZhReJL6\nEugV5eaGonA52TWtFdB8p+79wPUeI3KcdPmQ9Ll5Zi/jBemY4bzasmgKzNeMtwWP\nfk6WgrvBwptqohw71HDymGxFUnUP7XYYjic2sVKhv9AevMGycVgwWBiWroDCQ9Ja\nbtKfxHhI2p+g+rcywmBobWJbZsujTNjhtme+kNn1mhJsD3bKPjKQfAxaTskBLb0V\nwgV21891TS1Dq9kdPLwoS4XNpYg2LLB4p9hmeG3fu9+OmqwY5oKXsHiWc43dei9Y\nyxZ1AAUOIaIdPkq+YG/PhlGE4YcQZ4RPpltAr0HfGgZhmXWigbGS+66pUj+Ojysc\nj0K5tCVxVu0fhhFpOlHv0LWaxCbnkgkQH9jfMEJkAWMOuQINBGCAXCYBEADW6RNr\nZVGNXvHVBqSiOWaxl1XOiEoiHPt50Aijt25yXbG+0kHIFSoR+1g6Lh20JTCChgfQ\nkGGjzQvEuG1HTw07YhsvLc0pkjNMfu6gJqFox/ogc53mz69OxXauzUQ/TZ27GDVp\nUBu+EhDKt1s3OtA6Bjz/csop/Um7gT0+ivHyvJ/jGdnPEZv8tNuSE/Uo+hn/Q9hg\n8SbveZzo3C+U4KcabCESEFl8Gq6aRi9vAfa65oxD5jKaIz7cy+pwb0lizqlW7H9t\nQlr3dBfdIcdzgR55hTFC5/XrcwJ6/nHVH/xGskEasnfCQX8RYKMuy0UADJy72TkZ\nbYaCx+XXIcVB8GTOmJVoAhrTSSVLAZspfCnjwnSxisDn3ZzsYrq3cV6sU8b+QlIX\n7VAjurE+5cZiVlaxgCjyhKqlGgmonnReWOBacCgL/UvuwMmMp5TTLmiLXLT7uxeG\nojEyoCk4sMrqrU1jevHyGlDJH9Taux15GILDwnYFfAvPF9WCid4UZ4Ouwjcaxfys\n3LxNiZIlUsXNKwS3mhiMRL4TRsbs4k4QE+LIMOsauIvcvm8/frydvQ/kUwIhVTH8\n0XGOH909bYtJvY3fudK7ShIwm7ZFTduBJUG473E/Fn3VkhTmBX6+PjOC50HR/Hyb\nwaRCzfDruMe3TAcE/tSP5CUOb9C7+P+hPzQcDwARAQABiQRyBBgBCgAmFiEEyHQB\nHwq0BRENAhBVNDZdlHLXRo8FAmCAXCYCGwIFCQlmAYACQAkQNDZdlHLXRo/BdCAE\nGQEKAB0WIQQ3TsdbSFkTYEqDHMfIIMbVzSerhwUCYIBcJgAKCRDIIMbVzSerh0Xw\nD/9ghnUsoNCu1OulcoJdHboMazJvDt/znttdQSnULBVElgM5zk0Uyv87zFBzuCyQ\nJWL3bWesQ2uFx5fRWEPDEfWVdDrjpQGb1OCCQyz1QlNPV/1M1/xhKGS9EeXrL8Dw\nF6KTGkRwn1yXiP4BGgfeFIQHmJcKXEZ9HkrpNb8mcexkROv4aIPAwn+IaE+NHVtt\nIBnufMXLyfpkWJQtJa9elh9PMLlHHnuvnYLvuAoOkhuvs7fXDMpfFZ01C+QSv1dz\nHm52GSStERQzZ51w4c0rYDneYDniC/sQT1x3dP5Xf6wzO+EhRMabkvoTbMqPsTEP\nxyWr2pNtTBYp7pfQjsHxhJpQF0xjGN9C39z7f3gJG8IJhnPeulUqEZjhRFyVZQ6/\nsiUeq7vu4+dM/JQL+i7KKe7Lp9UMrG6NLMH+ltaoD3+lVm8fdTUxS5MNPoA/I8cK\n1OWTJHkrp7V/XaY7mUtvQn5V1yET5b4bogz4nME6WLiFMd+7x73gB+YJ6MGYNuO8\ne/NFK67MfHbk1/AiPTAJ6s5uHRQIkZcBPG7y5PpfcHpIlwPYCDGYlTajZXblyKrw\nBttVnYKvKsnlysv11glSg0DphGxQJbXzWpvBNyhMNH5dffcfvd3eXJAxnD81GD2z\nZAriMJ4Av2TfeqQ2nxd2ddn0jX4WVHtAvLXfCgLM2Gveho4jD/9sZ6PZz/rEeTvt\nh88t50qPcBa4bb25X0B5FO3TeK2LL3VKLuEp5lgdcHVonrcdqZFobN1CgGJua8TW\nSprIkh+8ATZ/FXQTi01NzLhHXT1IQzSpFaZw0gb2f5ruXwvTPpfXzQrs2omY+7s7\nfkCwGPesvpSXPKn9v8uhUwD7NGW/Dm+jUM+QtC/FqzX7+/Q+OuEPjClUh1cqopCZ\nEvAI3HjnavGrYuU6DgQdjyGT/UDbuwbCXqHxHojVVkISGzCTGpmBcQYQqhcFRedJ\nyJlu6PSXlA7+8Ajh52oiMJ3ez4xSssFgUQAyOB16432tm4erpGmCyakkoRmMUn3p\nwx+QIppxRlsHznhcCQKR3tcblUqH3vq5i4/ZAihusMCa0YrShtxfdSb13oKX+pFr\naZXvxyZlCa5qoQQBV1sowmPL1N2j3dR9TVpdTyCFQSv4KeiExmowtLIjeCppRBEK\neeYHJnlfkyKXPhxTVVO6H+dU4nVu0ASQZ07KiQjbI+zTpPKFLPp3/0sPRJM57r1+\naTS71iR7nZNZ1f8LZV2OvGE6fJVtgJ1J4Nu02K54uuIhU3tg1+7Xt+IqwRc9rbVr\npHH/hFCYBPW2D2dxB+k2pQlg5NI+TpsXj5Zun8kRw5RtVb+dLuiH/xmxArIee8Jq\nZF5q4h4I33PSGDdSvGXn9UMY5Isjpg==\n=7pIB\n-----END PGP PUBLIC KEY BLOCK-----",
          "trustSignature": "5.0",
          "source": "HashiCorp",
          "sourceUrl": "https://www.hashicorp.com/security.html"
        }
    }
}
```

> You can change the URL from the above paramaters and use a URL that you control, I was using the terraform registry url for example purposes

Now in your terraform code you can have something like this:

```
terraform {
  required_providers {
    random = {
      source  = "terrakube-reg.minikube.net/simple/random"
      version = "3.0.1"
    }
  }
}
```

And when running terraform init you will see something like:

```shell
user@pop-os:~/git/simple-terraform$ terraform init

Initializing the backend...
Initializing modules...

Initializing provider plugins...
- Finding terrakube-reg.minikube.net/simple/random versions matching "3.0.1"...
- Finding latest version of hashicorp/null...
- Finding latest version of hashicorp/time...
- Finding latest version of hashicorp/random...
- Installing hashicorp/null v3.2.2...
- Installed hashicorp/null v3.2.2 (signed by HashiCorp)
- Installing hashicorp/time v0.12.0...
- Installed hashicorp/time v0.12.0 (signed by HashiCorp)
- Installing hashicorp/random v3.6.2...
- Installed hashicorp/random v3.6.2 (signed by HashiCorp)
- Installing terrakube-reg.minikube.net/simple/random v3.0.1...
- Installed terrakube-reg.minikube.net/simple/random v3.0.1 (signed by HashiCorp)

Terraform has created a lock file .terraform.lock.hcl to record the provider
selections it made above. Include this file in your version control repository
so that Terraform can guarantee to make the same selections by default when
you run "terraform init" in the future.

Terraform has been successfully initialized!

You may now begin working with Terraform. Try running "terraform plan" to see
any changes that are required for your infrastructure. All Terraform commands
should now work.

If you ever set or change modules or backend configuration for Terraform,
rerun this command to reinitialize your working directory. If you forget, other
commands will detect it and remind you to do so if necessary.
```


---

[Next Page](/llms-full.txt/1)